
作者:0x7F@知道創宇404實驗室
日期: 2023年5月5日
0x00 前言
Windows 從 vista 版本引入一種進程保護機制(Process Protection),用于更進一步的控制進程的訪問級別,在此之前,用戶只需要使用 SeDebugPrivilege 令牌權限即可獲取任意進程的所有訪問權限;隨后 Windows8.1 在此進程保護的基礎上,擴展引入了進程保護光機制(Protected Process Light),簡稱 PPL 機制,其能提供更加細粒度化的進程訪問權限控制。
本文將介紹 Windows 的 PPL 安全機制,以及在實驗環境下如何繞過該機制,從而實現對 PPL 的進程進行動態調試。
本文實驗環境:
Windows 10 專業版 22H2
Visual Studio 2019
0x01 PPL機制
使用 Process Explorer 工具查看進程列表,我們可以看到 Windows 的部分核心進程設置了 PPL 保護:
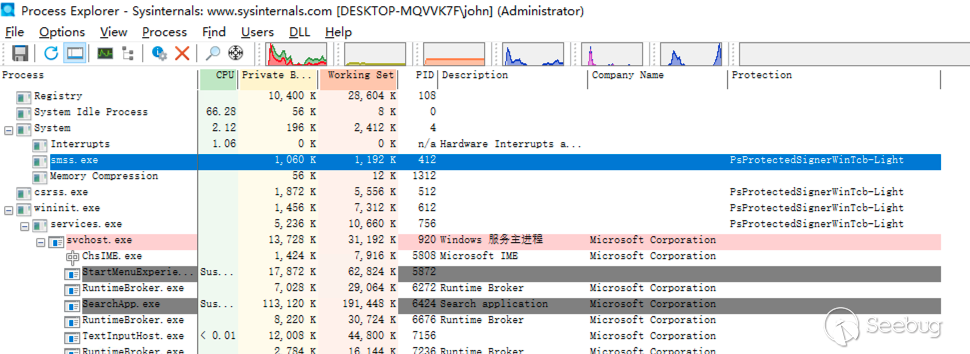
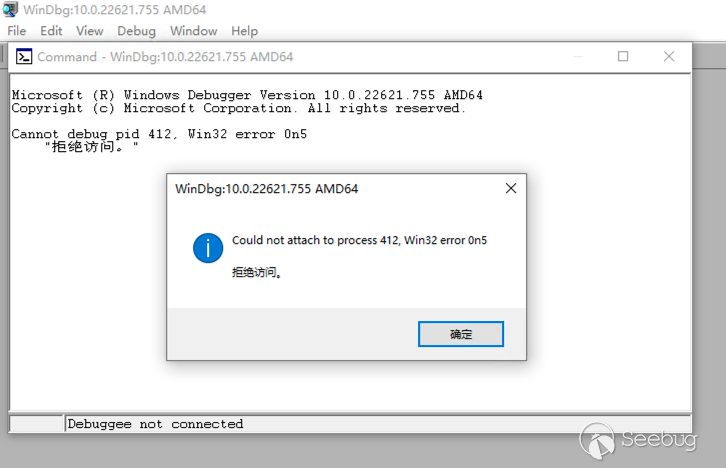
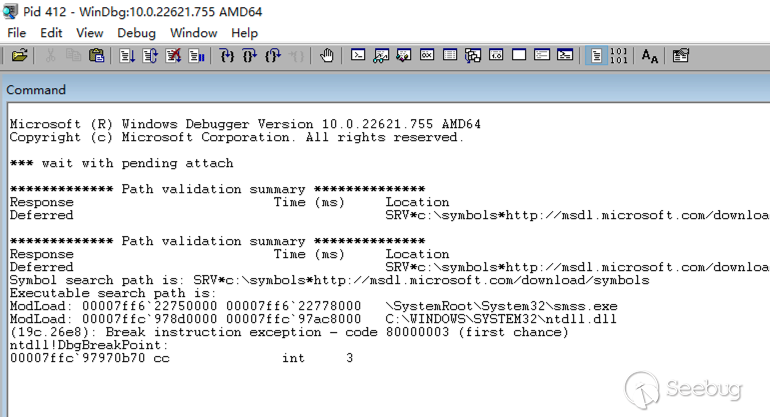
對于安全研究來說,PPL機制最直觀的感受就是即便使用管理員權限也無法 attach 這個進程進行調試:
通過官網文檔(https://learn.microsoft.com/en-us/windows/win32/procthread/zwqueryinformationprocess)可以了解到 PS_PROTECTION 的結構如下:
typedef struct _PS_PROTECTION {
    union {
        UCHAR Level;
        struct {
            UCHAR Type   : 3;
            UCHAR Audit  : 1;                  // Reserved
            UCHAR Signer : 4;
        };
    };
} PS_PROTECTION, *PPS_PROTECTION;
前 3 位包含進程保護的類型:
typedef enum _PS_PROTECTED_TYPE {
    PsProtectedTypeNone = 0,
    PsProtectedTypeProtectedLight = 1,
    PsProtectedTypeProtected = 2
} PS_PROTECTED_TYPE, *PPS_PROTECTED_TYPE;
后 4 位包含進程保護的簽名者標識:
typedef enum _PS_PROTECTED_SIGNER {
PsProtectedSignerNone = 0,
PsProtectedSignerAuthenticode,
PsProtectedSignerCodeGen,
PsProtectedSignerAntimalware,
PsProtectedSignerLsa,
PsProtectedSignerWindows,
PsProtectedSignerWinTcb,
PsProtectedSignerWinSystem,
PsProtectedSignerApp,
PsProtectedSignerMax
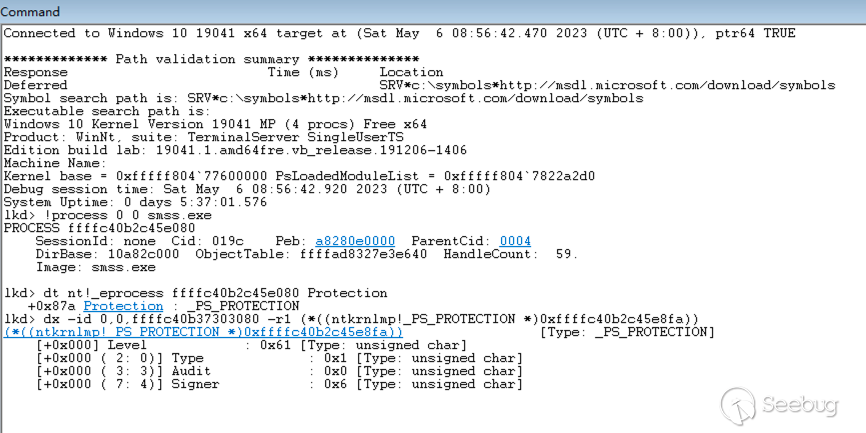
} PS_PROTECTED_SIGNER, *PPS_PROTECTED_SIGNER;通過 WinDBG 進行本地內核調試,查看上圖進程 smss.exe(412) 的內核對象 EPROCESS 可以查看 PPL=0x61,如下:
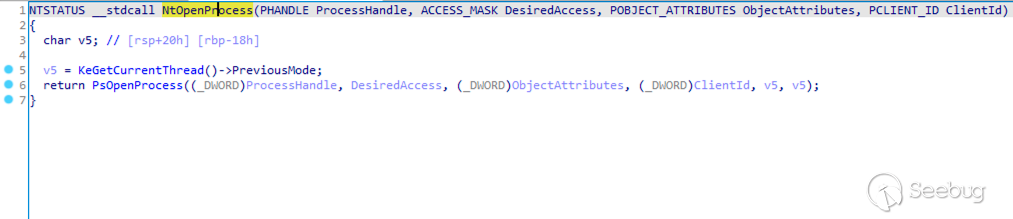
PPL 機制在內核函數 NtOpenProcess 進行實現,當我們訪問進程時最終都會調用該函數;NtOpenProcess 位于 ntoskrnl.exe 內,結合符號表逆向如下:
經過一系列的調用,最終進入到 PPL 檢查的關鍵邏輯 RtlTestProtectedAccess,其調用棧如下:
RtlTestProtectedAccess 的判斷邏輯如下:
其中 Protection.Signer 經過 RtlProtectedAccess 轉換的權限如下:
PsProtectedSignerNone         0 => 0x0
PsProtectedSignerAuthenticode 1 => 0x2
PsProtectedSignerCodeGen      2 => 0x4
PsProtectedSignerAntimalware  3 => 0x108
PsProtectedSignerLsa          4 => 0x110
PsProtectedSignerWindows      5 => 0x13e
PsProtectedSignerWinTcb       6 => 0x17e
PsProtectedSignerWinSystem    7 => 0x1fe
PsProtectedSignerApp          8 => 0x0
實際
NtOpenProcess中還有諸多條件影響 PPL 的檢查,不過本文我們主要關注核心判斷邏輯RtlTestProtectedAccess就可以了。
0x02 雙機調試bypass
使用雙機內核調試可以無視大多數的安全機制,這里我使用網絡雙機調試,成功連接被調試主機后,再進入到有 PPL 機制的 smss.exe(412) 的進程空間下,直接就可以正常調試:
但是實際場景下雙機調試可能受環境限制,同時雙機調試也不如用戶模式下方便,下面我們看看通過本地調試的方法來繞過 PPL 機制。
0x03 本地調試bypass
通過上文對 PPL 機制的介紹,我們知道 PPL 的標識位是以 _PS_PROTECTION 結構存放于 EPROCESS 進程對象中,雖然本地內核調試無法控制程序執行流,但可以修改內存值;那么我們可以先通過本地內核調試去除 PPL 標識,隨后便可以在用戶模式下調試目標進程。
配置好本地內核調試環境后,使用管理員權限啟動 WinDBG,覆寫 smss.exe(412) 進程的 Protection = 0x00 命令如下:
# 獲取 smss.exe 進程的 EPROCESS 地址
lkd > !process 0 0 smss.exe
# 從 EPROCESS 獲取 Protection 的偏移和值
lkd > dt nt!_eprocess ffffc40b2c45e080 Protection
lkd > db ffffc40b2c45e080+0x87a l1
# 將 Protection 值修改為 0x00
lkd > eb ffffc40b2c45e080+0x87a 0x00
執行如下:
隨后我們再以管理員權限啟動 WinDBG,attach 到目標進程上,可以成功進行調試:
0x04 工具化
根據本地內核調試去除 PPL 標識的思路,我們可以編寫驅動程序如下,使用 ZwQuerySystemInformation() 遍歷進程,使用 PsLookupProcessByProcessId() 獲取進程的 EPROCESS,隨后按 Protection 的偏移將其內存值覆寫為 0x00:
#include <ntifs.h>
#include <wdf.h>
#define EPROCESS_PROTECTION_OFFSET 0x87A // windows10 professional 22H2
DRIVER_INITIALIZE DriverEntry;
typedef enum _SYSTEM_INFORMATION_CLASS {
SystemProcessInformation = 5,
// ...
} SYSTEM_INFORMATION_CLASS;
typedef struct _SYSTEM_PROCESS_INFORMATION {
ULONG NextEntryOffset;
ULONG NumberOfThreads;
BYTE Reserved1[48];
PVOID Reserved2[3];
HANDLE UniqueProcessId;
PVOID Reserved3;
ULONG HandleCount;
BYTE Reserved4[4];
PVOID Reserved5[11];
SIZE_T PeakPagefileUsage;
SIZE_T PrivatePageCount;
LARGE_INTEGER Reserved6[6];
} SYSTEM_PROCESS_INFORMATION, *PSYSTEM_PROCESS_INFORMATION;
NTSTATUS NTAPI ZwQuerySystemInformation(
_In_ SYSTEM_INFORMATION_CLASS SystemInformationClass,
_Inout_ PVOID SystemInformation,
_In_ ULONG SystemInformationLength,
_Out_opt_ PULONG ReturnLength
);
NTKERNELAPI UCHAR* PsGetProcessImageFileName(__in PEPROCESS Process);
VOID OnUnload(_In_ PDRIVER_OBJECT DriverObject)
{
UNREFERENCED_PARAMETER(DriverObject);
KdPrintEx((DPFLTR_IHVDRIVER_ID, DPFLTR_INFO_LEVEL, "remove_ppl: unload driver\n"));
}
NTSTATUS DriverEntry(_In_ PDRIVER_OBJECT DriverObject, _In_ PUNICODE_STRING RegistryPath) {
ULONG BufferSize = 0;
NTSTATUS Status = STATUS_SUCCESS;
PVOID Buffer = NULL;
PSYSTEM_PROCESS_INFORMATION pInfo = NULL;
UNREFERENCED_PARAMETER(DriverObject);
UNREFERENCED_PARAMETER(RegistryPath);
KdPrintEx((DPFLTR_IHVDRIVER_ID, DPFLTR_INFO_LEVEL, "remove_ppl: driver entry\n"));
// register unload function
DriverObject->DriverUnload = OnUnload;
// get size of SYSTEM_PROCESS_INFORMATION
Status = ZwQuerySystemInformation(SystemProcessInformation, NULL, 0, &BufferSize);
if (Status != STATUS_INFO_LENGTH_MISMATCH) {
KdPrintEx((DPFLTR_IHVDRIVER_ID, DPFLTR_INFO_LEVEL, "remove_ppl: ZwQuerySystemInformation get size failed status=0x%x\n", Status));
goto _LABEL_EXIT;
}
// alloc memory and get SYSTEM_PROCESS_INFORMATION
Buffer = ExAllocatePoolWithTag(PagedPool, BufferSize, '1gaT');
if (Buffer == NULL) {
KdPrintEx((DPFLTR_IHVDRIVER_ID, DPFLTR_INFO_LEVEL, "remove_ppl: ExAllocatePoolWithTag failed\n"));
goto _LABEL_EXIT;
}
Status = ZwQuerySystemInformation(SystemProcessInformation, Buffer, BufferSize, &BufferSize);
if (Status != STATUS_SUCCESS) {
KdPrintEx((DPFLTR_IHVDRIVER_ID, DPFLTR_INFO_LEVEL, "remove_ppl: ZwQuerySystemInformation get info failed status=0x%x\n", Status));
goto _LABEL_EXIT;
}
// traverse all processes and rewrite "Protection" to 0x00
pInfo = (PSYSTEM_PROCESS_INFORMATION)Buffer;
do {
PEPROCESS Process = NULL;
Status = PsLookupProcessByProcessId(pInfo->UniqueProcessId, &Process);
if (NT_SUCCESS(Status)) {
BYTE* Protection = (BYTE*)Process + EPROCESS_PROTECTION_OFFSET;
if (*Protection != 0) {
KdPrintEx((DPFLTR_IHVDRIVER_ID, DPFLTR_INFO_LEVEL, "remove_ppl: rewrite %s[%d] Protection=0x%x to 0x00\n",
PsGetProcessImageFileName(Process), pInfo->UniqueProcessId, *Protection));
*Protection = 0x00;
}
}
else {
KdPrintEx((DPFLTR_IHVDRIVER_ID, DPFLTR_INFO_LEVEL, "remove_ppl: PsLookupProcessByProcessId [%d] failed status=0x%x\n",
pInfo->UniqueProcessId, Status));
}
pInfo = (PSYSTEM_PROCESS_INFORMATION)((PUCHAR)pInfo + pInfo->NextEntryOffset);
} while (pInfo->NextEntryOffset);
_LABEL_EXIT:
if (Buffer != NULL) {
ExFreePoolWithTag(Buffer, '1gaT');
}
return STATUS_SUCCESS;
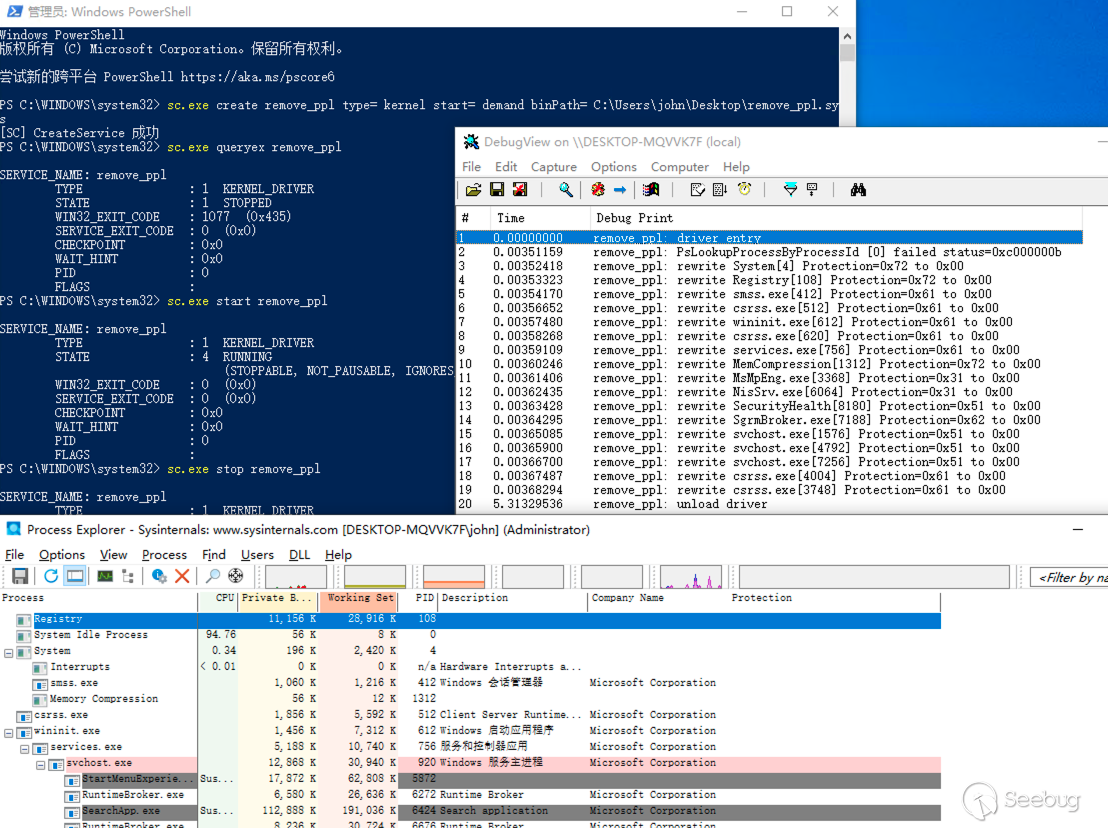
}成功編譯后,將驅動程序注冊為服務來啟動運行(需設置主機為測試模式):
# 注冊驅動程序為服務
sc.exe create remove_ppl type= kernel start= demand binPath= [src]remove_ppl.sys
# 查看服務信息
sc.exe queryex remove_ppl
# 啟動驅動程序/服務
sc.exe start remove_ppl
運行驅動程序,并使用 Process Explorer 查看,所有進程的 PPL 標識都被去除了:
除了以上實驗代碼外,也可以參考更加完善的 PPL 控制工具:
0x0x References
https://learn.microsoft.com/en-us/windows/win32/services/protecting-anti-malware-services-
https://learn.microsoft.com/en-us/windows/win32/procthread/zwqueryinformationprocess
https://learn.microsoft.com/en-us/windows/win32/procthread/process-security-and-access-rights
https://download.microsoft.com/download/a/f/7/af7777e5-7dcd-4800-8a0a-b18336565f5b/process_vista.doc
https://www.crowdstrike.com/blog/evolution-protected-processes-part-1-pass-hash-mitigations-windows-81/
https://www.crowdstrike.com/blog/evolution-protected-processes-part-2-exploitjailbreak-mitigations-unkillable-processes-and/
https://www.cnblogs.com/H4ck3R-XiX/p/15872255.html
https://www.cnblogs.com/revercc/p/16961961.html
https://itm4n.github.io/debugging-protected-processes/
http://www.bjnorthway.com/1892/
https://github.com/Mattiwatti/PPLKiller
https://github.com/itm4n/PPLcontrol
 本文由 Seebug Paper 發布,如需轉載請注明來源。本文地址:http://www.bjnorthway.com/2068/