
作者:非蟲
0x01 應用場景
此處討論的脫殼不是class-dump這類脫殼,而是指第三方的軟件壓縮與加密殼,例如upx這類殼在iOS/macOS上的脫殼。
App Store上的軟件是不允許這類殼程序存在的,但在iOS越獄插件開發領域與macOS第三方軟件提供商發布平臺,自定義加密的MachO與dylib隨處可見,到目前為此,沒有在網絡上看到關于這類程序脫殼方法的研究與討論,本篇與大家討論的就是在這種情況下,如何優雅的脫殼!
0x02 找尋脫殼點
首先,虛擬機殼與混淆殼不在本篇討論范圍中,在iOS/macOS平臺上,如果有虛擬機殼,也是很久以后的事情了,目前市在上見到最多的可能要屬upx類的壓縮型的殼,這類殼有一個明顯的特點:殼初始運行完后,會將代碼的控制權交回給原程序,并且內存中已經是存放好了完整的解密代碼,脫殼的思路與Android平臺上upx的脫殼一樣,主要是找準脫殼時機!
在Android時代,脫upx有一個優雅的方法,就是對DT_INIT的處理部分下斷點,當linker加載完so,要執行DT_INIT段指向的初始化函數指針時,對內存中的so進行dump來達到脫殼的目的,到了macOS平臺上,就采取同樣的思路來開始脫殼探索。
首先是編寫測試代碼:
#import <Foundation/Foundation.h>
#import <time.h>
#import <dlfcn.h>
#import <stdio.h>
#import <stdlib.h>
#import <unistd.h>
#import <fcntl.h>
#import <string.h>

// clang -x objective-c -std=gnu99 -fobjc-arc -flat_namespace -dynamiclib -o ./libunderstandpatcher.dylib understandpatcher.m

static double (*orig_difftime)(time_t time1, time_t time0) = NULL;

typedef double (*orig_difftime_type)(time_t time1, time_t time0);

__attribute__((constructor))
void init_funcs()
{
    printf("--------init funcs.--------\n");
    void * handle = dlopen("libSystem.dylib", RTLD_NOW);
    orig_difftime = (orig_difftime_type) dlsym(handle, "difftime");
    if(!orig_difftime) {
        printf("get difftime() addr error");
        exit(-1);
    }
    。。。

    printf("--------init done--------\n");
}
...
這只是代碼的片斷,在下寫的macOS平臺上understand程序的破解補丁,執行以下代碼編譯生成dylib:
clang -x objective-c -std=gnu99 -fobjc-arc -flat_namespace -dynamiclib -o ./libunderstandpatcher.dylib understandpatcher.m完事以后使用MachOView查看生成的dylib,看看init_funcs()以何種形式在Mach-O中存在,如圖所示:
有兩個地方需要注意:LC_FUNCTION_STARTS,__DATA,mod_init_func。
0x2.1 LC_FUNCTION_STARTS
這個加載命令是一個macho_linkedit_data_command結構體,從名稱上判斷,它是一個指向了函數起始執行的指針。它的內容如下:
$ otool -l ./libunderstandpatcher.dylib | grep LC_FUNCTION_STARTS -A 3
  cmd LC_FUNCTION_STARTS
cmdsize 16
dataoff 8504
datasize 8
dataoff字段的值8504(0x2138),在MachOView中看到,它指向Function Starts第一項的__init_funcs()函數。
0x2.2 __DATA,mod_init_func
__DATA,__mod_init_func是一個Section,它由編譯器生成添加到MachO中,用來標識MachO加載完成后要執行的初始化函數。它的內容如下:
$ otool -s __DATA __mod_init_func ./libunderstandpatcher.dylib
./libunderstandpatcher.dylib:
Contents of (__DATA,__mod_init_func) section
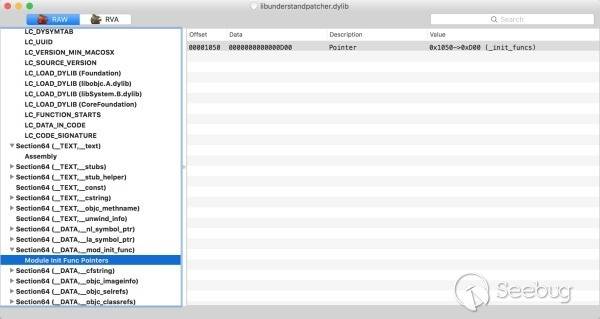
0000000000001050 00 0d 00 00 00 00 00 00位于文件偏移0x1050處指向的是一個個的初始化函數指針,這里只有一個,它的值是0xD00,其實就是__init_funcs()函數所在的地址:
$ otool -tv ./libunderstandpatcher.dylib
./libunderstandpatcher.dylib:
(__TEXT,__text) section
_init_funcs:
0000000000000d00    pushq    %rbp
0000000000000d01    movq    %rsp, %rbp
0000000000000d04    subq    $0x40, %rsp
0000000000000d08    leaq    0x1e9(%rip), %rdi
0000000000000d0f    movb    $0x0, %al
0000000000000d11    callq    0xe82
0000000000000d16    leaq    0x1f8(%rip), %rdi
0000000000000d1d    movl    $0x2, %esi
0000000000000d22    movl    %eax, -0x14(%rbp)
0000000000000d25    callq    0xe70
0000000000000d2a    leaq    0x1f4(%rip), %rsi
0000000000000d31    movq    %rax, -0x8(%rbp)
0000000000000d35    movq    -0x8(%rbp), %rdi
0000000000000d39    callq    0xe76
0000000000000d3e    movq    %rax, 0x35b(%rip)
0000000000000d45    cmpq    $0x0, 0x353(%rip)
0000000000000d4d    jne    0xd6e
0000000000000d53    leaq    0x1d4(%rip), %rdi
0000000000000d5a    movb    $0x0, %al
0000000000000d5c    callq    0xe82
0000000000000d61    movl    $0xffffffff, %edi
0000000000000d66    movl    %eax, -0x18(%rbp)
0000000000000d69    callq    0xe7c
0000000000000d6e    movq    0x323(%rip), %rax
0000000000000d75    movq    0x304(%rip), %rsi
0000000000000d7c    movq    %rax, %rdi
0000000000000d7f    callq    0xe5e
0000000000000d84    movq    %rax, %rdi
0000000000000d87    callq    0xe64
0000000000000d8c    xorl    %ecx, %ecx
0000000000000d8e    movl    %ecx, %edi
0000000000000d90    movq    %rax, -0x10(%rbp)
0000000000000d94    movq    -0x10(%rbp), %rax
0000000000000d98    movq    %rax, -0x20(%rbp)
0000000000000d9c    callq    0xe88
0000000000000da1    leaq    0x2b0(%rip), %rsi
0000000000000da8    movq    0x2d9(%rip), %rdi
0000000000000daf    movq    -0x20(%rbp), %rdx
0000000000000db3    movq    %rdi, -0x28(%rbp)
0000000000000db7    movq    %rdx, %rdi
0000000000000dba    movq    -0x28(%rbp), %rdx
0000000000000dbe    movq    %rsi, -0x30(%rbp)
0000000000000dc2    movq    %rdx, %rsi
0000000000000dc5    movq    %rax, %rdx
0000000000000dc8    movq    -0x30(%rbp), %rcx
0000000000000dcc    callq    0xe5e
0000000000000dd1    movq    -0x10(%rbp), %rax
0000000000000dd5    movq    0x2b4(%rip), %rsi
0000000000000ddc    movq    %rax, %rdi
0000000000000ddf    callq    0xe5e
0000000000000de4    leaq    0x178(%rip), %rdi
0000000000000deb    movb    %al, -0x31(%rbp)
0000000000000dee    movb    $0x0, %al
0000000000000df0    callq    0xe82
0000000000000df5    xorl    %r8d, %r8d
0000000000000df8    movl    %r8d, %esi
0000000000000dfb    leaq    -0x10(%rbp), %rcx
0000000000000dff    movq    %rcx, %rdi
0000000000000e02    movl    %eax, -0x38(%rbp)
0000000000000e05    callq    0xe6a
0000000000000e0a    addq    $0x40, %rsp
0000000000000e0e    popq    %rbp
0000000000000e0f    retq
0x2.3 dyld執行初始化函數過程
dyld如何執行初始化函數才是我們需要重點關注的。下載dyld源碼查看,它啟動運行的第一個方法dyldbootstrap::start()代碼如下:
uintptr_t start(const struct macho_header* appsMachHeader, int argc, const char* argv[], intptr_t slide, const struct macho_header* dyldsMachHeader, uintptr_t* startGlue)
{
    // if kernel had to slide dyld, we need to fix up load sensitive locations
    // we have to do this before using any global variables
    if ( slide != 0 ) {
        rebaseDyld(dyldsMachHeader, slide);
    }

    // allow dyld to use mach messaging
    mach_init();

    // kernel sets up env pointer to be just past end of agv array
    const char** envp = &argv[argc+1];

    // kernel sets up apple pointer to be just past end of envp array
    const char** apple = envp;
    while(*apple != NULL) { ++apple; }
    ++apple;

    // set up random value for stack canary
    __guard_setup(apple);

#if DYLD_INITIALIZER_SUPPORT
    // run all C++ initializers inside dyld
    runDyldInitializers(dyldsMachHeader, slide, argc, argv, envp, apple);
#endif

    // now that we are done bootstrapping dyld, call dyld's main
    uintptr_t appsSlide = slideOfMainExecutable(appsMachHeader);
    return dyld::_main(appsMachHeader, appsSlide, argc, argv, envp, apple, startGlue);
}
在開啟DYLD_INITIALIZER_SUPPORT的情況下,會調用runDyldInitializers()執行Mach-O的初始化方法,i當然,目前dyld是支持初始化方法執行的,runDyldInitializers()代碼如下:
static void runDyldInitializers(const struct macho_header* mh, intptr_t slide, int argc, const char* argv[], const char* envp[], const char* apple[])
{
    for (const Initializer* p = &inits_start; p < &inits_end; ++p) {
        (*p)(argc, argv, envp, apple);
    }
}
這段代碼從inits_start到inits_end之間循環獲取Initializer方法并執行,Initializer與這兩個地址定義如下:
typedef void (*Initializer)(int argc, const char* argv[], const char* envp[], const char* apple[]);

extern const Initializer  inits_start  __asm("section$start$__DATA$__mod_init_func");
extern const Initializer  inits_end    __asm("section$end$__DATA$__mod_init_func");
可以看出,dyld定位與執行初始化方法是通過”__DATA$mod_init_func”節區完成的。
了解了dyld加載執行初始化方法的地方,接下來就是如何脫殼了!
0x03 如何動手
殼程序加載完成,第一件事要做的就是自己或者調用dyld來執行初始化方法,因此,使用任意一款調試器對runDyldInitializers()下斷即可。
斷點到達后對內存中的MachO進行dump就完成脫殼了,當然對于防內存dump也是有一些tricks的,逆向搞過Hopper主程序的人就會有感觸,以后有機會與大家討論一下!
最后,Mach-O的dump與ELF不太一樣,更加簡單與完整,這里不再贅述了!
 本文由 Seebug Paper 發布,如需轉載請注明來源。本文地址:http://www.bjnorthway.com/202/