
作者:深信服千里目安全實驗室
原文鏈接:https://mp.weixin.qq.com/s/5bXU__xGwKMLw7eKbyh9gQ
前言
AFL,全稱“American Fuzzy Lop”,是由安全研究員Michal Zalewski開發的一款基于覆蓋引導(Coverage-guided)的模糊測試工具,它通過記錄輸入樣本的代碼覆蓋率(代碼執行路徑的覆蓋情況),以此進行反饋,對輸入樣本進行調整以提高覆蓋率,從而提升發現漏洞的可能性。AFL可以針對有源碼和無源碼的程序進行模糊測試,其設計思想和實現方案在模糊測試領域具有十分重要的意義。
深入分析AFL源碼,對理解AFL的設計理念和其中用到的技巧有著巨大的幫助,對于后期進行定制化Fuzzer開發也具有深刻的指導意義。所以,閱讀AFL源碼是學習AFL必不可少的一個關鍵步驟。
(注:需要強調的是,本文的主要目的是協助fuzz愛好者閱讀AFL的源碼,所以需要在了解AFL基本工作流程和原理的前提下進行閱讀,本文并不會在原理側做過多說明。)
當別人都要快的時候,你要慢下來。
宏觀
首先在宏觀上看一下AFL的源碼結構:

主要的代碼在 afl-fuzz.c 文件中,然后是幾個獨立模塊的實現代碼,llvm_mode 和 qemu_mode 的代碼量大致相當,所以分析的重點應該還是在AFL的根目錄下的幾個核心功能的實現上,尤其是 afl-fuzz.c,屬于核心中的重點。
各個模塊的主要功能和作用的簡要說明:
-
插樁模塊
-
afl-as.h,?afl-as.c,?afl-gcc.c:普通插樁模式,針對源碼插樁,編譯器可以使用gcc, clang; llvm_mode:llvm 插樁模式,針對源碼插樁,編譯器使用clang;-
qemu_mode:qemu 插樁模式,針對二進制文件插樁。 -
fuzzer 模塊
-
afl-fuzz.c:fuzzer 實現的核心代碼,AFL 的主體。 -
其他輔助模塊
-
afl-analyze:對測試用例進行分析,通過分析給定的用例,確定是否可以發現用例中有意義的字段; afl-plot:生成測試任務的狀態圖;afl-tmin:對測試用例進行最小化;afl-cmin:對語料庫進行精簡操作;afl-showmap:對單個測試用例進行執行路徑跟蹤;afl-whatsup:各并行例程fuzzing結果統計;-
afl-gotcpu:查看當前CPU狀態。 -
部分頭文件說明
-
alloc-inl.h:定義帶檢測功能的內存分配和釋放操作; config.h:定義配置信息;debug.h:與提示信息相關的宏定義;hash.h:哈希函數的實現定義;types.h:部分類型及宏的定義。
一、AFL的插樁——普通插樁
(一) 、AFL 的 gcc —— afl-gcc.c
1. 概述
afl-gcc 是GCC 或 clang 的一個wrapper(封裝),常規的使用方法是在調用 ./configure 時通過 CC 將路徑傳遞給 afl-gcc 或 afl-clang。(對于 C++ 代碼,則使用 CXX 并將其指向 afl-g++ / afl-clang++。)afl-clang, afl-clang++, afl-g++ 均為指向 afl-gcc 的一個符號鏈接。
afl-gcc 的主要作用是實現對于關鍵節點的代碼插樁,屬于匯編級,從而記錄程序執行路徑之類的關鍵信息,對程序的運行情況進行反饋。
2. 源碼
1. 關鍵變量
在開始函數代碼分析前,首先要明確幾個關鍵變量:
static u8*  as_path;                /* Path to the AFL 'as' wrapper,AFL的as的路徑      */
static u8** cc_params;              /* Parameters passed to the real CC,CC實際使用的編譯器參數 */
static u32  cc_par_cnt = 1;         /* Param count, including argv0 ,參數計數 */
static u8   be_quiet,               /* Quiet mode,靜默模式      */
            clang_mode;             /* Invoked as afl-clang*? ,是否使用afl-clang*模式 */

# 數據類型說明
# typedef uint8_t  u8;
# typedef uint16_t u16;
# typedef uint32_t u32;
2. main函數
main 函數全部邏輯如下:
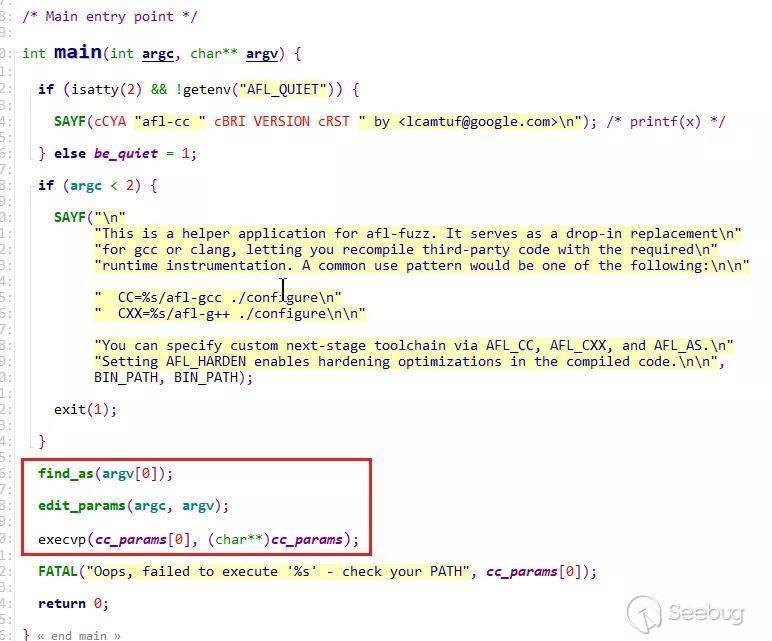
其中主要有如下三個函數的調用:
find_as(argv[0]):查找使用的匯編器edit_params(argc, argv):處理傳入的編譯參數,將確定好的參數放入cc_params[]數組- 調用
execvp(cc_params[0], (cahr**)cc_params)執行afl-gcc
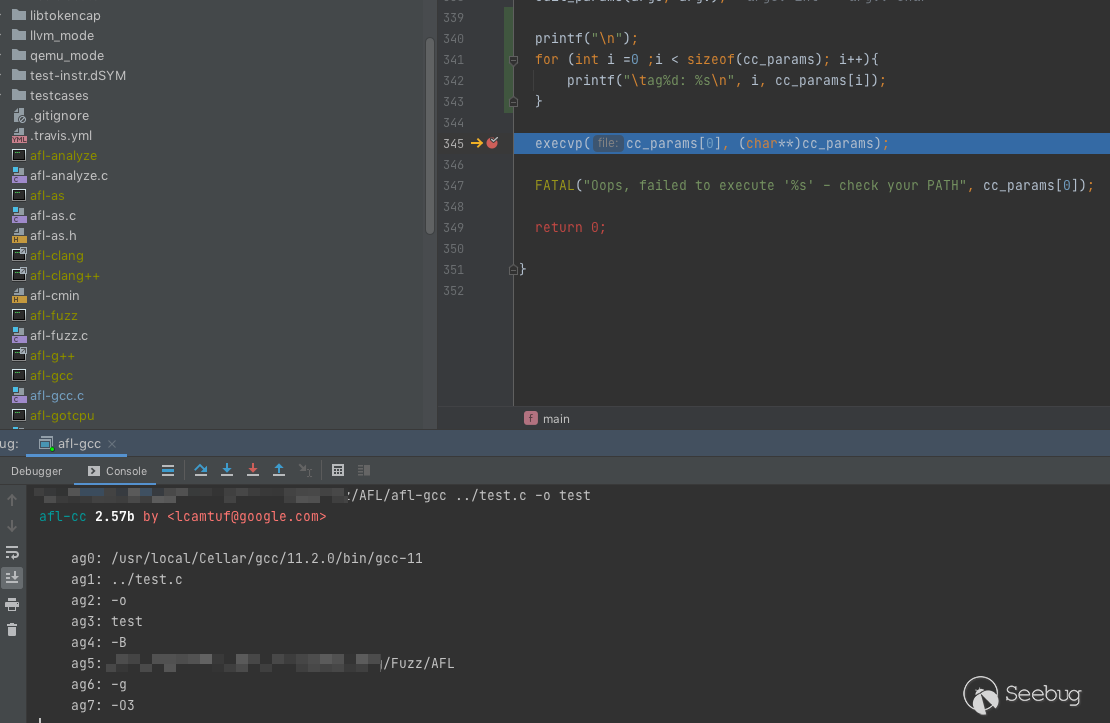
這里添加了部分代碼打印出傳入的參數 arg[0] - arg[7] ,其中一部分是我們指定的參數,另外一部分是自動添加的編譯選項。
3. find_as 函數
函數的核心作用:尋找 afl-as
函數內部大概的流程如下(軟件自動生成,控制流程圖存在誤差,但關鍵邏輯沒有問題):
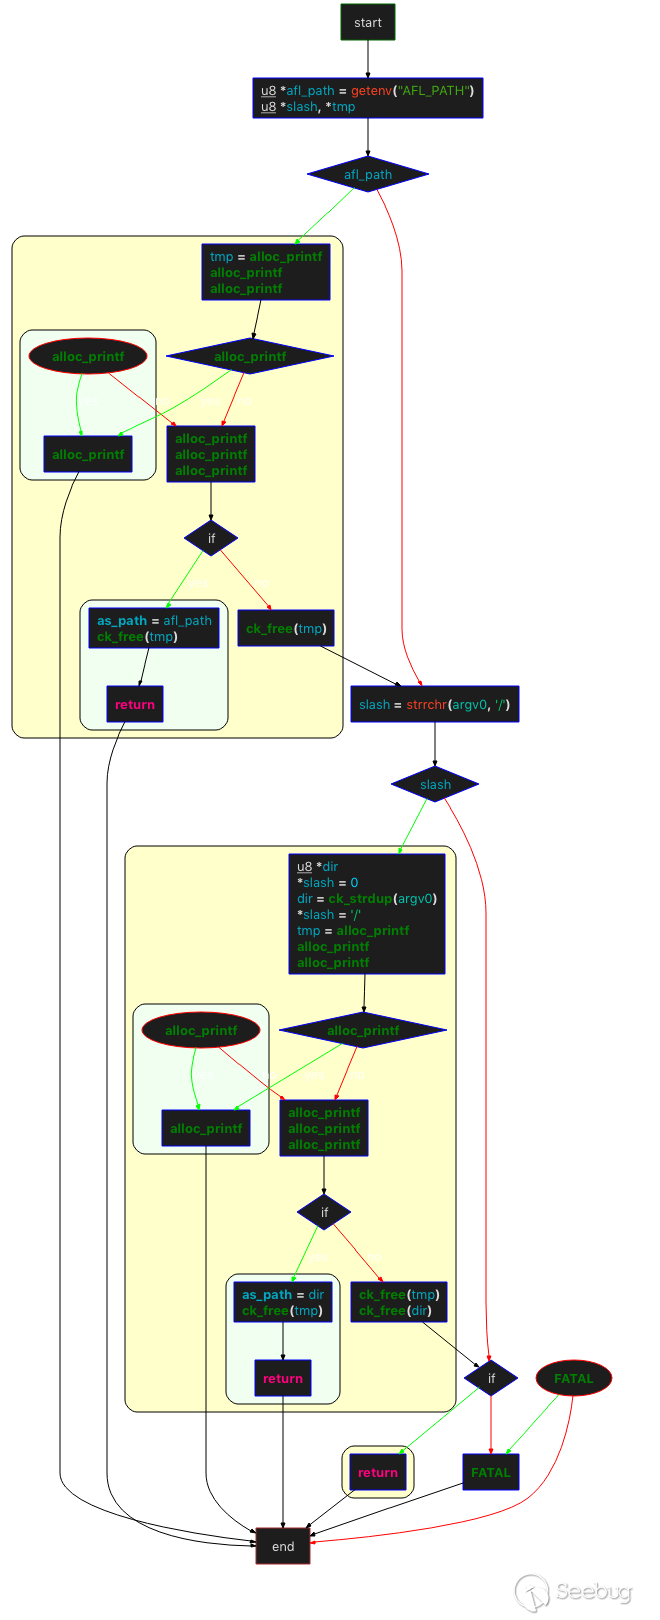
- 首先檢查環境變量
AFL_PATH,如果存在直接賦值給afl_path,然后檢查afl_path/as文件是否可以訪問,如果可以,as_path?=?afl_path。 - 如果不存在環境變量
AFL_PATH,檢查argv[0](如“/Users/v4ler1an/AFL/afl-gcc”)中是否存在 "/" ,如果存在則取最后“/” 前面的字符串作為dir,然后檢查dir/afl-as是否可以訪問,如果可以,將as_path =?dir。 - 以上兩種方式都失敗,拋出異常。
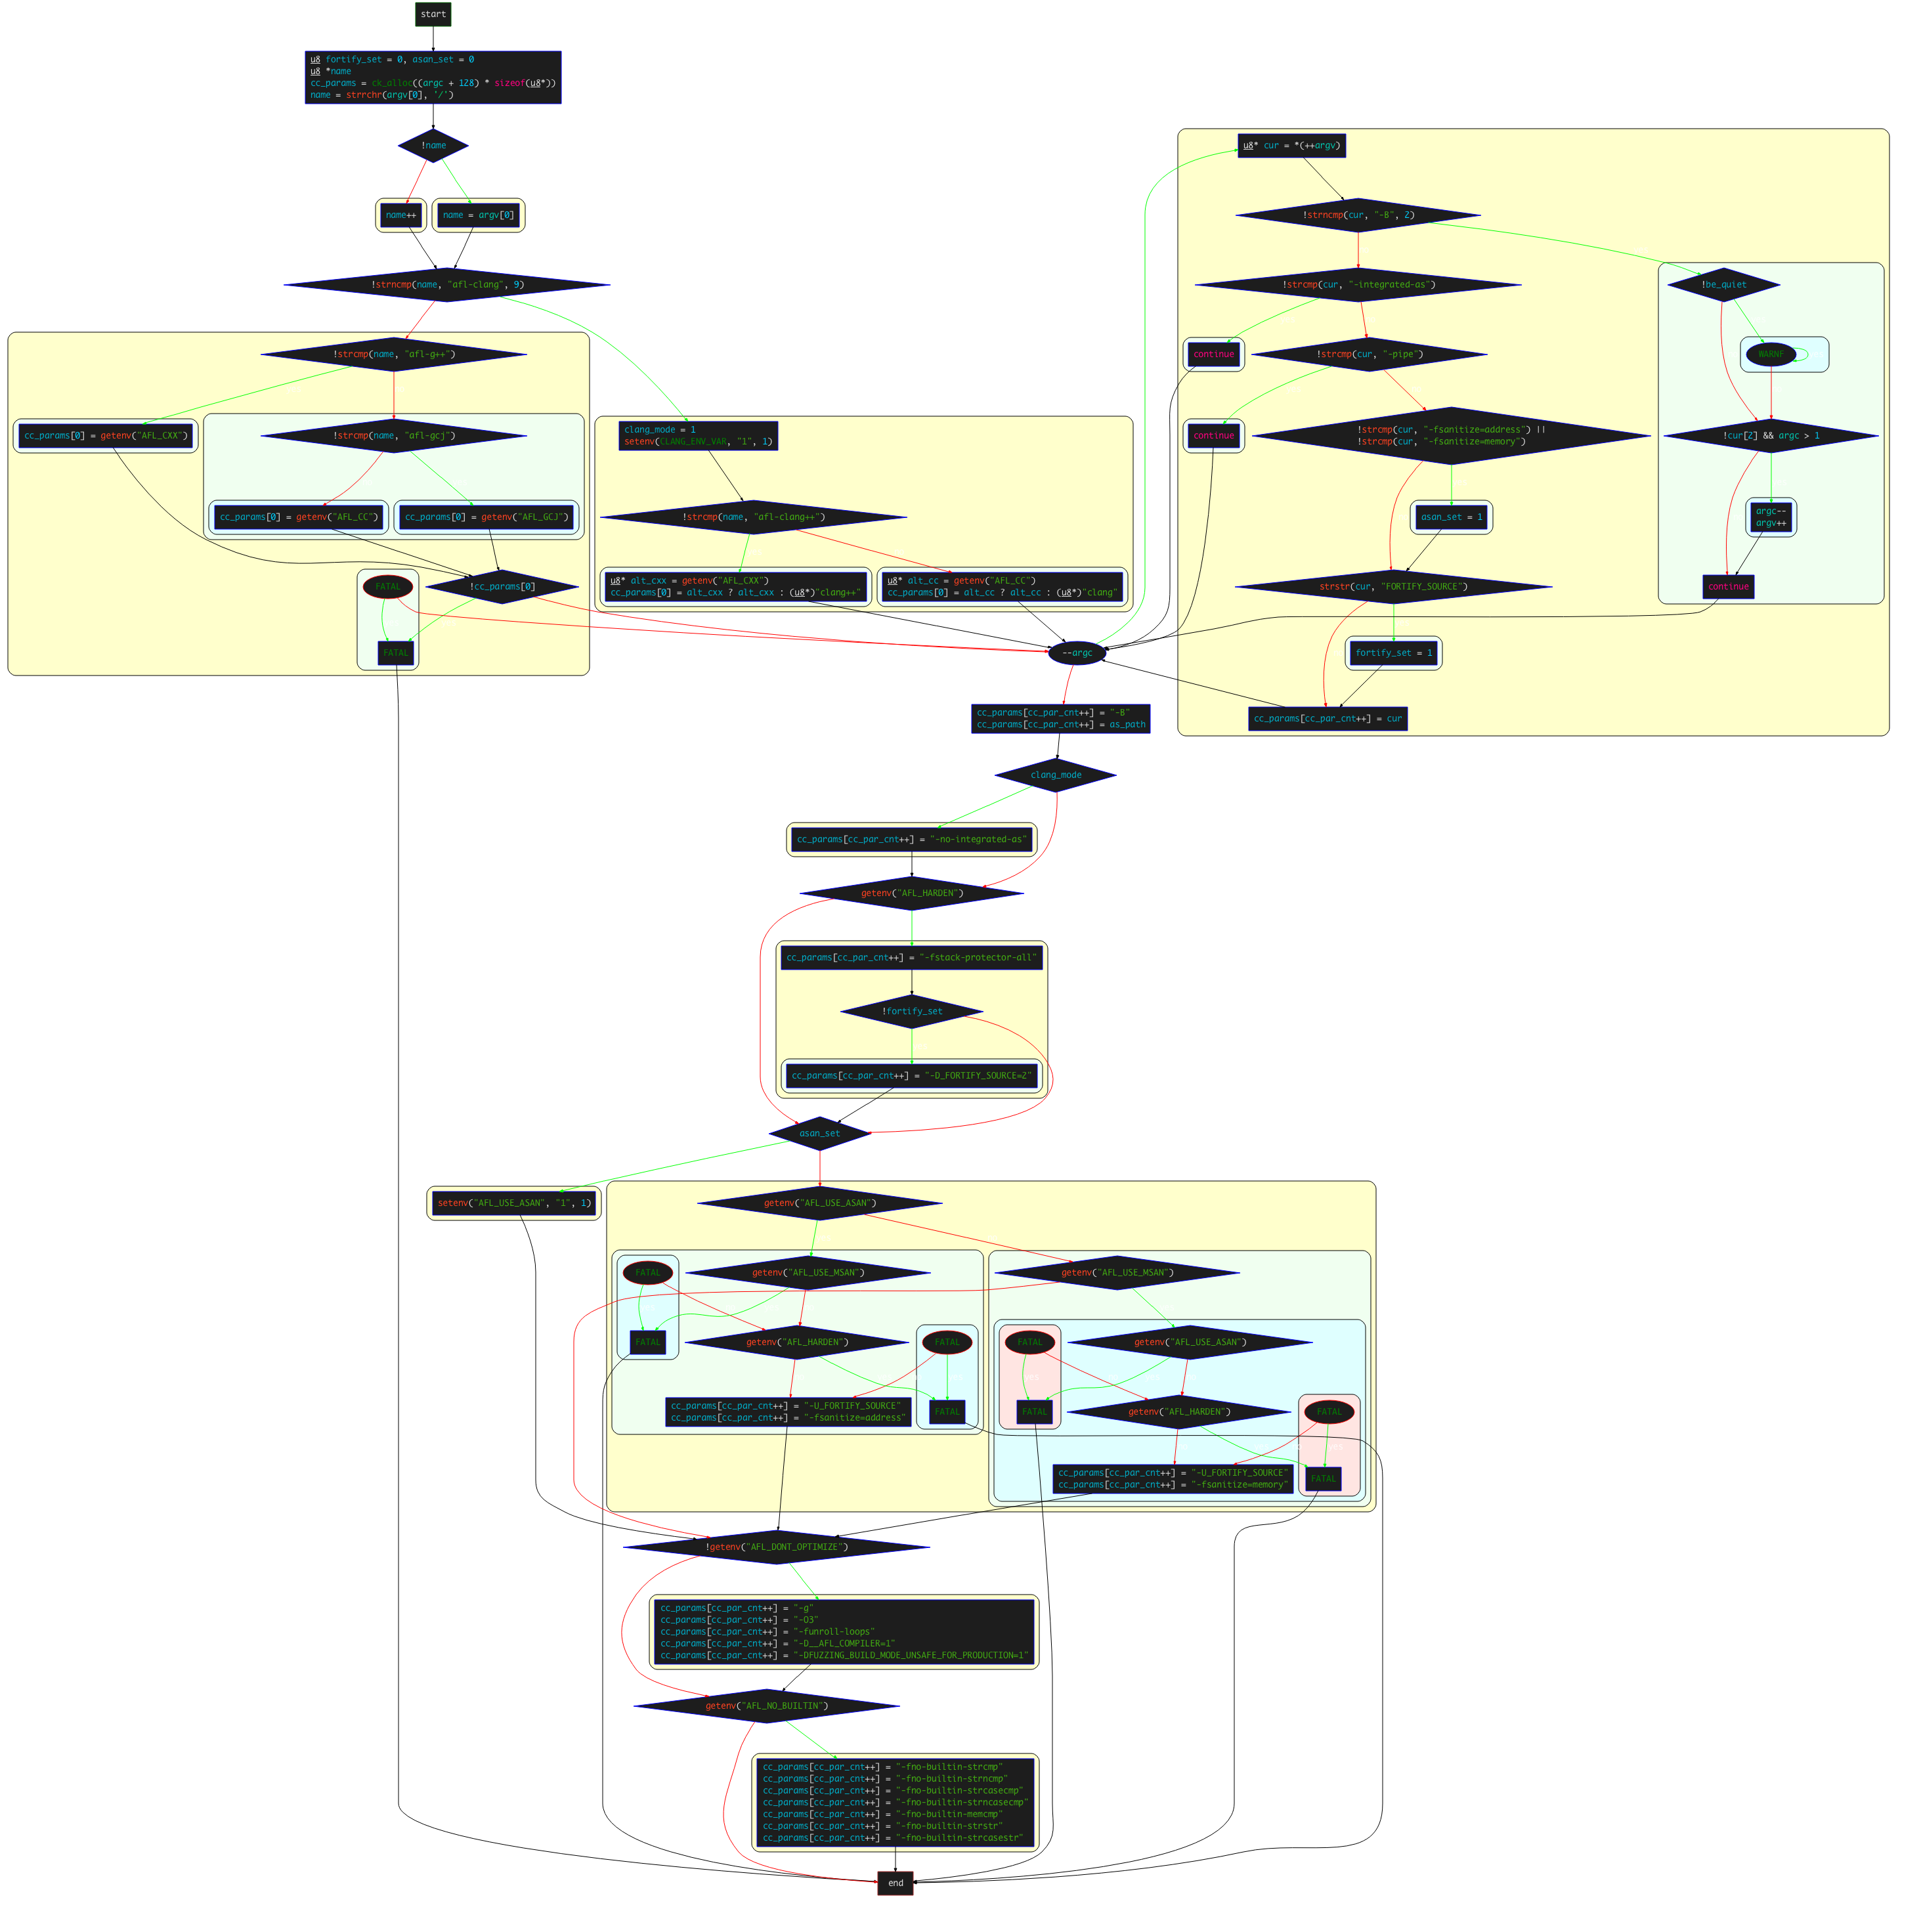
4. edit_params 函數
核心作用:將 argv 拷貝到 u8 **cc_params,然后進行相應的處理。
函數內部的大概流程如下:
-
調用
ch_alloc()為cc_params分配大小為(argc + 128)?*?8的內存(u8的類型為1byte無符號整數) -
檢查
argv[0]中是否存在/,如果不存在則name?= argv[0],如果存在則一直找到最后一個/,并將其后面的字符串賦值給name -
對比
name和固定字符串afl-clang: -
若相同,設置
clang_mode =?1,設置環境變量CLANG_ENV_VAR為1- 對比
name和固定字符串afl-clang++::- 若相同,則獲取環境變量
AFL_CXX的值,如果存在,則將該值賦值給cc_params[0],否則將afl-clang++賦值給cc_params[0]。這里的cc_params為保存編譯參數的數組; - 若不相同,則獲取環境變量
AFL_CC的值,如果存在,則將該值賦值給cc_params[0],否則將afl-clang賦值給cc_params[0]。
- 若相同,則獲取環境變量
- 對比
-
如果不相同,并且是Apple平臺,會進入
#ifdef __APPLE__。在Apple平臺下,開始對name進行對比,并通過cc_params[0] = getenv("")對cc_params[0]進行賦值;如果是非Apple平臺,對比name和 固定字符串afl-g++(此處忽略對Java環境的處理過程):-
若相同,則獲取環境變量
AFL_CXX的值,如果存在,則將該值賦值給cc_params[0],否則將g++賦值給cc_params[0]; -
若不相同,則獲取環境變量
AFL_CC的值,如果存在,則將該值賦值給cc_params[0],否則將gcc賦值給cc_params[0]。
-
-
進入 while 循環,遍歷從
argv[1]開始的argv參數: -
如果掃描到
-B,-B選項用于設置編譯器的搜索路徑,直接跳過。(因為在這之前已經處理過as_path了); -
如果掃描到
-integrated-as,跳過; -
如果掃描到
-pipe,跳過; -
如果掃描到
-fsanitize=address和-fsanitize=memory告訴 gcc 檢查內存訪問的錯誤,比如數組越界之類,設置asan_set = 1; -
如果掃描到
FORTIFY_SOURCE,設置fortify_set = 1。FORTIFY_SOURCE主要進行緩沖區溢出問題的檢查,檢查的常見函數有memcpy, mempcpy, memmove, memset, strcpy, stpcpy, strncpy, strcat, strncat, sprintf, vsprintf, snprintf, gets等; -
對
cc_params進行賦值:cc_params[cc_par_cnt++]?= cur; -
跳出
while循環,設置其他參數: -
取出前面計算出的
as_path,設置-B?as_path; - 如果為
clang_mode,則設置-no-integrated-as; - 如果存在環境變量
AFL_HARDEN,則設置-fstack-protector-all。且如果沒有設置fortify_set,追加-D_FORTIFY_SOURCE=2; -
sanitizer相關,通過多個if進行判斷:
-
如果
asan_set在前面被設置為1,則設置環境變量AFL_USE_ASAN為1;- 如果
asan_set不為1且,存在AFL_USE_ASAN環境變量,則設置-U_FORTIFY_SOURCE -fsanitize=address;
- 如果
-
如果不存在
AFL_USE_ASAN環境變量,但存在AFL_USE_MSAN環境變量,則設置-fsanitize=memory(不能同時指定AFL_USE_ASAN或者AFL_USE_MSAN,也不能同時指定AFL_USE_MSAN和AFL_HARDEN,因為這樣運行時速度過慢;- 如果不存在
AFL_DONT_OPTIMIZE環境變量,則設置-g -O3 -funroll-loops -D__AFL_COMPILER=1 -DFUZZING_BUILD_MODE_UNSAFE_FOR_PRODUCTION=1; - 如果存在
AFL_NO_BUILTIN環境變量,則表示允許進行優化,設置-fno-builtin-strcmp -fno-builtin-strncmp -fno-builtin-strcasecmp -fno-builtin-strncasecmp -fno-builtin-memcmp -fno-builtin-strstr -fno-builtin-strcasestr。 - 最后補充
cc_params[cc_par_cnt] = NULL;,cc_params參數數組編輯完成。
- 如果不存在
(二)、AFL的插樁 —— afl-as.c
1. 概述
afl-gcc 是 GNU as 的一個wrapper(封裝),唯一目的是預處理由 GCC/clang 生成的匯編文件,并注入包含在 afl-as.h 中的插樁代碼。 使用 afl-gcc / afl-clang 編譯程序時,工具鏈會自動調用它。該wapper的目標并不是為了實現向 .s 或 asm? 代碼塊中插入手寫的代碼。
experiment/clang_asm_normalize/ 中可以找到可能允許 clang 用戶進行手動插入自定義代碼的解決方案,GCC并不能實現該功能。
2. 源碼
1. 關鍵變量
在開始函數代碼分析前,首先要明確幾個關鍵變量:
static u8** as_params;          /* Parameters passed to the real 'as',傳遞給as的參數   */

static u8*  input_file;         /* Originally specified input file ,輸入文件     */
static u8*  modified_file;      /* Instrumented file for the real 'as',as進行插樁處理的文件  */

static u8   be_quiet,           /* Quiet mode (no stderr output) ,靜默模式,沒有標準輸出       */
            clang_mode,         /* Running in clang mode?    是否運行在clang模式           */
            pass_thru,          /* Just pass data through?   只通過數據           */
            just_version,       /* Just show version?        只顯示版本   */
            sanitizer;          /* Using ASAN / MSAN         是否使用ASAN/MSAN           */

static u32  inst_ratio = 100,   /* Instrumentation probability (%)  插樁覆蓋率    */
            as_par_cnt = 1;     /* Number of params to 'as'    傳遞給as的參數數量初始值         */
注:如果在參數中沒有指明 --m32 或 --m64 ,則默認使用在編譯時使用的選項。
2. main函數
main 函數全部邏輯如下:
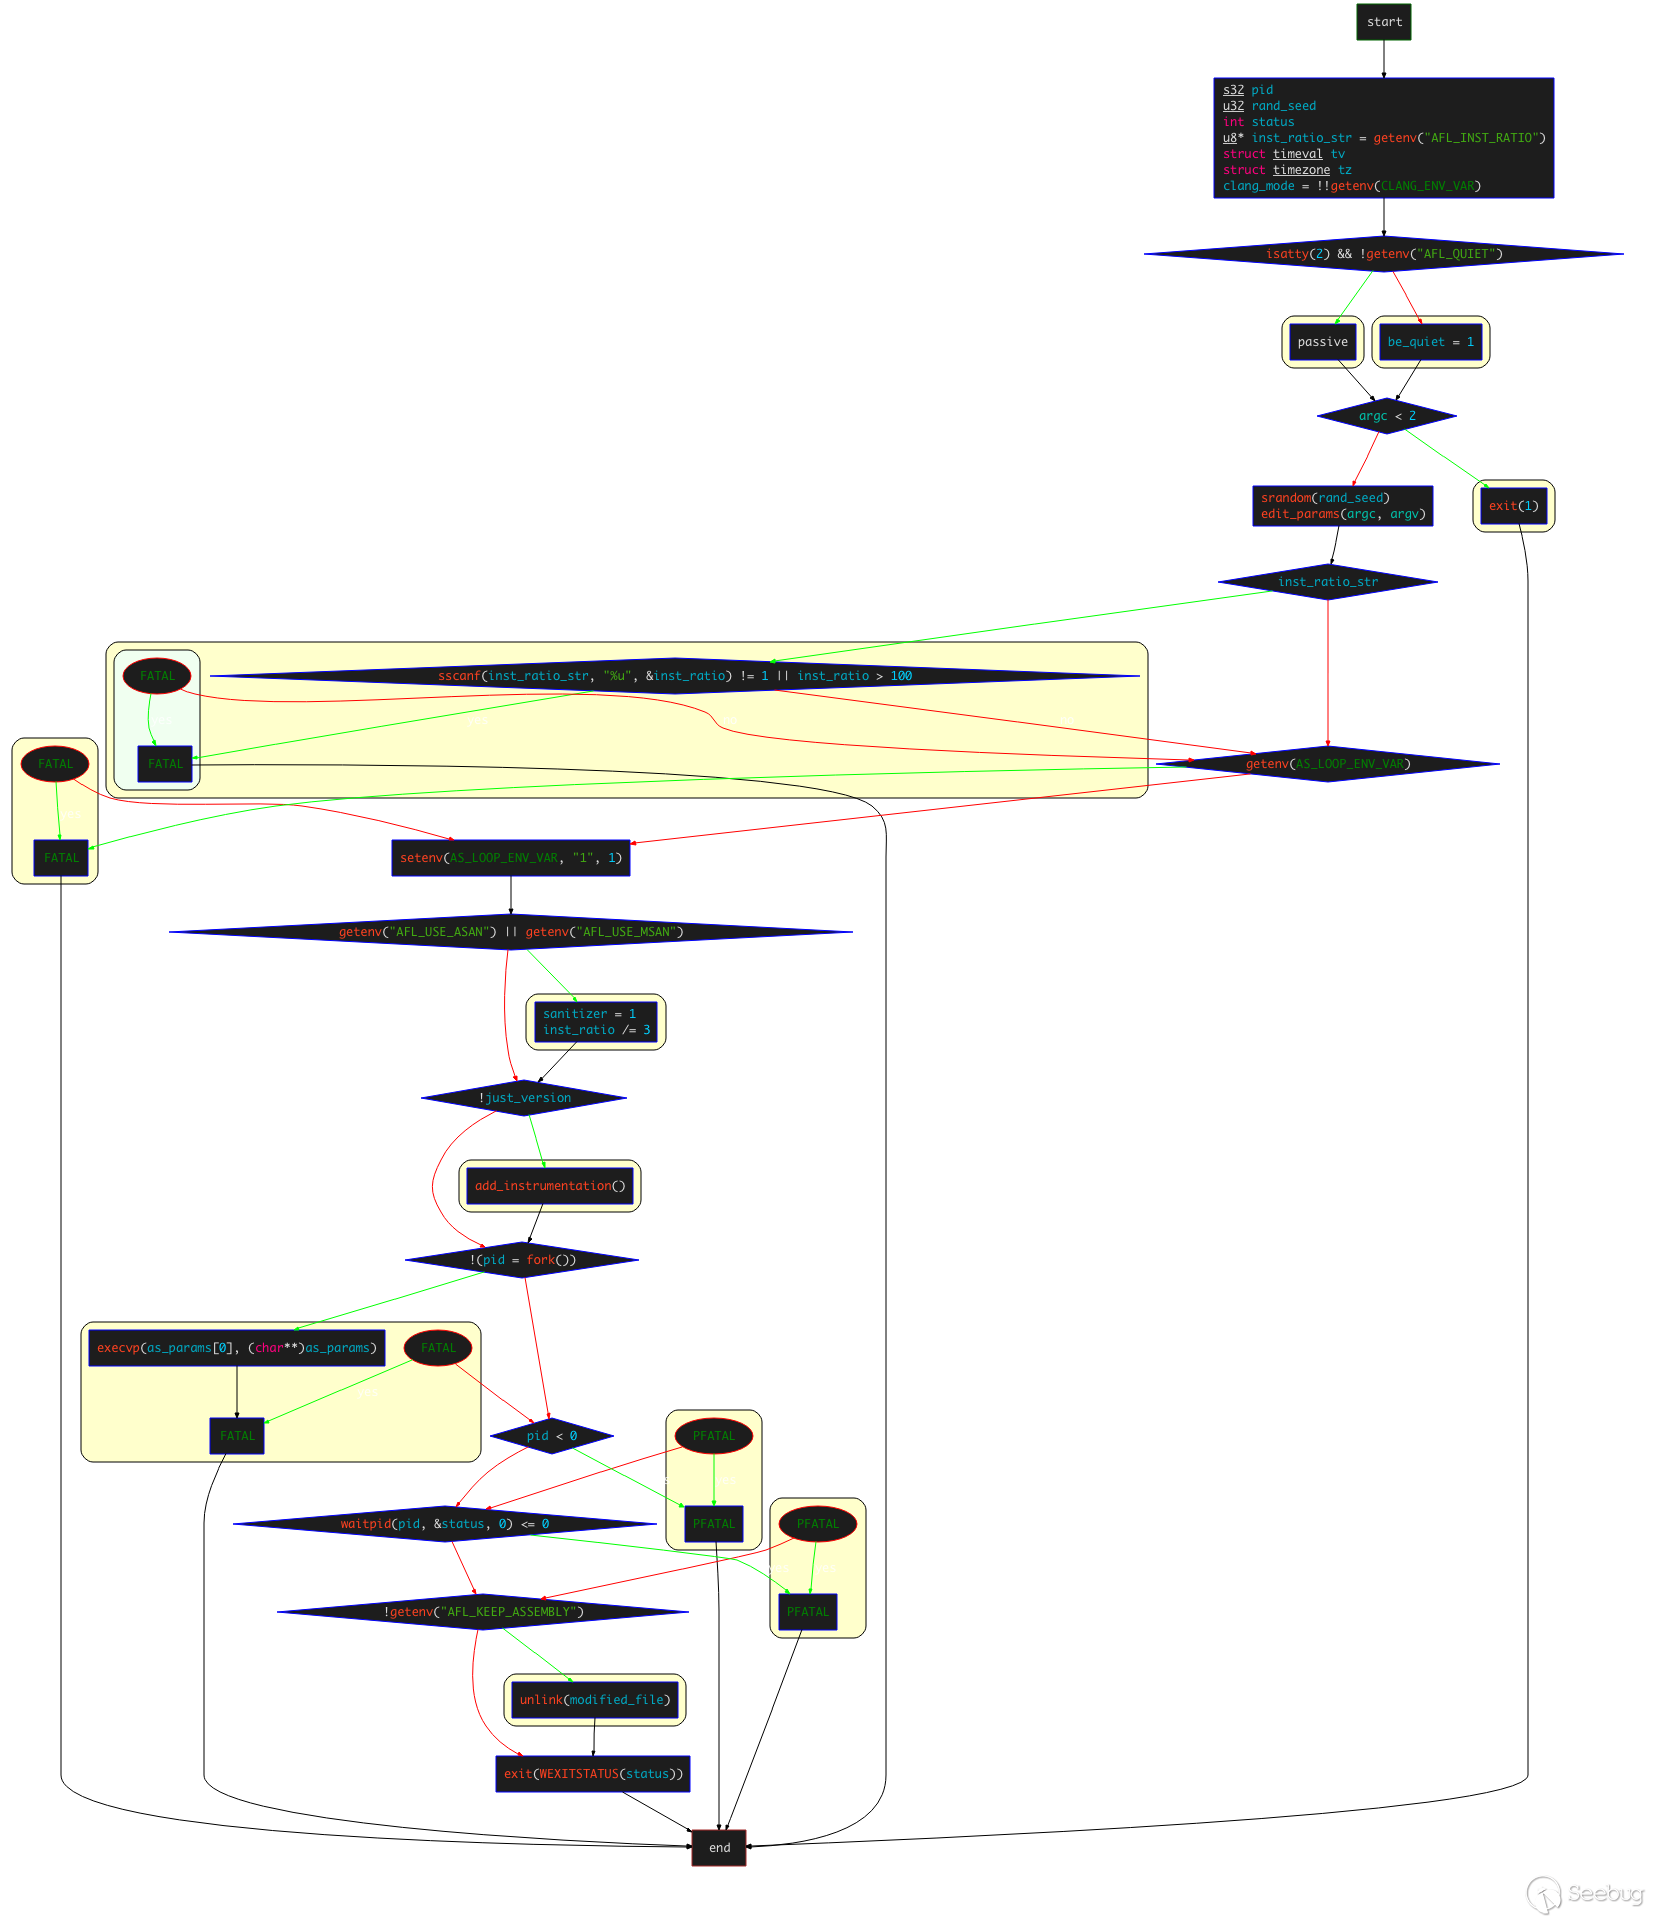
- 首先獲取環境變量
AFL_INST_RATIO,賦值給inst_ratio_str,該環境變量主要控制檢測每個分支的概率,取值為0到100%,設置為0時則只檢測函數入口的跳轉,而不會檢測函數分支的跳轉; - 通過
gettimeofday(&tv,&tz);獲取時區和時間,然后設置srandom()的隨機種子rand_seed = tv.tv_sec ^ tv.tv_usec ^ getpid(); - 調用
edit_params(argc, argv)函數進行參數處理; - 檢測
inst_ratio_str的值是否合法范圍內,并設置環境變量AFL_LOOP_ENV_VAR; - 讀取環境變量
`AFL_USE_ASAN和AFL_USE_MSAN的值,如果其中有一個為1,則設置sanitizer為1,且將inst_ratio除3。這是因為在進行ASAN的編譯時,AFL無法識別出ASAN特定的分支,導致插入很多無意義的樁代碼,所以直接暴力地將插樁概率/3; - 調用
add_instrumentation()函數,這是實際的插樁函數; - fork 一個子進程來執行
execvp(as_params[0], (char**)as_params);。這里采用的是 fork 一個子進程的方式來執行插樁。這其實是因為我們的execvp執行的時候,會用as_params[0]來完全替換掉當前進程空間中的程序,如果不通過子進程來執行實際的as,那么后續就無法在執行完實際的as之后,還能unlink掉modified_file; - 調用
waitpid(pid, &status, 0)等待子進程執行結束; - 讀取環境變量
AFL_KEEP_ASSEMBLY的值,如果沒有設置這個環境變量,就unlink掉modified_file(已插完樁的文件)。設置該環境變量主要是為了防止afl-as刪掉插樁后的匯編文件,設置為1則會保留插樁后的匯編文件。
可以通過在main函數中添加如下代碼來打印實際執行的參數:
print("\n");

for (int i = 0; i < sizeof(as_params); i++){
  peinrf("as_params[%d]:%s\n", i, as_params[i]);

}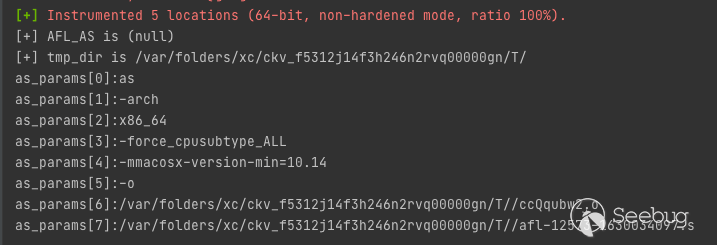
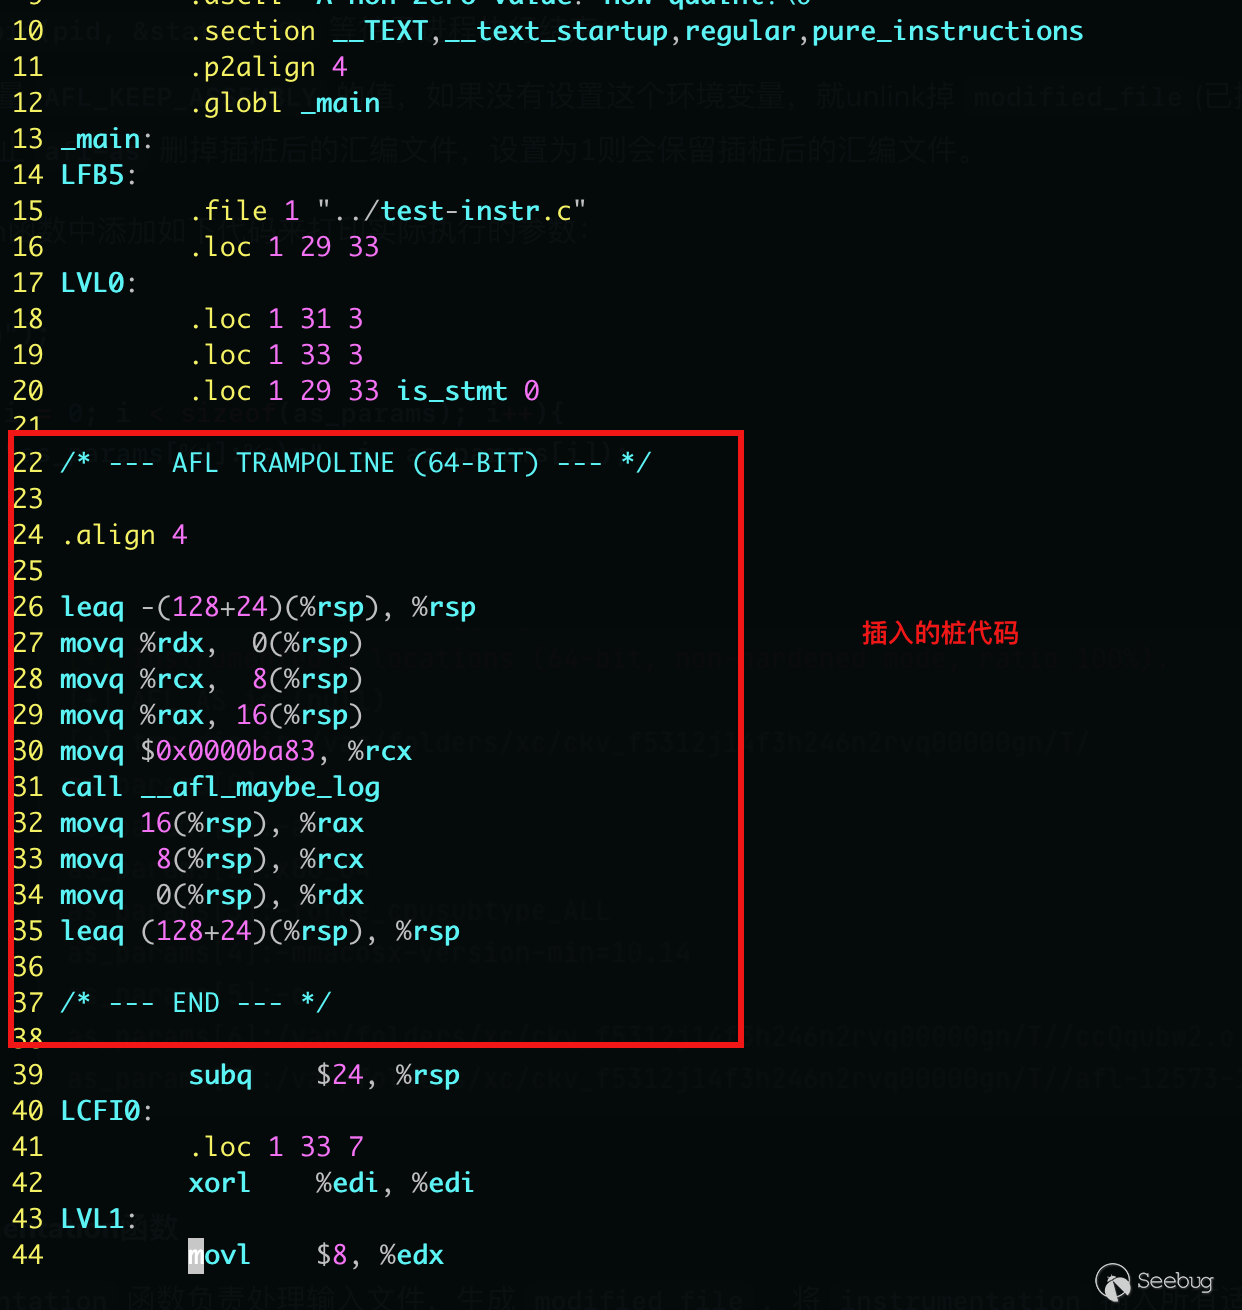
在插樁完成后,會生成 .s 文件,內容如下(具體的文件位置與設置的環境變量相關):
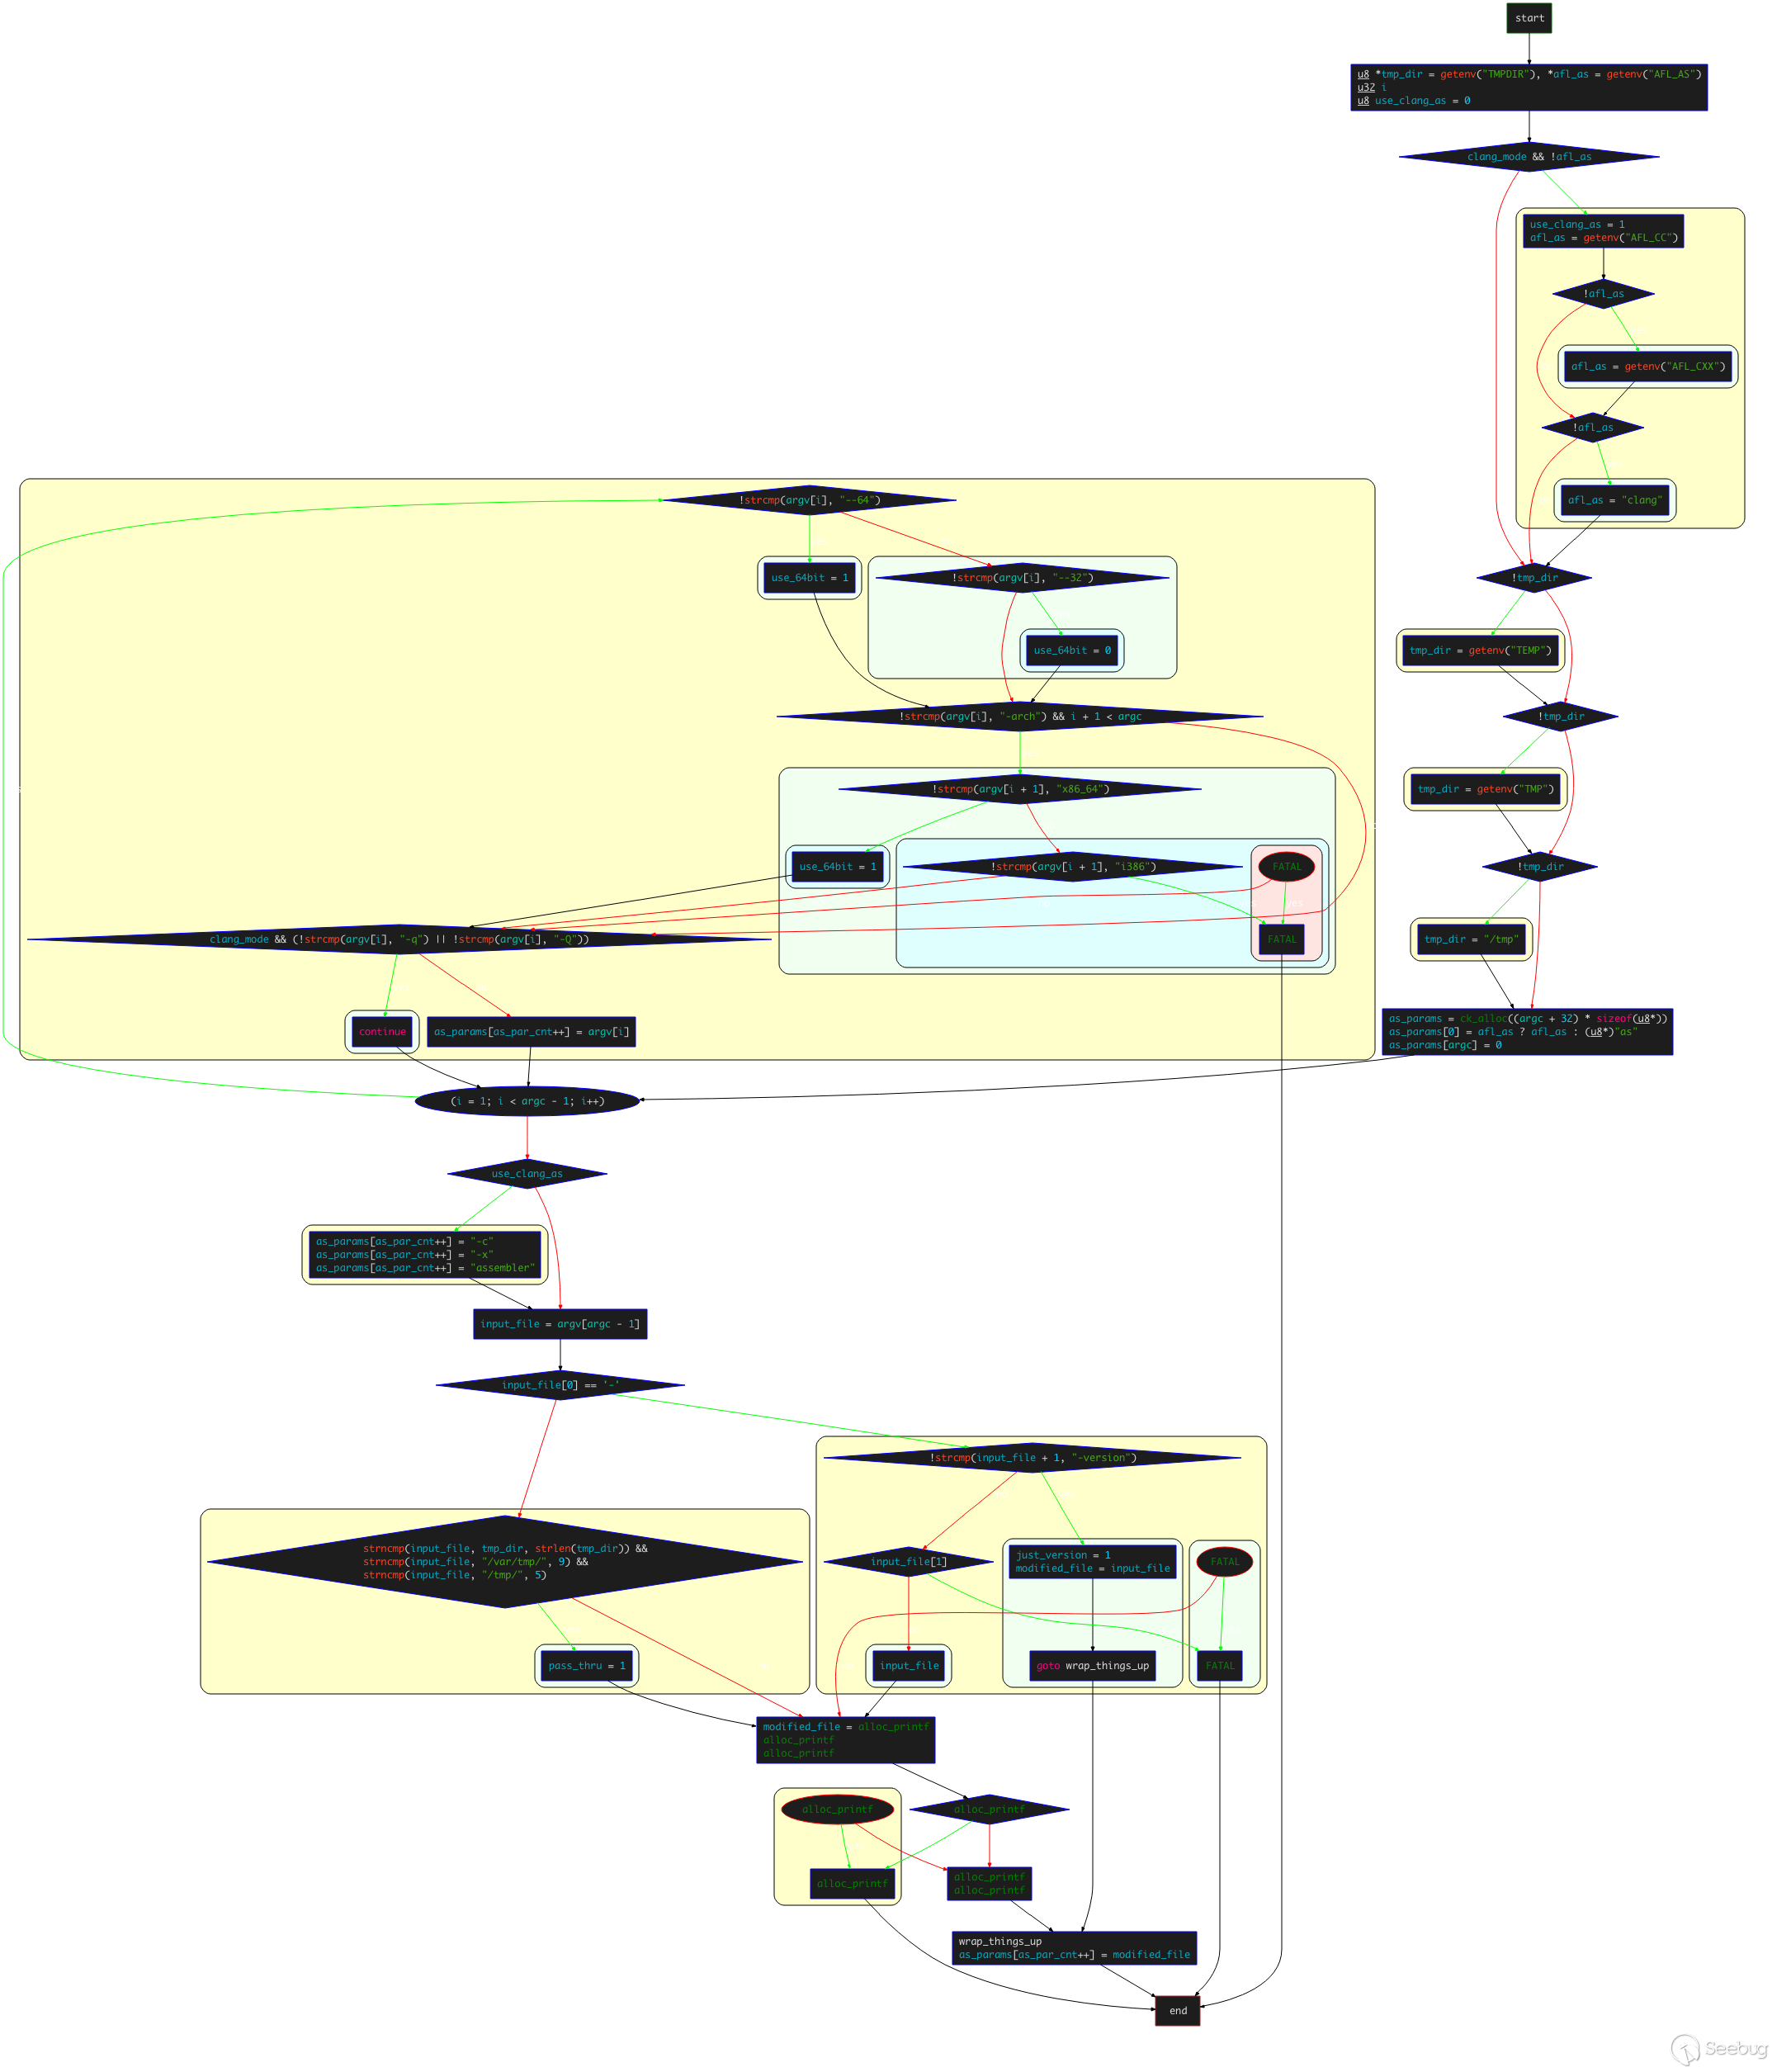
3. add_instrumentation函數
add_instrumentation 函數負責處理輸入文件,生成 modified_file ,將 instrumentation 插入所有適當的位置。其整體控制流程如下:
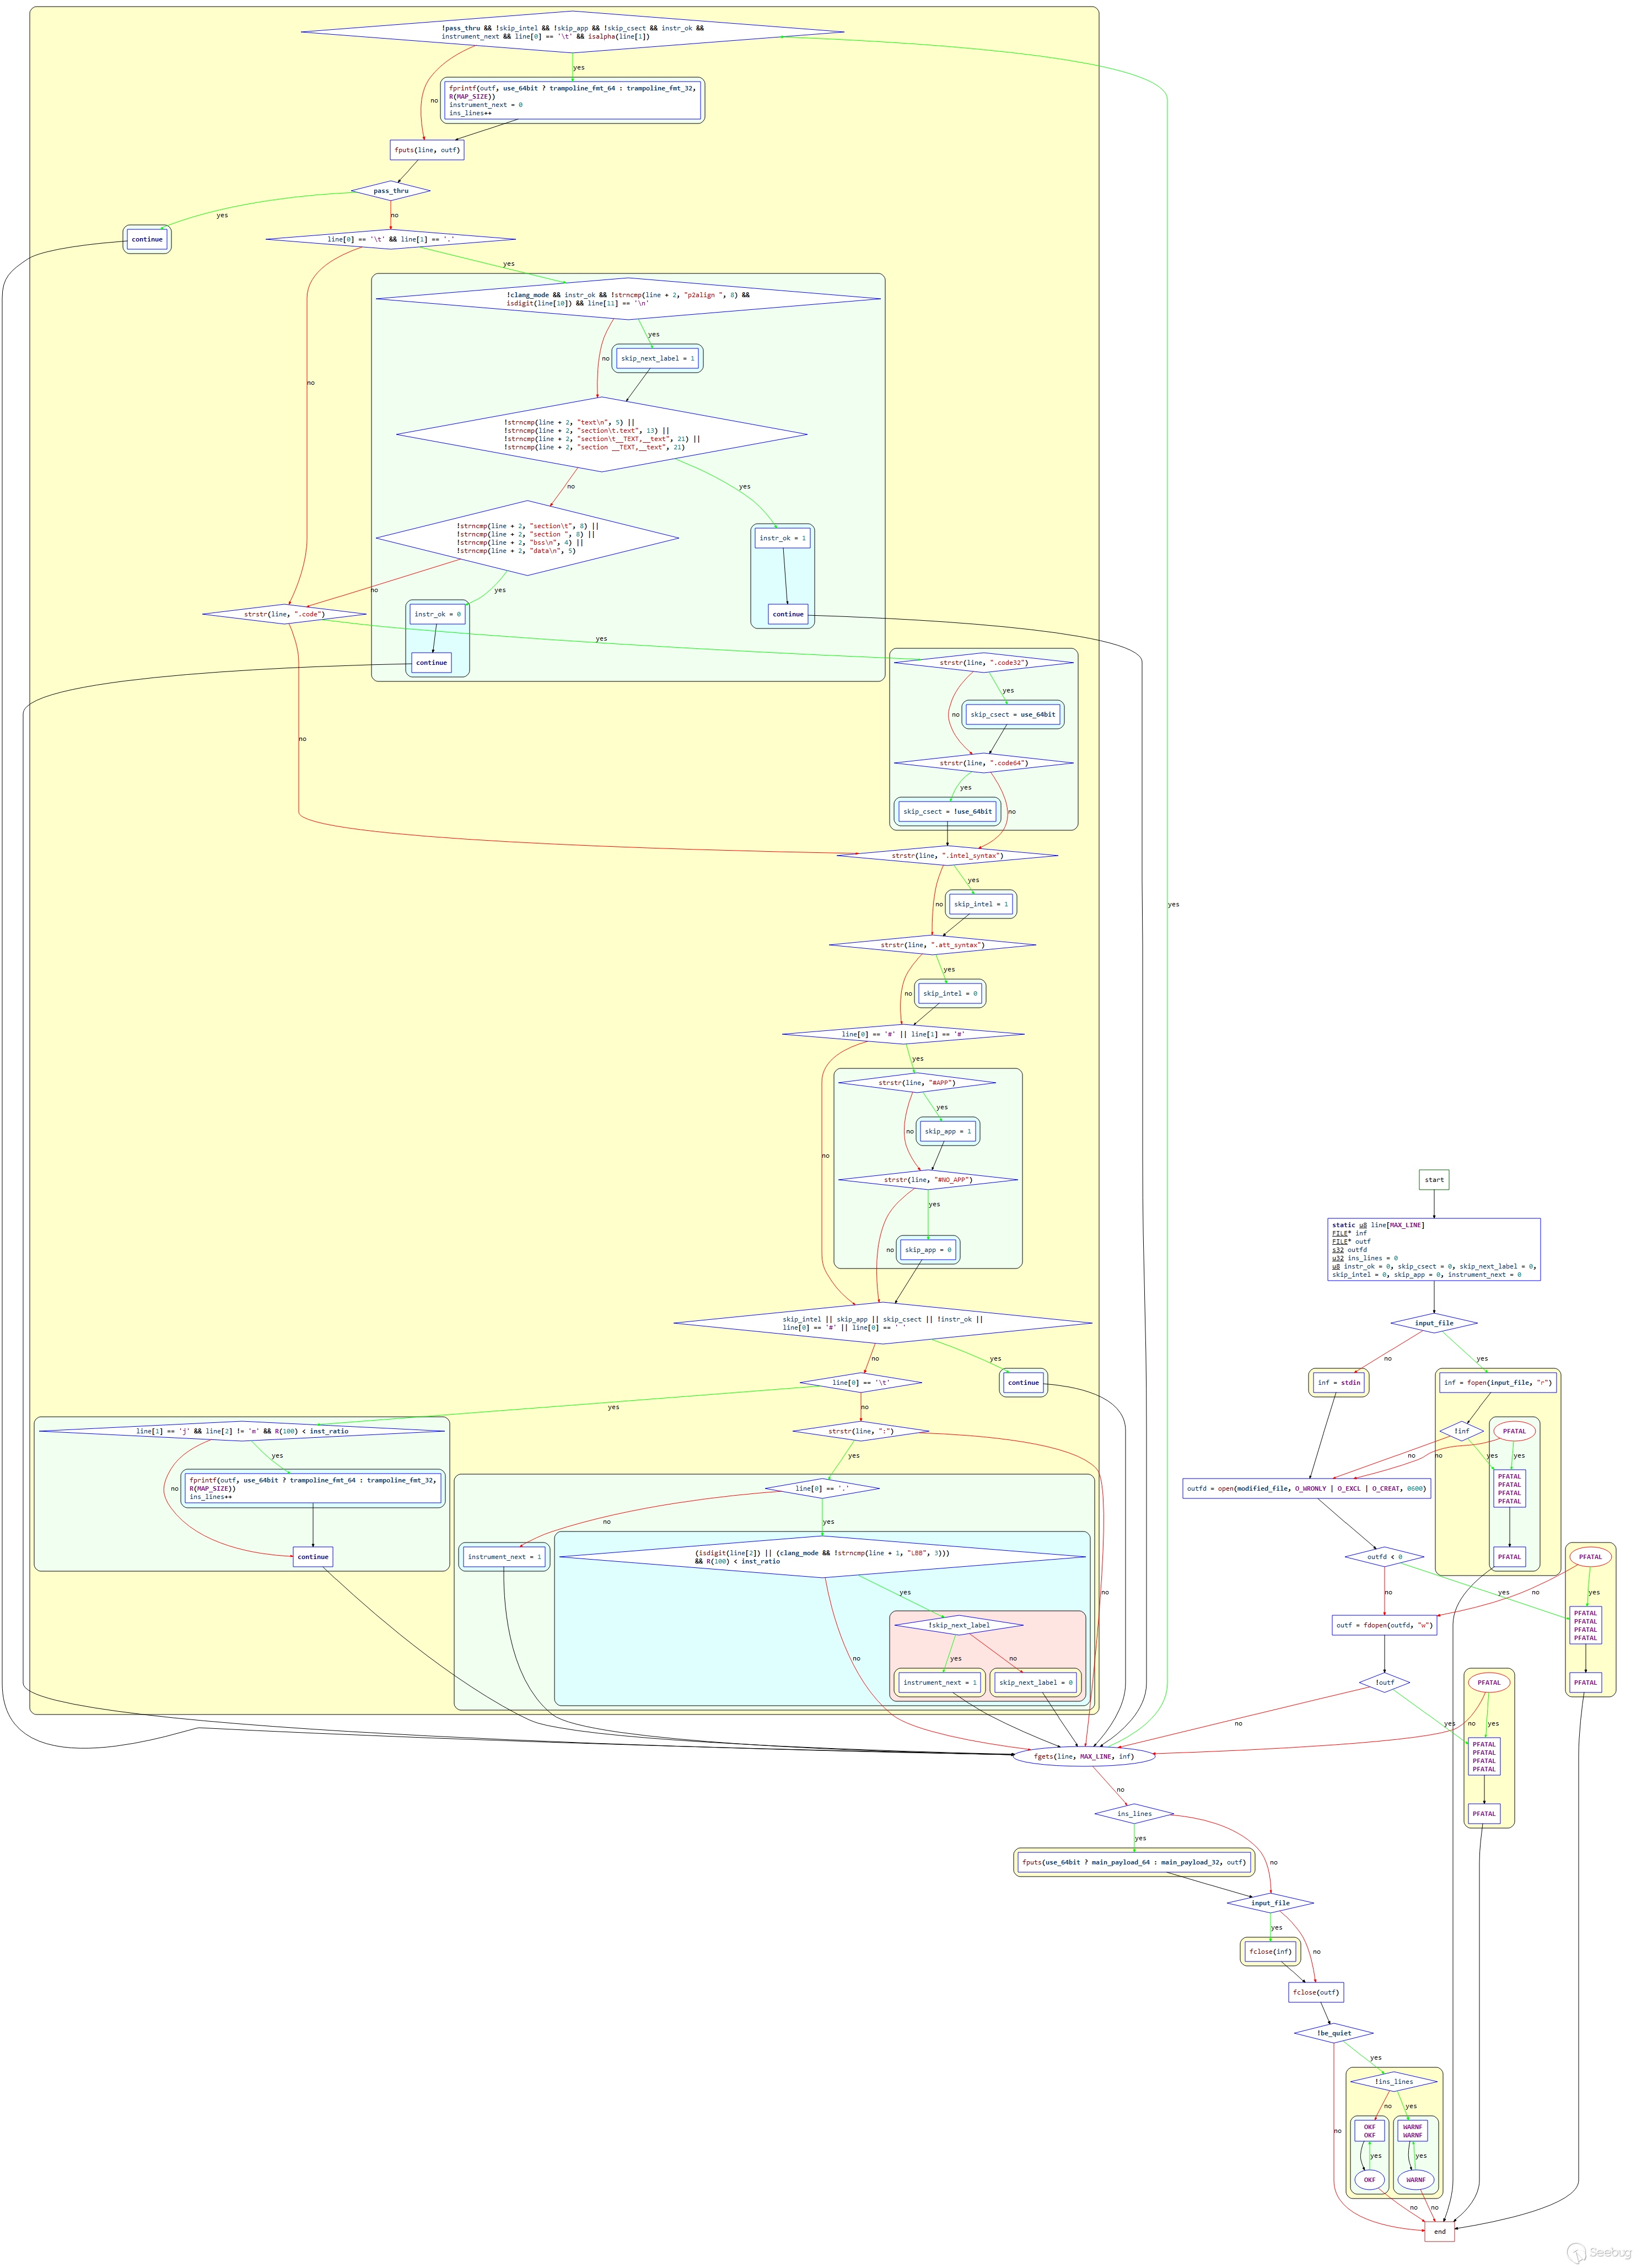
整體邏輯看上去有點復雜,但是關鍵內容并不算很多。在main函數中調用完 edit_params() 函數完成 as_params 參數數組的處理后,進入到該函數。
-
判斷
input_file是否為空,如果不為空則嘗試打開文件獲取fd賦值給inf,失敗則拋出異常;input_file為空則inf設置為標準輸入; -
打開
modified_file,獲取fd賦值給outfd,失敗返回異常;進一步驗證該文件是否可寫,不可寫返回異常; -
while循環讀取inf指向文件的每一行到line數組,每行最多MAX_LINE?= 8192個字節(含末尾的‘\0’),從line數組里將讀取到的內容寫入到outf指向的文件,然后進入到真正的插樁邏輯。這里需要注意的是,插樁只向.text段插入,: -
首先跳過標簽、宏、注釋;
-
這里結合部分關鍵代碼進行解釋。需要注意的是,變量
instr_ok本質上是一個flag,用于表示是否位于.text段。變量設置為1,表示位于.text中,如果不為1,則表示不再。于是,如果instr_ok為1,就會在分支處執行插樁邏輯,否則就不插樁。-
首先判斷讀入的行是否以‘\t’ 開頭,本質上是在匹配
.s文件中聲明的段,然后判斷line[1]是否為.:```c if (line[0] == '\t' && line[1] == '.') {
   /* OpenBSD puts jump tables directly inline with the code, which is
      a bit annoying. They use a specific format of p2align directives
      around them, so we use that as a signal. */

   if (!clang_mode && instr_ok && !strncmp(line + 2, "p2align ", 8) &&
       isdigit(line[10]) && line[11] == '\n') skip_next_label = 1;

   if (!strncmp(line + 2, "text\n", 5) ||
       !strncmp(line + 2, "section\t.text", 13) ||
       !strncmp(line + 2, "section\t__TEXT,__text", 21) ||
       !strncmp(line + 2, "section __TEXT,__text", 21)) {
     instr_ok = 1;
     continue;
   }

   if (!strncmp(line + 2, "section\t", 8) ||
       !strncmp(line + 2, "section ", 8) ||
       !strncmp(line + 2, "bss\n", 4) ||
       !strncmp(line + 2, "data\n", 5)) {
     instr_ok = 0;
     continue;
   }

 }
```
- '\t'開頭,且
line[1]=='.',檢查是否為p2align指令,如果是,則設置skip_next_label?= 1; - 嘗試匹配
"text\n""section\t.text""section\t__TEXT,__text""section __TEXT,__text"其中任意一個,匹配成功, 設置instr_ok?=?1, 表示位于.text段中,continue跳出,進行下一次遍歷; - 嘗試匹配
"section\t""section ""bss\n""data\n"其中任意一個,匹配成功,設置instr_ok?= 0,表位于其他段中,continue跳出,進行下一次遍歷;
- '\t'開頭,且
-
接下來通過幾個
if判斷,來設置一些標志信息,包括off-flavor?assembly,Intel/AT&T的塊處理方式、ad-hoc?__asm__塊的處理方式等;```c / Detect off-flavor assembly (rare, happens in gdb). When this is encountered, we set skip_csect until the opposite directive is seen, and we do not instrument. /
 if (strstr(line, ".code")) {

   if (strstr(line, ".code32")) skip_csect = use_64bit;
   if (strstr(line, ".code64")) skip_csect = !use_64bit;

 }

 /* Detect syntax changes, as could happen with hand-written assembly.
    Skip Intel blocks, resume instrumentation when back to AT&T. */

 if (strstr(line, ".intel_syntax")) skip_intel = 1;
 if (strstr(line, ".att_syntax")) skip_intel = 0;

 /* Detect and skip ad-hoc __asm__ blocks, likewise skipping them. */

 if (line[0] == '#' || line[1] == '#') {

   if (strstr(line, "#APP")) skip_app = 1;
   if (strstr(line, "#NO_APP")) skip_app = 0;

 }
```
-
AFL在插樁時重點關注的內容包括:
^main,?^.L0,?^.LBB0_0,?^\tjnz?foo(_main函數, gcc和clang下的分支標記,條件跳轉分支標記),這些內容通常標志了程序的流程變化,因此AFL會重點在這些位置進行插樁:對于形如
\tj[^m].格式的指令,即條件跳轉指令,且R(100)產生的隨機數小于插樁密度inst_ratio,直接使用fprintf將trampoline_fmt_64(插樁部分的指令)寫入outf指向的文件,寫入大小為小于MAP_SIZE的隨機數——R(MAP_SIZE),然后插樁計數
ins_lines加一,continue跳出,進行下一次遍歷;```c /* If we're in the right mood for instrumenting, check for function names or conditional labels. This is a bit messy, but in essence, we want to catch:
      ^main:      - function entry point (always instrumented)
      ^.L0:       - GCC branch label
      ^.LBB0_0:   - clang branch label (but only in clang mode)
      ^\tjnz foo  - conditional branches

    ...but not:

      ^# BB#0:    - clang comments
      ^ # BB#0:   - ditto
      ^.Ltmp0:    - clang non-branch labels
      ^.LC0       - GCC non-branch labels
      ^.LBB0_0:   - ditto (when in GCC mode)
      ^\tjmp foo  - non-conditional jumps

    Additionally, clang and GCC on MacOS X follow a different convention
    with no leading dots on labels, hence the weird maze of #ifdefs
    later on.

  */

 if (skip_intel || skip_app || skip_csect || !instr_ok ||
     line[0] == '#' || line[0] == ' ') continue;

 /* Conditional branch instruction (jnz, etc). We append the instrumentation
    right after the branch (to instrument the not-taken path) and at the
    branch destination label (handled later on). */

 if (line[0] == '\t') {

   if (line[1] == 'j' && line[2] != 'm' && R(100) < inst_ratio) {

     fprintf(outf, use_64bit ? trampoline_fmt_64 : trampoline_fmt_32,
             R(MAP_SIZE));

     ins_lines++;

   }

   continue;

 }
```
-
對于label的相關評估,有一些label可能是一些分支的目的地,需要自己評判
首先檢查該行中是否存在
:,然后檢查是否以.開始-
如果以
.開始,則代表想要插樁^.L0:或者^.LBB0_0:這樣的branch label,即 style jump destination- 檢查
line[2]是否為數字 或者 如果是在clang_mode下,比較從line[1]開始的三個字節是否為LBB.,前述所得結果和R(100) < inst_ratio)相與。如果結果為真,則設置instrument_next = 1; 2. 否則代表這是一個function,插樁^func:,function entry point,直接設置instrument_next = 1(defer mode)。
- 檢查
```c / Label of some sort. This may be a branch destination, but we need to tread carefully and account for several different formatting conventions. /
#ifdef APPLE
 /* Apple: L<whatever><digit>: */

 if ((colon_pos = strstr(line, ":"))) {

   if (line[0] == 'L' && isdigit(*(colon_pos - 1))) {
#else
 /* Everybody else: .L<whatever>: */

 if (strstr(line, ":")) {

   if (line[0] == '.') {
#endif / APPLE /
/* .L0: or LBB0_0: style jump destination */#ifdef APPLE
     /* Apple: L<num> / LBB<num> */

     if ((isdigit(line[1]) || (clang_mode && !strncmp(line, "LBB", 3)))
         && R(100) < inst_ratio) {
#else
     /* Apple: .L<num> / .LBB<num> */

     if ((isdigit(line[2]) || (clang_mode && !strncmp(line + 1, "LBB", 3)))
         && R(100) < inst_ratio) {
#endif / APPLE /
       /* An optimization is possible here by adding the code only if the
          label is mentioned in the code in contexts other than call / jmp.
          That said, this complicates the code by requiring two-pass
          processing (messy with stdin), and results in a speed gain
          typically under 10%, because compilers are generally pretty good
          about not generating spurious intra-function jumps.

          We use deferred output chiefly to avoid disrupting
          .Lfunc_begin0-style exception handling calculations (a problem on
          MacOS X). */

       if (!skip_next_label) instrument_next = 1; else skip_next_label = 0;

     }

   } else {

     /* Function label (always instrumented, deferred mode). */

     instrument_next = 1;

   }
 }
} ```
-
-
上述過程完成后,來到
while循環的下一個循環,在while的開頭,可以看到對以 defered mode 進行插樁的位置進行了真正的插樁處理:```c if (!pass_thru && !skip_intel && !skip_app && !skip_csect && instr_ok && instrument_next && line[0] == '\t' && isalpha(line[1])) {
  fprintf(outf, use_64bit ? trampoline_fmt_64 : trampoline_fmt_32,
          R(MAP_SIZE));

  instrument_next = 0;
  ins_lines++;

}
```
這里對
instr_ok,?instrument_next變量進行了檢驗是否為1,而且進一步校驗是否位于.text段中,且設置了 defered mode 進行插樁,則就進行插樁操作,寫入trampoline_fmt_64/32。
-
至此,插樁函數 add_instrumentation 的主要邏輯已梳理完成。
4. edit_params函數
edit_params,該函數主要是設置變量 as_params 的值,以及 use_64bit/modified_file 的值, 其整體控制流程如下:
-
獲取環境變量
TMPDIR和AFL_AS; -
對于
__APPLE_宏, 如果當前在clang_mode且沒有設置AFL_AS環境變量,會設置use_clang_mode =?1,并設置afl-as為AFL_CC/AFL_CXX/clang中的一種; -
設置
tmp_dir,嘗試獲取的環境變量依次為TEMP,?TMP,如果都失敗,則直接設置為/tmp; -
調用
ck_alloc()函數為as_params參數數組分配內存,大小為(argc + 32) * 8; -
設置
afl-as路徑:as_params[0] = afl_as ? afl_as : (u8*)"as"; -
設置
as_params[argc] = 0;,as_par_cnt 初始值為1; -
遍歷從
argv[1]到argv[argc-1]之前的每個 argv: -
如果存在字符串
--64, 則設置use_64bit?= 1;如果存在字符串--32,則設置use_64bit = 0。對于__APPLE__,如果存在-arch x86_64,設置use_64bit=1,并跳過-q和-Q選項; -
as_params[as_par_cnt++] = argv[i],設置as_params的值為argv對應的參數值 -
開始設置其他參數:
-
對于
__APPLE__,如果設置了use_clang_as,則追加-c?-x?assembler; -
設置
input_file變量:input_file = argv[argc - 1];,把最后一個參數的值作為input_file;-
如果
input_file的首字符為-:- 如果后續為
-version,則just_version?= 1,modified_file?= input_file,然后跳轉到wrap_things_up。這里就只是做version的查詢; - 如果后續不為
-version,拋出異常;
- 如果后續為
-
如果
input_file首字符不為-,比較input_file和tmp_dir、/var/tmp、/tmp/的前strlen(tmp_dir)/9/5個字節是否相同,如果不相同,就設置pass_thru為1;
-
-
設置
modified_file:modified_file = alloc_printf("%s/.afl-%u-%u.s", tmp_dir, getpid(), (u32)time(NULL));,即為tmp_dir/afl-pid-tim.s格式的字符串- 設置
as_params[as_par_cnt++] = modified_file,as_params[as_par_cnt] = NULL;。
- 設置
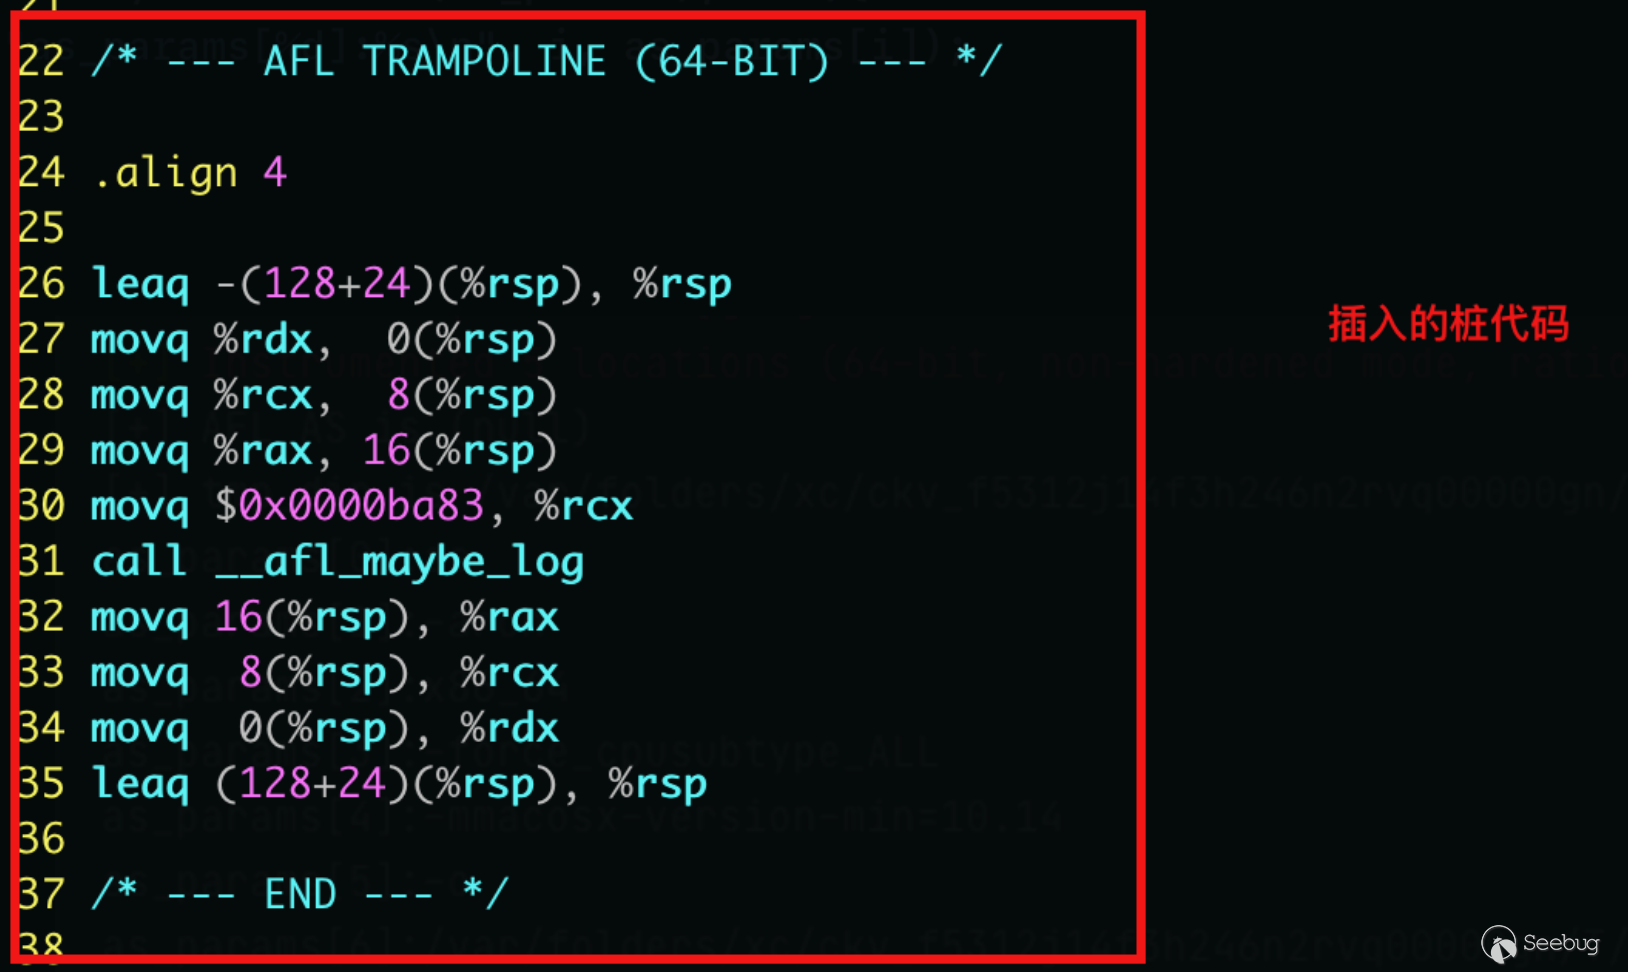
3. instrumentation trampoline 和 main_payload
trampoline 的含義是“蹦床”,直譯過來就是“插樁蹦床”。個人感覺直接使用英文更能表達出其代表的真實含義和作用,可以簡單理解為樁代碼。
1. trampoline_fmt_64/32
根據前面內容知道,在64位環境下,AFL會插入 trampoline_fmt_64 到文件中,在32位環境下,AFL會插入trampoline_fmt_32 到文件中。trampoline_fmt_64/32定義在 afl-as.h 頭文件中:
static const u8* trampoline_fmt_32 =
"\n"
"/* --- AFL TRAMPOLINE (32-BIT) --- */\n"
"\n"
".align 4\n"
"\n"
"leal -16(%%esp), %%esp\n"
"movl %%edi, 0(%%esp)\n"
"movl %%edx, 4(%%esp)\n"
"movl %%ecx, 8(%%esp)\n"
"movl %%eax, 12(%%esp)\n"
"movl $0x%08x, %%ecx\n" // 向ecx中存入識別代碼塊的隨機樁代碼id
"call __afl_maybe_log\n" // 調用 __afl_maybe_log 函數
"movl 12(%%esp), %%eax\n"
"movl 8(%%esp), %%ecx\n"
"movl 4(%%esp), %%edx\n"
"movl 0(%%esp), %%edi\n"
"leal 16(%%esp), %%esp\n"
"\n"
"/* --- END --- */\n"
"\n";
static const u8* trampoline_fmt_64 =
"\n"
"/* --- AFL TRAMPOLINE (64-BIT) --- */\n"
"\n"
".align 4\n"
"\n"
"leaq -(128+24)(%%rsp), %%rsp\n"
"movq %%rdx, 0(%%rsp)\n"
"movq %%rcx, 8(%%rsp)\n"
"movq %%rax, 16(%%rsp)\n"
"movq $0x%08x, %%rcx\n" // 64位下使用的寄存器為rcx
"call __afl_maybe_log\n" // 調用 __afl_maybe_log 函數
"movq 16(%%rsp), %%rax\n"
"movq 8(%%rsp), %%rcx\n"
"movq 0(%%rsp), %%rdx\n"
"leaq (128+24)(%%rsp), %%rsp\n"
"\n"
"/* --- END --- */\n"
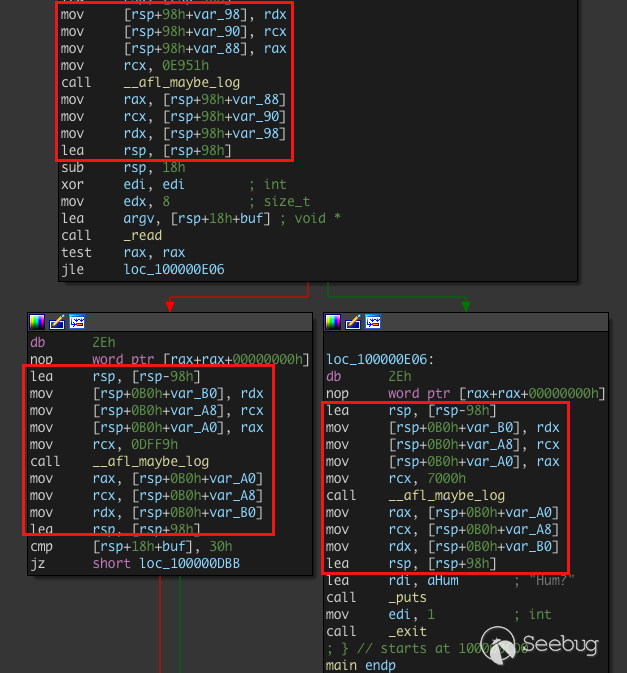
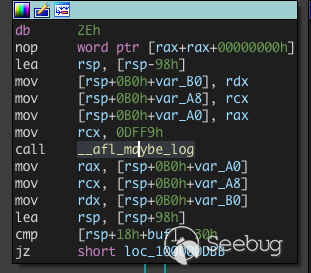
"\n";上面列出的插樁代碼與我們在 .s 文件和IDA逆向中看到的插樁代碼是一樣的:
.s 文件中的樁代碼:
IDA逆向中顯示的樁代碼:
上述代碼執行的主要功能包括:
- 保存
rdx、rcx、rax寄存器 - 將
rcx的值設置為fprintf()函數將要打印的變量內容 - 調用
__afl_maybe_log函數 - 恢復寄存器
在以上的功能中, __afl_maybe_log 才是核心內容。
從 __afl_maybe_log 函數開始,后續的處理流程大致如下(圖片來自ScUpax0s師傅):
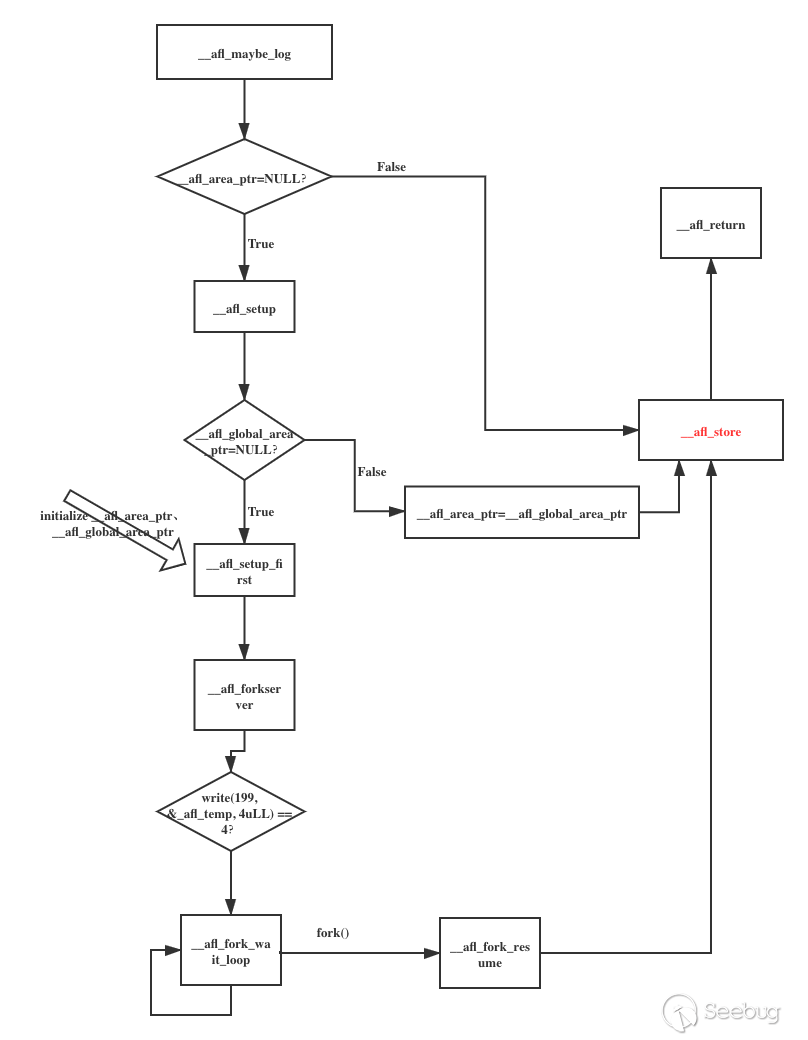
首先對上面流程中涉及到的幾個bss段的變量進行簡單說明(以64位為例,從main_payload_64中提取):
.AFL_VARS:

  .comm   __afl_area_ptr, 8
  .comm   __afl_prev_loc, 8
  .comm   __afl_fork_pid, 4
  .comm   __afl_temp, 4
  .comm   __afl_setup_failure, 1
.comm __afl_global_area_ptr, 8, 8__afl_area_ptr:共享內存地址;__afl_prev_loc:上一個插樁位置(id為R(100)隨機數的值);__afl_fork_pid:由fork產生的子進程的pid;__afl_temp:緩沖區;__afl_setup_failure:標志位,如果置位則直接退出;__afl_global_area_ptr:全局指針。
說明
以下介紹的指令段均來自于 main_payload_64 。
2. __afl_maybe_log
__afl_maybe_log:   /* 源碼刪除無關內容后 */

  lahf
  seto  %al

  /* Check if SHM region is already mapped. */

  movq  __afl_area_ptr(%rip), %rdx
  testq %rdx, %rdx
  je    __afl_setup
首先,使用 lahf 指令(加載狀態標志位到AH)將EFLAGS寄存器的低八位復制到 AH,被復制的標志位包括:符號標志位(SF)、零標志位(ZF)、輔助進位標志位(AF)、奇偶標志位(PF)和進位標志位(CF),使用該指令可以方便地將標志位副本保存在變量中;
然后,使用 seto 指令溢出置位;
接下來檢查共享內存是否進行了設置,判斷 __afl_area_ptr 是否為NULL:
- 如果為NULL,跳轉到
__afl_setup函數進行設置; - 如果不為NULL,繼續進行。
3. __afl_setup
__afl_setup:

        /* Do not retry setup is we had previous failues. */
        cmpb $0, __afl_setup_failure(%rip)
        jne __afl_return

        /* Check out if we have a global pointer on file. */
        movq __afl_global_area_ptr(%rip), %rdx
        testq %rdx, %rdx
        je __afl_setup_first

        movq %rdx, __afl_area_ptr(%rip)
        jmp  __afl_store
該部分的主要作用為初始化 __afl_area_ptr ,且只在運行到第一個樁時進行本次初始化。
首先,如果 __afl_setup_failure 不為0,直接跳轉到 __afl_return 返回;
然后,檢查 __afl_global_area_ptr 文件指針是否為NULL:
- 如果為NULL,跳轉到
__afl_setup_first進行接下來的工作; - 如果不為NULL,將
__afl_global_area_ptr的值賦給__afl_area_ptr,然后跳轉到__afl_store。
4. __afl_setup_first
__afl_setup_first:

  /* Save everything that is not yet saved and that may be touched by
     getenv() and several other libcalls we'll be relying on. */

  leaq -352(%rsp), %rsp

  movq %rax,   0(%rsp)
  movq %rcx,   8(%rsp)
  movq %rdi,  16(%rsp)
  movq %rsi,  32(%rsp)
  movq %r8,   40(%rsp)
  movq %r9,   48(%rsp)
  movq %r10,  56(%rsp)
  movq %r11,  64(%rsp)

  movq %xmm0,  96(%rsp)
  movq %xmm1,  112(%rsp)
  movq %xmm2,  128(%rsp)
  movq %xmm3,  144(%rsp)
  movq %xmm4,  160(%rsp)
  movq %xmm5,  176(%rsp)
  movq %xmm6,  192(%rsp)
  movq %xmm7,  208(%rsp)
  movq %xmm8,  224(%rsp)
  movq %xmm9,  240(%rsp)
  movq %xmm10, 256(%rsp)
  movq %xmm11, 272(%rsp)
  movq %xmm12, 288(%rsp)
  movq %xmm13, 304(%rsp)
  movq %xmm14, 320(%rsp)
  movq %xmm15, 336(%rsp)

  /* Map SHM, jumping to __afl_setup_abort if something goes wrong. */

  /* The 64-bit ABI requires 16-byte stack alignment. We'll keep the
     original stack ptr in the callee-saved r12. */

  pushq %r12
  movq  %rsp, %r12
  subq  $16, %rsp
  andq  $0xfffffffffffffff0, %rsp

  leaq .AFL_SHM_ENV(%rip), %rdi
call _getenv

  testq %rax, %rax
  je    __afl_setup_abort

  movq  %rax, %rdi
call _atoi

  xorq %rdx, %rdx   /* shmat flags    */
  xorq %rsi, %rsi   /* requested addr */
  movq %rax, %rdi   /* SHM ID         */
call _shmat

  cmpq $-1, %rax
  je   __afl_setup_abort

  /* Store the address of the SHM region. */

  movq %rax, %rdx
  movq %rax, __afl_area_ptr(%rip)

  movq %rax, __afl_global_area_ptr(%rip)
  movq %rax, %rdx
首先,保存所有寄存器的值,包括 xmm 寄存器組;
然后,進行 rsp 的對齊;
然后,獲取環境變量 __AFL_SHM_ID,該環境變量保存的是共享內存的ID:
- 如果獲取失敗,跳轉到
__afl_setup_abort; - 如果獲取成功,調用
_shmat,啟用對共享內存的訪問,啟用失敗跳轉到__afl_setup_abort。
接下來,將 _shmat 返回的共享內存地址存儲在 __afl_area_ptr 和 __afl_global_area_ptr 變量中。
后面即開始運行 __afl_forkserver。
5. __afl_forkserver
__afl_forkserver:

     /* Enter the fork server mode to avoid the overhead of execve() calls. We
     push rdx (area ptr) twice to keep stack alignment neat. */

  pushq %rdx
  pushq %rdx

  /* Phone home and tell the parent that we're OK. (Note that signals with
     no SA_RESTART will mess it up). If this fails, assume that the fd is
     closed because we were execve()d from an instrumented binary, or because
     the parent doesn't want to use the fork server. */

  movq $4, %rdx               /* length    */
  leaq __afl_temp(%rip), %rsi /* data      */
  movq $" STRINGIFY((FORKSRV_FD + 1)) ", %rdi       /* file desc */
CALL_L64("write")

  cmpq $4, %rax
  jne  __afl_fork_resume
這一段實現的主要功能是向 FORKSRV_FD+1 (也就是198+1)號描述符(即狀態管道)中寫 __afl_temp 中的4個字節,告訴 fork server (將在后續的文章中進行詳細解釋)已經成功啟動。
6. __afl_fork_wait_loop
__afl_fork_wait_loop:

  /* Wait for parent by reading from the pipe. Abort if read fails. */

  movq $4, %rdx               /* length    */
  leaq __afl_temp(%rip), %rsi /* data      */
  movq $" STRINGIFY(FORKSRV_FD) ", %rdi            /* file desc */
CALL_L64("read")
  cmpq $4, %rax
  jne  __afl_die

  /* Once woken up, create a clone of our process. This is an excellent use
     case for syscall(__NR_clone, 0, CLONE_PARENT), but glibc boneheadedly
     caches getpid() results and offers no way to update the value, breaking
     abort(), raise(), and a bunch of other things :-( */

CALL_L64("fork")
  cmpq $0, %rax
  jl   __afl_die
  je   __afl_fork_resume

  /* In parent process: write PID to pipe, then wait for child. */

  movl %eax, __afl_fork_pid(%rip)

  movq $4, %rdx                   /* length    */
  leaq __afl_fork_pid(%rip), %rsi /* data      */
  movq $" STRINGIFY((FORKSRV_FD + 1)) ", %rdi             /* file desc */
CALL_L64("write")

  movq $0, %rdx                   /* no flags  */
  leaq __afl_temp(%rip), %rsi     /* status    */
  movq __afl_fork_pid(%rip), %rdi /* PID       */
CALL_L64("waitpid")
  cmpq $0, %rax
  jle  __afl_die

  /* Relay wait status to pipe, then loop back. */

  movq $4, %rdx               /* length    */
  leaq __afl_temp(%rip), %rsi /* data      */
  movq $" STRINGIFY((FORKSRV_FD + 1)) ", %rdi         /* file desc */
CALL_L64("write")

jmp __afl_fork_wait_loop- 等待fuzzer通過控制管道發送過來的命令,讀入到
__afl_temp中: - 讀取失敗,跳轉到
__afl_die,結束循環; - 讀取成功,繼續;
- fork 一個子進程,子進程執行
__afl_fork_resume; - 將子進程的pid賦給
__afl_fork_pid,并寫到狀態管道中通知父進程; - 等待子進程執行完成,寫入狀態管道告知 fuzzer;
- 重新執行下一輪
__afl_fork_wait_loop。
7. __afl_fork_resume
__afl_fork_resume:

/* In child process: close fds, resume execution. */

  movq $" STRINGIFY(FORKSRV_FD) ", %rdi
CALL_L64("close")

  movq $(" STRINGIFY(FORKSRV_FD) " + 1), %rdi
CALL_L64("close")

  popq %rdx
  popq %rdx

  movq %r12, %rsp
  popq %r12

  movq  0(%rsp), %rax
  movq  8(%rsp), %rcx
  movq 16(%rsp), %rdi
  movq 32(%rsp), %rsi
  movq 40(%rsp), %r8
  movq 48(%rsp), %r9
  movq 56(%rsp), %r10
  movq 64(%rsp), %r11

  movq  96(%rsp), %xmm0
  movq 112(%rsp), %xmm1
  movq 128(%rsp), %xmm2
  movq 144(%rsp), %xmm3
  movq 160(%rsp), %xmm4
  movq 176(%rsp), %xmm5
  movq 192(%rsp), %xmm6
  movq 208(%rsp), %xmm7
  movq 224(%rsp), %xmm8
  movq 240(%rsp), %xmm9
  movq 256(%rsp), %xmm10
  movq 272(%rsp), %xmm11
  movq 288(%rsp), %xmm12
  movq 304(%rsp), %xmm13
  movq 320(%rsp), %xmm14
  movq 336(%rsp), %xmm15

  leaq 352(%rsp), %rsp

jmp __afl_store- 關閉子進程中的fd;
- 恢復子進程的寄存器狀態;
- 跳轉到
__afl_store執行。
8. __afl_store
__afl_store:

  /* Calculate and store hit for the code location specified in rcx. */

  xorq __afl_prev_loc(%rip), %rcx
  xorq %rcx, __afl_prev_loc(%rip)
  shrq $1, __afl_prev_loc(%rip)

  incb (%rdx, %rcx, 1)
我們直接看反編譯的代碼:
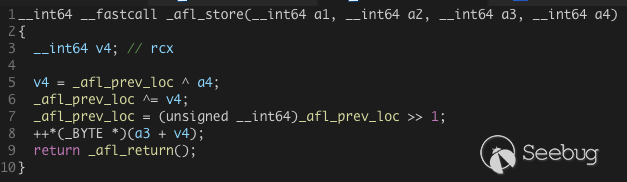
這里第一步的異或中的 a4 ,其實是調用 __afl_maybe_log 時傳入 的參數:

再往上追溯到插樁代碼:
可以看到傳入 rcx 的,實際上就是用于標記當前樁的隨機id, 而 _afl_prev_loc 其實是上一個樁的隨機id。
經過兩次異或之后,再將 _afl_prev_loc 右移一位作為新的 _afl_prev_loc,最后再共享內存中存儲當前插樁位置的地方計數加一。
二、AFL 的插樁 —— llvm_mode
(一)、LLVM 前置知識
LLVM 主要為了解決編譯時多種多樣的前端和后端導致編譯環境復雜、苛刻的問題,其核心為設計了一個稱為 LLVM?IR 的中間表示,并以庫的形式提供一些列接口,以提供諸如操作 IR 、生成目標平臺代碼等等后端的功能。其整體架構如下所示:
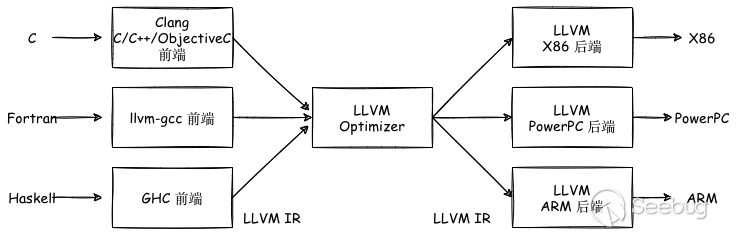
不同的前端和后端使用統一的中間代碼LLVM InterMediate Representation(LLVM IR),其結果就是如果需要支持一門新的編程語言,只需要實現一個新的前端;如果需要支持一款新的硬件設備,只需要實現一個新的后端;優化階段為通用階段,針對統一的 LLVM IR ,與新的編程語言和硬件設備無關。
GCC 的前后端耦合在一起,沒有進行分離,所以GCC為了支持一門新的編程語言或一個新的硬件設備,需要重新開發前端到后端的完整過程。
Clang 是 LLVM 項目的一個子項目,它是 LLVM 架構下的 C/C++/Objective-C 的編譯器,是 LLVM 前端的一部分。相較于GCC,具備編譯速度快、占用內存少、模塊化設計、診斷信息可讀性強、設計清晰簡單等優點。
最終從源碼到機器碼的流程如下(以 Clang 做編譯器為例):

(LLVM Pass 是一些中間過程處理 IR 的可以用戶自定義的內容,可以用來遍歷、修改 IR 以達到插樁、優化、靜態分析等目的。)
代碼首先由編譯器前端clang處理后得到中間代碼IR,然后經過各 LLVM Pass 進行優化和轉換,最終交給編譯器后端生成機器碼。
(二)、 AFL的afl-clang-fast
1. 概述
AFL的 llvm_mode 可以實現編譯器級別的插樁,可以替代 afl-gcc 或 afl-clang 使用的比較“粗暴”的匯編級別的重寫的方法,且具備如下幾個優勢:
- 編譯器可以進行很多優化以提升效率;
- 可以實現CPU無關,可以在非 x86 架構上進行fuzz;
- 可以更好地處理多線程目標。
在AFL的 llvm_mode 文件夾下包含3個文件: afl-clang-fast.c ,?afl-llvm-pass.so.cc,?afl-llvm-rt.o.c。
afl-llvm-rt.o.c 文件主要是重寫了 afl-as.h 文件中的 main_payload 部分,方便調用;
afl-llvm-pass.so.cc 文件主要是當通過 afl-clang-fast 調用 clang 時,這個pass被插入到 LLVM 中,告訴編譯器添加與 `afl-as.h 中大致等效的代碼;
afl-clang-fast.c 文件本質上是 clang 的 wrapper,最終調用的還是 clang 。但是與 afl-gcc 一樣,會進行一些參數處理。
llvm_mode 的插樁思路就是通過編寫pass來實現信息記錄,對每個基本塊都插入探針,具體代碼在 afl-llvm-pass.so.cc 文件中,初始化和forkserver操作通過鏈接完成。
2. 源碼
1. afl-clang-fast.c
1. main 函數
main 函數的全部邏輯如下:
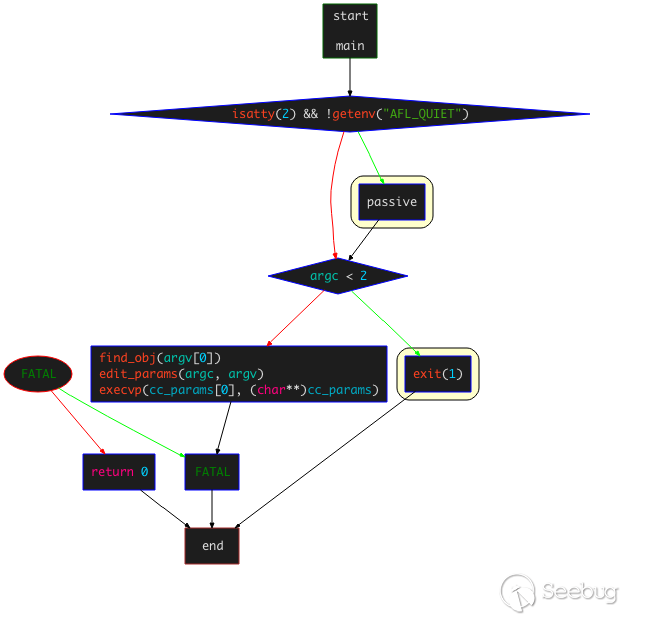
主要是對 find_obj(),?edit_params(),?execvp() 函數的調用,
其中主要有以下三個函數的調用:
find_obj(argv[0]):查找運行時libraryedit_params(argc, argv):處理傳入的編譯參數,將確定好的參數放入cc_params[]數組execvp(cc_params[0], (cahr**)cc_params):替換進程空間,傳遞參數,執行要調用的clang
這里后兩個函數的作用與 afl-gcc.c 中的作用基本相同,只是對參數的處理過程存在不同,不同的主要是 find_obj() 函數。
2. find_obj 函數
find_obj()函數的控制流邏輯如下:
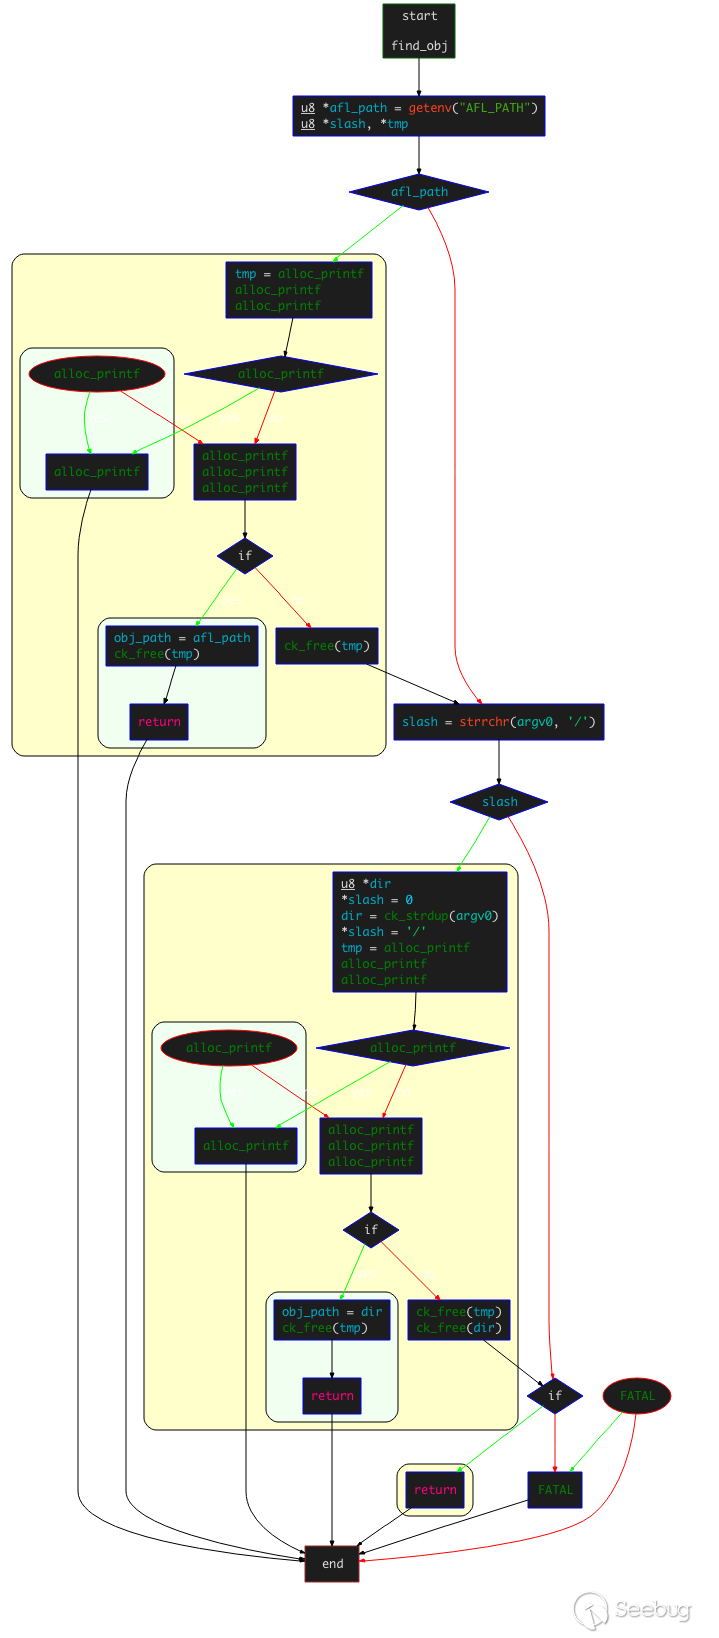
- 首先,讀取環境變量
AFL_PATH的值: - 如果讀取成功,確認
AFL_PATH/afl-llvm-rt.o是否可以訪問;如果可以訪問,設置該目錄為obj_path,然后直接返回; - 如果讀取失敗,檢查
arg0中是否存在/字符,如果存在,則判斷最后一個/前面的路徑為 AFL 的根目錄;然后讀取afl-llvm-rt.o文件,成功讀取,設置該目錄為obj_path,然后直接返回。 - 如果上面兩種方式都失敗,到
/usr/local/lib/afl目錄下查找是否存在afl-llvm-rt.o,如果存在,則設置為obj_path并直接返回(之所以向該路徑下尋找,是因為默認的AFL的MakeFile在編譯時,會定義一個名為AFL_PATH的宏,該宏會指向該路徑); - 如果以上全部失敗,拋出異常提示找不到
afl-llvm-rt.o文件或afl-llvm-pass.so文件,并要求設置AFL_PATH環境變量 。
函數的主要功能是在尋找AFL的路徑以找到 afl-llvm-rt.o 文件,該文件即為要用到的運行時庫。
3. edit_params 函數
該函數的主要作用仍然為編輯參數數組,其控制流程如下:

-
首先,判斷執行的是否為
afl-clang-fast++: -
如果是,設置
cc_params[0]為環境變量AFL_CXX;如果環境變量為空,則設置為clang++; -
如果不是,設置
cc_params[0]為環境變量AFL_CC;如果環境變量為空,則設置為clang; -
判斷是否定義了
USE_TRACE_PC宏,如果有,添加-fsanitize-coverage=trace-pc-guard -mllvm(only Android) -sanitizer-coverage-block-threshold=0(only Android)選項到參數數組;如果沒有,依次將-Xclang -load -Xclang obj_path/afl-llvm-pass.so -Qunused-arguments選項添加到參數數組;(這里涉及到llvm_mode使用的2種插樁方式:默認使用的是傳統模式,使用afl-llvm-pass.so注入來進行插樁,這種方式較為穩定;另外一種是處于實驗階段的方式——trace-pc-guard模式,對于該模式的詳細介紹可以參考llvm相關文檔——tracing-pcs-with-guards) -
遍歷傳遞給
afl-clang-fast的參數,進行一定的檢查和設置,并添加到cc_params數組: -
如果存在
-m32或armv7a-linux-androideabi,設置bit_mode為32; - 如果存在
-m64,設置bit_mode為64; - 如果存在
-x,設置x_set為1; - 如果存在
-fsanitize=address或-fsanitize=memory,設置asan_set為1; -
如果存在
-Wl,-z,defs或-Wl,--no-undefined,則直接pass掉。 -
檢查環境變量是否設置了
AFL_HARDEN: -
如果有,添加
-fstack-protector-all選項; -
如果有且沒有設置
FORTIFY_SOURCE,添加-D_FORTIFY_SOURCE=2選項; -
檢查參數中是否存在
-fsanitize=memory,即asan_set為0: -
如果沒有,嘗試讀取環境變量
AFL_USE_ASAN,如果存在,添加-U_FORTIFY_SOURCE -fsanitize=address; -
接下來對環境變量
AFL_USE_MSAN的處理方式與AFL_USE_ASAN類似,添加的選項為-U_FORTIFY_SOURCE?-fsanitize=memory; -
檢查是否定義了
USE_TRACE_PC宏,如果存在定義,檢查是否存在環境變量AFL_INST_RATIO,如果存在,拋出異常AFL_INST_RATIO無法在trace-pc時使用; - 檢查環境變量
AFL_NO_BUILTIN,如果沒有設置,添加-g?-O3?-funroll-loops; - 檢查環境變量
AFL_NO_BUILTIN,如果進行了設置,添加-fno-builtin-strcmp -fno-builtin-strncmp -fno-builtin-strcasecmp -fno-builtin-strcasecmp -fno-builtin-memcmp; - 添加參數
-D__AFL_HAVE_MANUAL_CONTROL=1?-D__AFL_COMPILER=1 -DFUZZING_BUILD_MODE_UNSAFE_FOR_PRODUCTION=1; - 定義了兩個宏
__AFL_LOOP(),?__AFL_INIT(); - 檢查是否設置了
x_set, 如果有添加-x?none; - 檢查是否設置了宏
__ANDORID__,如果沒有,判斷bit_mode的值: - 如果為0,即沒有
-m32和-m64,添加obj_path/afl-llvm-rt.o; - 如果為32,添加
obj_path/afl-llvm-rt-32.o; - 如果為64,添加
obj_path/afl-llvm-rt-64.o。
2. afl-llvm-pass.so.cc
afl-llvm-pass.so.cc 文件實現了 LLVM-mode 下的一個插樁 LLVM Pass。
本文不過多關心如何實現一個LLVM Pass,重點分析該pass的實現邏輯。
該文件只有一個Transform?pass:?AFLCoverage,繼承自 ModulePass,實現了一個 runOnModule 函數,這也是我們需要重點分析的函數。
namespace {

  class AFLCoverage : public ModulePass {

    public:

      static char ID;
      AFLCoverage() : ModulePass(ID) { }

      bool runOnModule(Module &M) override;

      // StringRef getPassName() const override {
      //  return "American Fuzzy Lop Instrumentation";
      // }

  };

}
1. pass注冊
對pass進行注冊的部分源碼如下:
static void registerAFLPass(const PassManagerBuilder &,
                            legacy::PassManagerBase &PM) {

  PM.add(new AFLCoverage());

}


static RegisterStandardPasses RegisterAFLPass(
    PassManagerBuilder::EP_ModuleOptimizerEarly, registerAFLPass);

static RegisterStandardPasses RegisterAFLPass0(
    PassManagerBuilder::EP_EnabledOnOptLevel0, registerAFLPass);
其核心功能為向PassManager注冊新的pass,每個pass相互獨立。
對于pass注冊的細節部分請讀者自行研究llvm的相關內容。
2. runOnModule 函數
該函數為該文件中的關鍵函數,其控制流程圖如下:
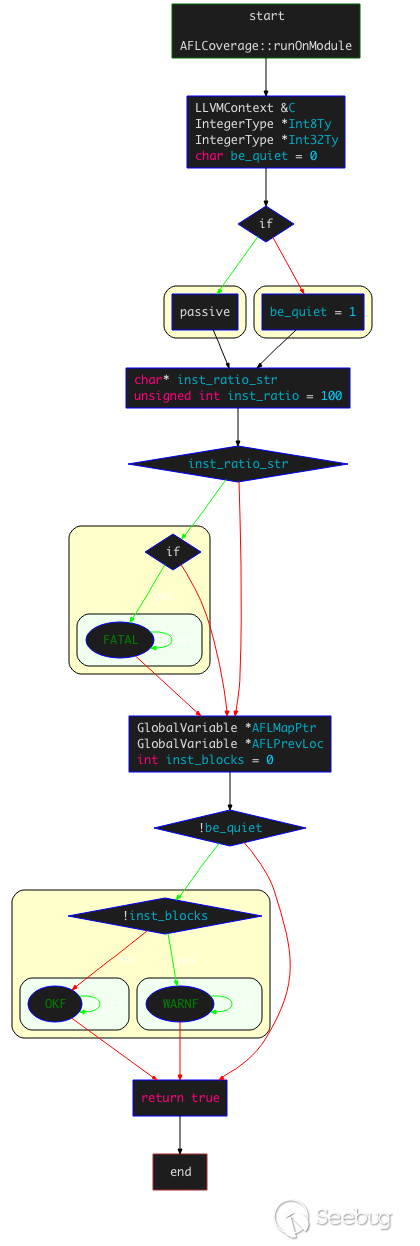
- 首先,通過
getContext()來獲取LLVMContext,獲取進程上下文:
```c LLVMContext &C = M.getContext();
IntegerType Int8Ty = IntegerType::getInt8Ty(C); IntegerType Int32Ty = IntegerType::getInt32Ty(C); ```
-
設置插樁密度:讀取環境變量
AFL_INST_RATIO,并賦值給inst_ratio,其值默認為100,范圍為 1~100,該值表示插樁概率; -
獲取只想共享內存shm的指針以及上一個基本塊的隨機ID:
```c GlobalVariable *AFLMapPtr = new GlobalVariable(M, PointerType::get(Int8Ty, 0), false, GlobalValue::ExternalLinkage, 0, "__afl_area_ptr");
GlobalVariable *AFLPrevLoc = new GlobalVariable( M, Int32Ty, false, GlobalValue::ExternalLinkage, 0, "__afl_prev_loc", 0, GlobalVariable::GeneralDynamicTLSModel, 0, false); ```
-
進入插樁過程:
-
通過
for循環遍歷每個BB(基本塊),尋找BB中適合插入樁代碼的位置,然后通過初始化IRBuilder實例執行插入;c BasicBlock::iterator IP = BB.getFirstInsertionPt(); IRBuilder<> IRB(&(*IP)); -
隨機創建當前BB的ID,然后插入load指令,獲取前一個BB的ID;
```c if (AFL_R(100) >= inst_ratio) continue; // 如果大于插樁密度,進行隨機插樁
/ Make up cur_loc /
unsigned int cur_loc = AFL_R(MAP_SIZE);
ConstantInt *CurLoc = ConstantInt::get(Int32Ty, cur_loc); // 隨機創建當前基本塊ID
/ Load prev_loc /
LoadInst PrevLoc = IRB.CreateLoad(AFLPrevLoc); PrevLoc->setMetadata(M.getMDKindID("nosanitize"), MDNode::get(C, None)); Value PrevLocCasted = IRB.CreateZExt(PrevLoc, IRB.getInt32Ty()); // 獲取上一個基本塊的隨機ID ```
-
插入load指令,獲取共享內存的地址,并調用
CreateGEP函數獲取共享內存中指定index的地址;```c / Load SHM pointer /
LoadInst MapPtr = IRB.CreateLoad(AFLMapPtr); MapPtr->setMetadata(M.getMDKindID("nosanitize"), MDNode::get(C, None)); Value MapPtrIdx = IRB.CreateGEP(MapPtr, IRB.CreateXor(PrevLocCasted, CurLoc)); ```
-
插入load指令,獲取對應index地址的值;插入add指令加一,然后創建store指令寫入新值,并更新共享內存;
```c / Update bitmap /
LoadInst Counter = IRB.CreateLoad(MapPtrIdx); Counter->setMetadata(M.getMDKindID("nosanitize"), MDNode::get(C, None)); Value Incr = IRB.CreateAdd(Counter, ConstantInt::get(Int8Ty, 1)); IRB.CreateStore(Incr, MapPtrIdx) ->setMetadata(M.getMDKindID("nosanitize"), MDNode::get(C, None)); ```
-
右移
cur_loc,插入store指令,更新__afl_prev_loc;```c / Set prev_loc to cur_loc >> 1 /
StoreInst *Store = IRB.CreateStore(ConstantInt::get(Int32Ty, cur_loc >> 1), AFLPrevLoc); Store->setMetadata(M.getMDKindID("nosanitize"), MDNode::get(C, None)); ```
-
最后對插樁計數加1;
-
掃描下一個BB,根據設置是否為quiet模式等,并判斷
inst_blocks是否為0,如果為0則說明沒有進行插樁;```c if (!be_quiet) {
if (!inst_blocks) WARNF("No instrumentation targets found.");
else OKF("Instrumented %u locations (%s mode, ratio %u%%).",
         inst_blocks, getenv("AFL_HARDEN") ? "hardened" :
         ((getenv("AFL_USE_ASAN") || getenv("AFL_USE_MSAN")) ?
          "ASAN/MSAN" : "non-hardened"), inst_ratio);
} ```
整個插樁過程較為清晰,沒有冗余動作和代碼。
3. afl-llvm-rt.o.c
該文件主要實現了llvm_mode的3個特殊功能:deferred?instrumentation,?persistent mode,trace-pc-guard?mode?。
1. deferred instrumentation
AFL會嘗試通過只執行一次目標二進制文件來提升性能,在 main() 之前暫停程序,然后克隆“主”進程獲得一個穩定的可進行持續fuzz的目標。簡言之,避免目標二進制文件的多次、重復的完整運行,而是采取了一種類似快照的機制。
雖然這種機制可以減少程序運行在操作系統、鏈接器和libc級別的消耗,但是在面對大型配置文件的解析時,優勢并不明顯。
在這種情況下,可以將 forkserver 的初始化放在大部分初始化工作完成之后、二進制文件解析之前來進行,這在某些情況下可以提升10倍以上的性能。我們把這種方式稱為LLVM模式下的 deferred?instrumentation。
首先,在代碼中尋找可以進行延遲克隆的合適的、不會破壞原二進制文件的位置,然后添加如下代碼:
#ifdef __AFL_HAVE_MANUAL_CONTROL
    __AFL_INIT();
#endif
以上代碼插入,在 afl-clang-fast.c 文件中有說明:
  cc_params[cc_par_cnt++] = "-D__AFL_INIT()="
    "do { static volatile char *_A __attribute__((used)); "
    " _A = (char*)\"" DEFER_SIG "\"; "
#ifdef __APPLE__
    "__attribute__((visibility(\"default\"))) "
    "void _I(void) __asm__(\"___afl_manual_init\"); "
#else
    "__attribute__((visibility(\"default\"))) "
    "void _I(void) __asm__(\"__afl_manual_init\"); "
#endif /* ^__APPLE__ */
__afl_manual_init() 函數實現如下:
/* This one can be called from user code when deferred forkserver mode
    is enabled. */

void __afl_manual_init(void) {

  static u8 init_done;

  if (!init_done) {

    __afl_map_shm();
    __afl_start_forkserver();
    init_done = 1;

  }

}
首先,判斷是否進行了初始化,沒有則調用 __afl_map_shm() 函數進行共享內存初始化。 __afl_map_shm() 函數如下:
/* SHM setup. */

static void __afl_map_shm(void) {

  u8 *id_str = getenv(SHM_ENV_VAR); // 讀取環境變量 SHM_ENV_VAR 獲取id

  if (id_str) { // 成功讀取id

    u32 shm_id = atoi(id_str);

    __afl_area_ptr = shmat(shm_id, NULL, 0); // 獲取shm地址,賦給 __afl_area_ptr

    /* Whooooops. */

    if (__afl_area_ptr == (void *)-1) _exit(1);  // 異常則退出

    /* Write something into the bitmap so that even with low AFL_INST_RATIO,
       our parent doesn't give up on us. */

    __afl_area_ptr[0] = 1; // 進行設置

  }

}
然后,調用 __afl_start_forkserver() 函數開始執行forkserver:
/* Fork server logic. */

static void __afl_start_forkserver(void) {

  static u8 tmp[4];
  s32 child_pid;

  u8  child_stopped = 0;

  /* Phone home and tell the parent that we're OK. If parent isn't there,
     assume we're not running in forkserver mode and just execute program. */

  if (write(FORKSRV_FD + 1, tmp, 4) != 4) return; // 寫入4字節到狀態管道,通知 fuzzer已準備完成

  while (1) {

    u32 was_killed;
    int status;

    /* Wait for parent by reading from the pipe. Abort if read fails. */

    if (read(FORKSRV_FD, &was_killed, 4) != 4) _exit(1);

    /* If we stopped the child in persistent mode, but there was a race
       condition and afl-fuzz already issued SIGKILL, write off the old
       process. */

      // 處于persistent mode且子進程已被killed
    if (child_stopped && was_killed) {
      child_stopped = 0;
      if (waitpid(child_pid, &status, 0) < 0) _exit(1);
    }

    if (!child_stopped) {

      /* Once woken up, create a clone of our process. */

      child_pid = fork(); // 重新fork
      if (child_pid < 0) _exit(1);

      /* In child process: close fds, resume execution. */

      if (!child_pid) {

        close(FORKSRV_FD); // 關閉fd,
        close(FORKSRV_FD + 1);
        return;

      }

    } else {

      /* Special handling for persistent mode: if the child is alive but
         currently stopped, simply restart it with SIGCONT. */

      // 子進程只是暫停,則進行重啟
      kill(child_pid, SIGCONT);
      child_stopped = 0;

    }

    /* In parent process: write PID to pipe, then wait for child. */

    if (write(FORKSRV_FD + 1, &child_pid, 4) != 4) _exit(1);

    if (waitpid(child_pid, &status, is_persistent ? WUNTRACED : 0) < 0)
      _exit(1);

    /* In persistent mode, the child stops itself with SIGSTOP to indicate
       a successful run. In this case, we want to wake it up without forking
       again. */

    if (WIFSTOPPED(status)) child_stopped = 1;

    /* Relay wait status to pipe, then loop back. */

    if (write(FORKSRV_FD + 1, &status, 4) != 4) _exit(1);

  }

}
上述邏輯可以概括如下:
-
首先,設置
child_stopped?= 0,寫入4字節到狀態管道,通知fuzzer已準備完成; -
進入
while,開啟fuzz循環: -
調用
read從控制管道讀取4字節,判斷子進程是否超時。如果管道內讀取失敗,發生阻塞,讀取成功則表示AFL指示forkserver執行fuzz; -
如果
child_stopped為0,則fork出一個子進程執行fuzz,關閉和控制管道和狀態管道相關的fd,跳出fuzz循環; -
如果
child_stopped為1,在persistent mode下進行的特殊處理,此時子進程還活著,只是被暫停了,可以通過kill(child_pid, SIGCONT)來簡單的重啟,然后設置child_stopped為0; - forkserver向狀態管道
FORKSRV_FD + 1寫入子進程的pid,然后等待子進程結束; WIFSTOPPED(status)宏確定返回值是否對應于一個暫停子進程,因為在persistent mode里子進程會通過SIGSTOP信號來暫停自己,并以此指示運行成功,我們需要通過SIGCONT信號來喚醒子進程繼續執行,不需要再進行一次fuzz,設置child_stopped為1;- 子進程結束后,向狀態管道
FORKSRV_FD + 1寫入4個字節,通知AFL本次執行結束。
2. persistent mode
persistent?mode 并沒有通過fork子進程的方式來執行fuzz。一些庫中提供的API是無狀態的,或者可以在處理不同輸入文件之間進行重置,恢復到之前的狀態。執行此類重置時,可以使用一個長期存活的進程來測試多個用例,以這種方式來減少重復的 fork() 調用和操作系統的開銷。不得不說,這種思路真的很優秀。
一個基礎的框架大概如下:
while (__AFL_LOOP(1000)) {

  /* Read input data. */
  /* Call library code to be fuzzed. */
  /* Reset state. */

}

/* Exit normally */
設置一個 while 循環,并指定循環次數。在每次循環內,首先讀取數據,然后調用想fuzz的庫代碼,然后重置狀態,繼續循環。(本質上也是一種快照。)
對于循環次數的設置,循環次數控制了AFL從頭重新啟動過程之前的最大迭代次數,較小的循環次數可以降低內存泄漏類故障的影響,官方建議的數值為1000。(循環次數設置過高可能出現較多意料之外的問題,并不建議設置過高。)
一個 persistent?mode 的樣例程序如下:
#include <stdio.h>
#include <stdlib.h>
#include <unistd.h>
#include <signal.h>
#include <string.h>


/* Main entry point. */

int main(int argc, char** argv) {

  char buf[100]; /* Example-only buffer, you'd replace it with other global or
                    local variables appropriate for your use case. */

  while (__AFL_LOOP(1000)) {

    /*** PLACEHOLDER CODE ***/

    /* STEP 1: 初始化所有變量 */

    memset(buf, 0, 100);

    /* STEP 2: 讀取輸入數據,從文件讀入時需要先關閉舊的fd然后重新打開文件*/

    read(0, buf, 100);

    /* STEP 3: 調用待fuzz的code*/

    if (buf[0] == 'f') {
      printf("one\n");
      if (buf[1] == 'o') {
        printf("two\n");
        if (buf[2] == 'o') {
          printf("three\n");
          if (buf[3] == '!') {
            printf("four\n");
            abort();
          }
        }
      }
    }

    /*** END PLACEHOLDER CODE ***/

  }

  /* 循環結束,正常結束。AFL會重啟進程,并清理內存、剩余fd等 */

  return 0;

}
宏定義 __AFL_LOOP 內部調用 __afl_persistent_loop 函數:
  cc_params[cc_par_cnt++] = "-D__AFL_LOOP(_A)="
    "({ static volatile char *_B __attribute__((used)); "
    " _B = (char*)\"" PERSIST_SIG "\"; "
#ifdef __APPLE__
    "__attribute__((visibility(\"default\"))) "
    "int _L(unsigned int) __asm__(\"___afl_persistent_loop\"); "
#else
    "__attribute__((visibility(\"default\"))) "
    "int _L(unsigned int) __asm__(\"__afl_persistent_loop\"); "
#endif /* ^__APPLE__ */
    "_L(_A); })";
__afl_persistent_loop(unsigned int max_cnt) 的邏輯如下:
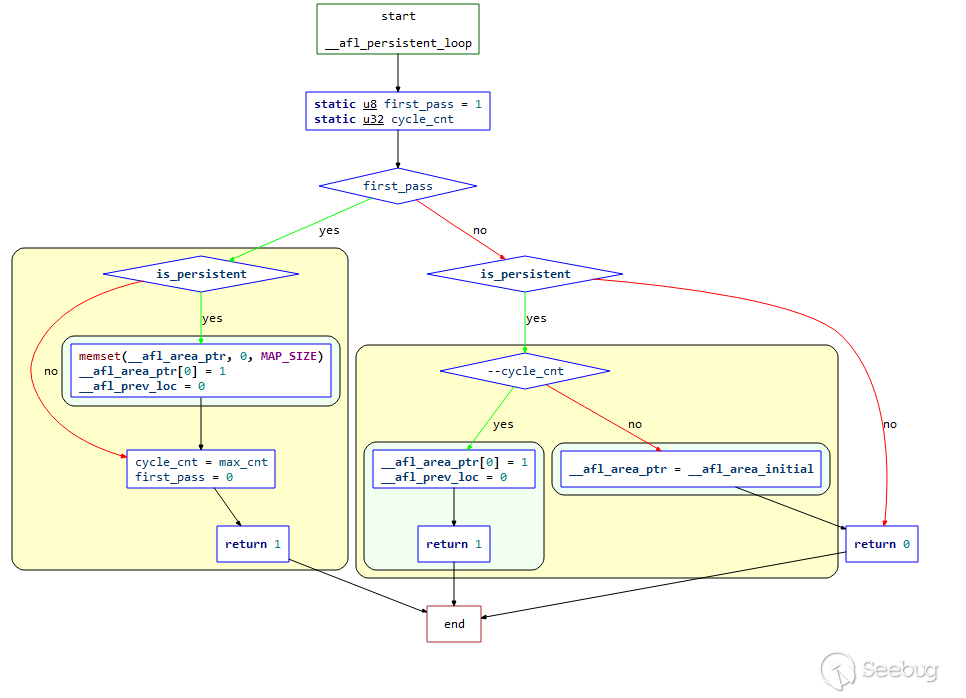
結合源碼梳理一下其邏輯:
/* A simplified persistent mode handler, used as explained in README.llvm. */

int __afl_persistent_loop(unsigned int max_cnt) {

  static u8  first_pass = 1;
  static u32 cycle_cnt;

  if (first_pass) {

    if (is_persistent) {

      memset(__afl_area_ptr, 0, MAP_SIZE);
      __afl_area_ptr[0] = 1;
      __afl_prev_loc = 0;
    }

    cycle_cnt  = max_cnt;
    first_pass = 0;
    return 1;

  }

  if (is_persistent) {

    if (--cycle_cnt) {

      raise(SIGSTOP);

      __afl_area_ptr[0] = 1;
      __afl_prev_loc = 0;

      return 1;

    } else {

      __afl_area_ptr = __afl_area_initial;

    }

  }

  return 0;

}-
首先判讀是否為第一次執行循環,如果是第一次:
-
如果
is_persistent為1,清空__afl_area_ptr,設置__afl_area_ptr[0]為1,__afl_prev_loc為0; -
設置
cycle_cnt的值為傳入的max_cnt參數,然后設置first_pass=0表示初次循環結束,返回1; -
如果不是第一次執行循環,在 persistent mode 下,且
--cycle_cnt大于1: -
發出信號
SIGSTOP讓當前進程暫停 -
設置
__afl_area_ptr[0]為1,__afl_prev_loc為0,然后直接返回1 -
如果
cycle_cnt為0,設置__afl_area_ptr指向數組__afl_area_initial。 -
最后返回0
重新總結一下上面的邏輯:
- 第一次執行loop循環,進行初始化,然后返回1,此時滿足
while(__AFL_LOOP(1000), 于是執行一次fuzz,計數器cnt減1,拋出SIGSTOP信號暫停子進程; - 第二次執行loop循環,恢復之前暫停的子進程繼續執行,并設置
child_stopped為0。此時相當于重新執行了一次程序,重新對__afl_prev_loc進行設置,隨后返回1,再次進入while(_AFL_LOOP(1000)),執行一次fuzz,計數器cnt減1,拋出SIGSTOP信號暫停子進程; - 第1000次執行,計數器cnt此時為0,不再暫停子進程,令
__afl_area_ptr指向無關數組__afl_area_initial,隨后子進程結束。
3. trace-pc-guard mode
該功能的使用需要設置宏 AFL_TRACE_PC=1 ,然后再執行 afl-clang-fast 時傳入參數 -fsanitize-coverage=trace-pc-guard 。
該功能的主要特點是會在每個edge插入樁代碼,函數 __sanitizer_cov_trace_pc_guard 會在每個edge進行調用,該函數利用函數參數 guard 指針所指向的 uint32 值來確定共享內存上所對應的地址:
void __sanitizer_cov_trace_pc_guard(uint32_t* guard) {
  __afl_area_ptr[*guard]++;
}
guard 的初始化位于函數 __sanitizer_cov_trace_pc_guard_init 中:
void __sanitizer_cov_trace_pc_guard_init(uint32_t* start, uint32_t* stop) {

  u32 inst_ratio = 100;
  u8* x;

  if (start == stop || *start) return;

  x = getenv("AFL_INST_RATIO");
  if (x) inst_ratio = atoi(x);

  if (!inst_ratio || inst_ratio > 100) {
    fprintf(stderr, "[-] ERROR: Invalid AFL_INST_RATIO (must be 1-100).\n");
    abort();
  }

  *(start++) = R(MAP_SIZE - 1) + 1;

  while (start < stop) { // 這里如果計算stop-start,就是程序里總計的edge數

    if (R(100) < inst_ratio) *start = R(MAP_SIZE - 1) + 1;
    else *start = 0;

    start++;

  }

}
三、AFL的fuzzer —— afl-fuzz.c
1. 、概述
AFL中最重要的部分便是fuzzer的實現部分——afl_fuzz.c ,其主要作用是通過不斷變異測試用例來影響程序的執行路徑。該文件代碼量在8000行左右,處于篇幅原因,我們不會對每一個函數進行源碼級分析,而是按照功能劃分,介紹其中的核心函數。該文件屬于AFL整個項目的核心中的核心,強烈建議通讀該文件。
在介紹源碼的同時,會穿插AFL的整體運行過程和設計思路,輔助理解源碼的設計思路。
在功能上,可以總體上分為3部分:
- 初始配置:進行fuzz環境配置相關工作
- fuzz執行:fuzz的主循環過程
- 變異策略:測試用例的變異過程和方式
我們將按照以上3個功能對其中的關鍵函數和流程進行分析。
2、核心源碼分析
1. 初始配置
1.1 第一個while循環
while ((opt = getopt(argc, argv, "+i:o:f:m:b:t:T:dnCB:S:M:x:QV")) > 0)
  ... ...
該循環主要通過 getopt 獲取各種環境配置、選項參數等。
1.2 setup_signal_handlers 函數
調用 sigaction ,注冊信號處理函數,設置信號句柄。具體的信號內容如下:
| 信號 | 作用 |
|---|---|
| SIGHUP/SIGINT/SIGTERM | 處理各種“stop”情況 |
| SIGALRM | 處理超時的情況 |
| SIGWINCH | 處理窗口大小 |
| SIGUSER1 | 用戶自定義信號,這里定義為skip request |
| SIGSTP/SIGPIPE | 不是很重要的一些信號,可以不用關心 |
1.3 check_asan_opts 函數
讀取環境變量 ASAN_OPTIONS 和 MSAN_OPTIONS,做一些必要性檢查。
1.4 fix_up_sync 函數
如果通過 -M或者-S指定了 sync_id,則更新 out_dir 和 sync_dir 的值:設置 sync_dir 的值為 out_dir,設置 out_dir 的值為out_dir/sync_id。
1.5 save_cmdline 函數
copy當前命令行參數,保存。
1.6 check_if_tty 函數
檢查是否在tty終端上面運行:讀取環境變量 AFL_NO_UI ,如果存在,設置 not_on_tty 為1,并返回;通過 ioctl 讀取window size,如果報錯為 ENOTTY,表示當前不在一個tty終端運行,設置 not_on_tty。
1.7 幾個CPU檢查相關的函數
static void get_core_count(void)get_core_count():獲取核心數量check_crash_handling():確保核心轉儲不會進入程序check_cpu_governor():檢查CPU管理者
1.8 setup_shm 函數
該函數用于設置共享內存和 virgin_bits,屬于比較重要的函數,這里我們結合源碼來解析一下:
/* Configure shared memory and virgin_bits. This is called at startup. */

EXP_ST void setup_shm(void) {

  u8* shm_str;

  if (!in_bitmap) memset(virgin_bits, 255, MAP_SIZE);
  // 如果 in_bitmap 為空,調用 memset 初始化數組 virgin_bits[MAP_SIZE] 的每個元素的值為 ‘255’。

  memset(virgin_tmout, 255, MAP_SIZE); // 調用 memset 初始化數組 virgin_tmout[MAP_SIZE] 的每個元素的值為 ‘255’。
  memset(virgin_crash, 255, MAP_SIZE); // 調用 memset 初始化數組 virgin_crash[MAP_SIZE] 的每個元素的值為 ‘255’。

  shm_id = shmget(IPC_PRIVATE, MAP_SIZE, IPC_CREAT | IPC_EXCL | 0600);
  // 調用 shmget 函數分配一塊共享內存,并將返回的共享內存標識符保存到 shm_id

  if (shm_id < 0) PFATAL("shmget() failed");

  atexit(remove_shm); // 注冊 atexit handler 為 remove_shm

  shm_str = alloc_printf("%d", shm_id); // 創建字符串 shm_str

  /* If somebody is asking us to fuzz instrumented binaries in dumb mode,
     we don't want them to detect instrumentation, since we won't be sending
     fork server commands. This should be replaced with better auto-detection
     later on, perhaps? */

  if (!dumb_mode) setenv(SHM_ENV_VAR, shm_str, 1);
  // 如果不是dumb_mode,設置環境變量 SHM_ENV_VAR 的值為 shm_str

  ck_free(shm_str);

  trace_bits = shmat(shm_id, NULL, 0);
  // 設置 trace_bits 并初始化為0

  if (trace_bits == (void *)-1) PFATAL("shmat() failed");

}
這里通過 trace_bits 和 virgin_bits 兩個 bitmap 來分別記錄當前的 tuple 信息及整體 tuple 信息,其中 trace_bits 位于共享內存上,便于進行進程間通信。通過 virgin_tmout 和 virgin_crash 兩個 bitmap 來記錄 fuzz 過程中出現的所有目標程序超時以及崩潰的 tuple 信息。
1.9 setup_dirs_fds 函數
該函數用于準備輸出文件夾和文件描述符,結合源碼進行解析:
EXP_ST void setup_dirs_fds(void) {

  u8* tmp;
  s32 fd;

  ACTF("Setting up output directories...");

  if (sync_id && mkdir(sync_dir, 0700) && errno != EEXIST)
      PFATAL("Unable to create '%s'", sync_dir);
  /* 如果sync_id,且創建sync_dir文件夾并設置權限為0700,如果報錯單errno不是 EEXIST ,拋出異常 */

  if (mkdir(out_dir, 0700)) { // 創建out_dir, 權限為0700

    if (errno != EEXIST) PFATAL("Unable to create '%s'", out_dir);

    maybe_delete_out_dir();

  } else {

    if (in_place_resume) // 創建成功
      FATAL("Resume attempted but old output directory not found");

    out_dir_fd = open(out_dir, O_RDONLY); // 以只讀模式打開,返回fd:out_dir_fd

#ifndef __sun

    if (out_dir_fd < 0 || flock(out_dir_fd, LOCK_EX | LOCK_NB))
      PFATAL("Unable to flock() output directory.");

#endif /* !__sun */

  }

  /* Queue directory for any starting & discovered paths. */

  tmp = alloc_printf("%s/queue", out_dir);
  if (mkdir(tmp, 0700)) PFATAL("Unable to create '%s'", tmp);
  // 創建 out_dir/queue 文件夾,權限為0700

  ck_free(tmp);

  /* Top-level directory for queue metadata used for session
     resume and related tasks. */

  tmp = alloc_printf("%s/queue/.state/", out_dir);

  // 創建 out_dir/queue/.state 文件夾,用于保存session resume 和相關tasks的隊列元數據。
  if (mkdir(tmp, 0700)) PFATAL("Unable to create '%s'", tmp);
  ck_free(tmp);

  /* Directory for flagging queue entries that went through
     deterministic fuzzing in the past. */

  tmp = alloc_printf("%s/queue/.state/deterministic_done/", out_dir);
  if (mkdir(tmp, 0700)) PFATAL("Unable to create '%s'", tmp);
  ck_free(tmp);

  /* Directory with the auto-selected dictionary entries. */

  tmp = alloc_printf("%s/queue/.state/auto_extras/", out_dir);
  if (mkdir(tmp, 0700)) PFATAL("Unable to create '%s'", tmp);
  ck_free(tmp);

  /* The set of paths currently deemed redundant. */

  tmp = alloc_printf("%s/queue/.state/redundant_edges/", out_dir);
  if (mkdir(tmp, 0700)) PFATAL("Unable to create '%s'", tmp);
  ck_free(tmp);

  /* The set of paths showing variable behavior. */

  tmp = alloc_printf("%s/queue/.state/variable_behavior/", out_dir);
  if (mkdir(tmp, 0700)) PFATAL("Unable to create '%s'", tmp);
  ck_free(tmp);

  /* Sync directory for keeping track of cooperating fuzzers. */

  if (sync_id) {

    tmp = alloc_printf("%s/.synced/", out_dir);

    if (mkdir(tmp, 0700) && (!in_place_resume || errno != EEXIST))
      PFATAL("Unable to create '%s'", tmp);

    ck_free(tmp);

  }

  /* All recorded crashes. */

  tmp = alloc_printf("%s/crashes", out_dir);
  if (mkdir(tmp, 0700)) PFATAL("Unable to create '%s'", tmp);
  ck_free(tmp);

  /* All recorded hangs. */

  tmp = alloc_printf("%s/hangs", out_dir);
  if (mkdir(tmp, 0700)) PFATAL("Unable to create '%s'", tmp);
  ck_free(tmp);

  /* Generally useful file descriptors. */

  dev_null_fd = open("/dev/null", O_RDWR);
  if (dev_null_fd < 0) PFATAL("Unable to open /dev/null");

  dev_urandom_fd = open("/dev/urandom", O_RDONLY);
  if (dev_urandom_fd < 0) PFATAL("Unable to open /dev/urandom");

  /* Gnuplot output file. */

  tmp = alloc_printf("%s/plot_data", out_dir);
  fd = open(tmp, O_WRONLY | O_CREAT | O_EXCL, 0600);
  if (fd < 0) PFATAL("Unable to create '%s'", tmp);
  ck_free(tmp);

  plot_file = fdopen(fd, "w");
  if (!plot_file) PFATAL("fdopen() failed");

  fprintf(plot_file, "# unix_time, cycles_done, cur_path, paths_total, "
                     "pending_total, pending_favs, map_size, unique_crashes, "
                     "unique_hangs, max_depth, execs_per_sec\n");
                     /* ignore errors */
該函數的源碼中,開發者對關鍵位置均做了清楚的注釋,很容易理解,不做過多解釋。
1.10 read_testcases 函數
該函數會將 in_dir 目錄下的測試用例掃描到 queue 中,并且區分該文件是否為經過確定性變異的input,如果是的話跳過,以節省時間。
調用函數 add_to_queue() 將測試用例排成queue隊列。該函數會在啟動時進行調用。
1.11 add_to_queue 函數
該函數主要用于將新的test case添加到隊列,初始化 fname 文件名稱,增加cur_depth 深度,增加 queued_paths 測試用例數量等。
首先,queue_entry 結構體定義如下:
struct queue_entry {

  u8* fname;                          /* File name for the test case      */
  u32 len;                            /* Input length                     */

  u8  cal_failed,                     /* Calibration failed?              */
      trim_done,                      /* Trimmed?                         */
      was_fuzzed,                     /* Had any fuzzing done yet?        */
      passed_det,                     /* Deterministic stages passed?     */
      has_new_cov,                    /* Triggers new coverage?           */
      var_behavior,                   /* Variable behavior?               */
      favored,                        /* Currently favored?               */
      fs_redundant;                   /* Marked as redundant in the fs?   */

  u32 bitmap_size,                    /* Number of bits set in bitmap     */
      exec_cksum;                     /* Checksum of the execution trace  */

  u64 exec_us,                        /* Execution time (us)              */
      handicap,                       /* Number of queue cycles behind    */
      depth;                          /* Path depth                       */

  u8* trace_mini;                     /* Trace bytes, if kept             */
  u32 tc_ref;                         /* Trace bytes ref count            */

  struct queue_entry *next,           /* Next element, if any             */
                     *next_100;       /* 100 elements ahead               */

};
然后在函數內部進行的相關操作如下:
/* Append new test case to the queue. */

static void add_to_queue(u8* fname, u32 len, u8 passed_det) {

  struct queue_entry* q = ck_alloc(sizeof(struct queue_entry));
  // 通過ck_alloc分配一個 queue_entry 結構體,并進行初始化

  q->fname        = fname;
  q->len          = len;
  q->depth        = cur_depth + 1;
  q->passed_det   = passed_det;

  if (q->depth > max_depth) max_depth = q->depth;

  if (queue_top) {

    queue_top->next = q;
    queue_top = q;

  } else q_prev100 = queue = queue_top = q;

  queued_paths++; // queue計數器加1
  pending_not_fuzzed++; // 待fuzz的樣例計數器加1

  cycles_wo_finds = 0;

  /* Set next_100 pointer for every 100th element (index 0, 100, etc) to allow faster iteration. */
  if ((queued_paths - 1) % 100 == 0 && queued_paths > 1) {

    q_prev100->next_100 = q;
    q_prev100 = q;

  }

  last_path_time = get_cur_time();

}
1.12 pivot_inputs 函數
在輸出目錄中為輸入測試用例創建硬鏈接。
1. 13 find_timeout 函數
變量 timeout_given 沒有被設置時,會調用到該函數。該函數主要是在沒有指定 -t 選項進行 resuming session 時,避免一次次地自動調整超時時間。
1.14 detect_file_args
識別參數中是否有“@@”,如果有,則替換為 out_dir/.cur_input ,沒有則返回:
/* Detect @@ in args. */

EXP_ST void detect_file_args(char** argv) {

  u32 i = 0;
  u8* cwd = getcwd(NULL, 0);

  if (!cwd) PFATAL("getcwd() failed");

  while (argv[i]) {

    u8* aa_loc = strstr(argv[i], "@@"); // 查找@@

    if (aa_loc) {

      u8 *aa_subst, *n_arg;

      /* If we don't have a file name chosen yet, use a safe default. */

      if (!out_file)
        out_file = alloc_printf("%s/.cur_input", out_dir);

      /* Be sure that we're always using fully-qualified paths. */

      if (out_file[0] == '/') aa_subst = out_file;
      else aa_subst = alloc_printf("%s/%s", cwd, out_file);

      /* Construct a replacement argv value. */

      *aa_loc = 0;
      n_arg = alloc_printf("%s%s%s", argv[i], aa_subst, aa_loc + 2);
      argv[i] = n_arg;
      *aa_loc = '@';

      if (out_file[0] != '/') ck_free(aa_subst);

    }
    i++;
  }
  free(cwd); /* not tracked */

}
1.15 check_binary 函數
檢查指定路徑要執行的程序是否存在,是否為shell腳本,同時檢查elf文件頭是否合法及程序是否被插樁。
2. 第一遍fuzz
2.1 檢查
調用 get_cur_time() 函數獲取開始時間,檢查是否處于 qemu_mode。
2.2 perform_dry_run 函數
該函數是AFL中的一個關鍵函數,它會執行 input 文件夾下的預先準備的所有測試用例,生成初始化的 queue 和 bitmap,只對初始輸入執行一次。函數控制流程圖如下:
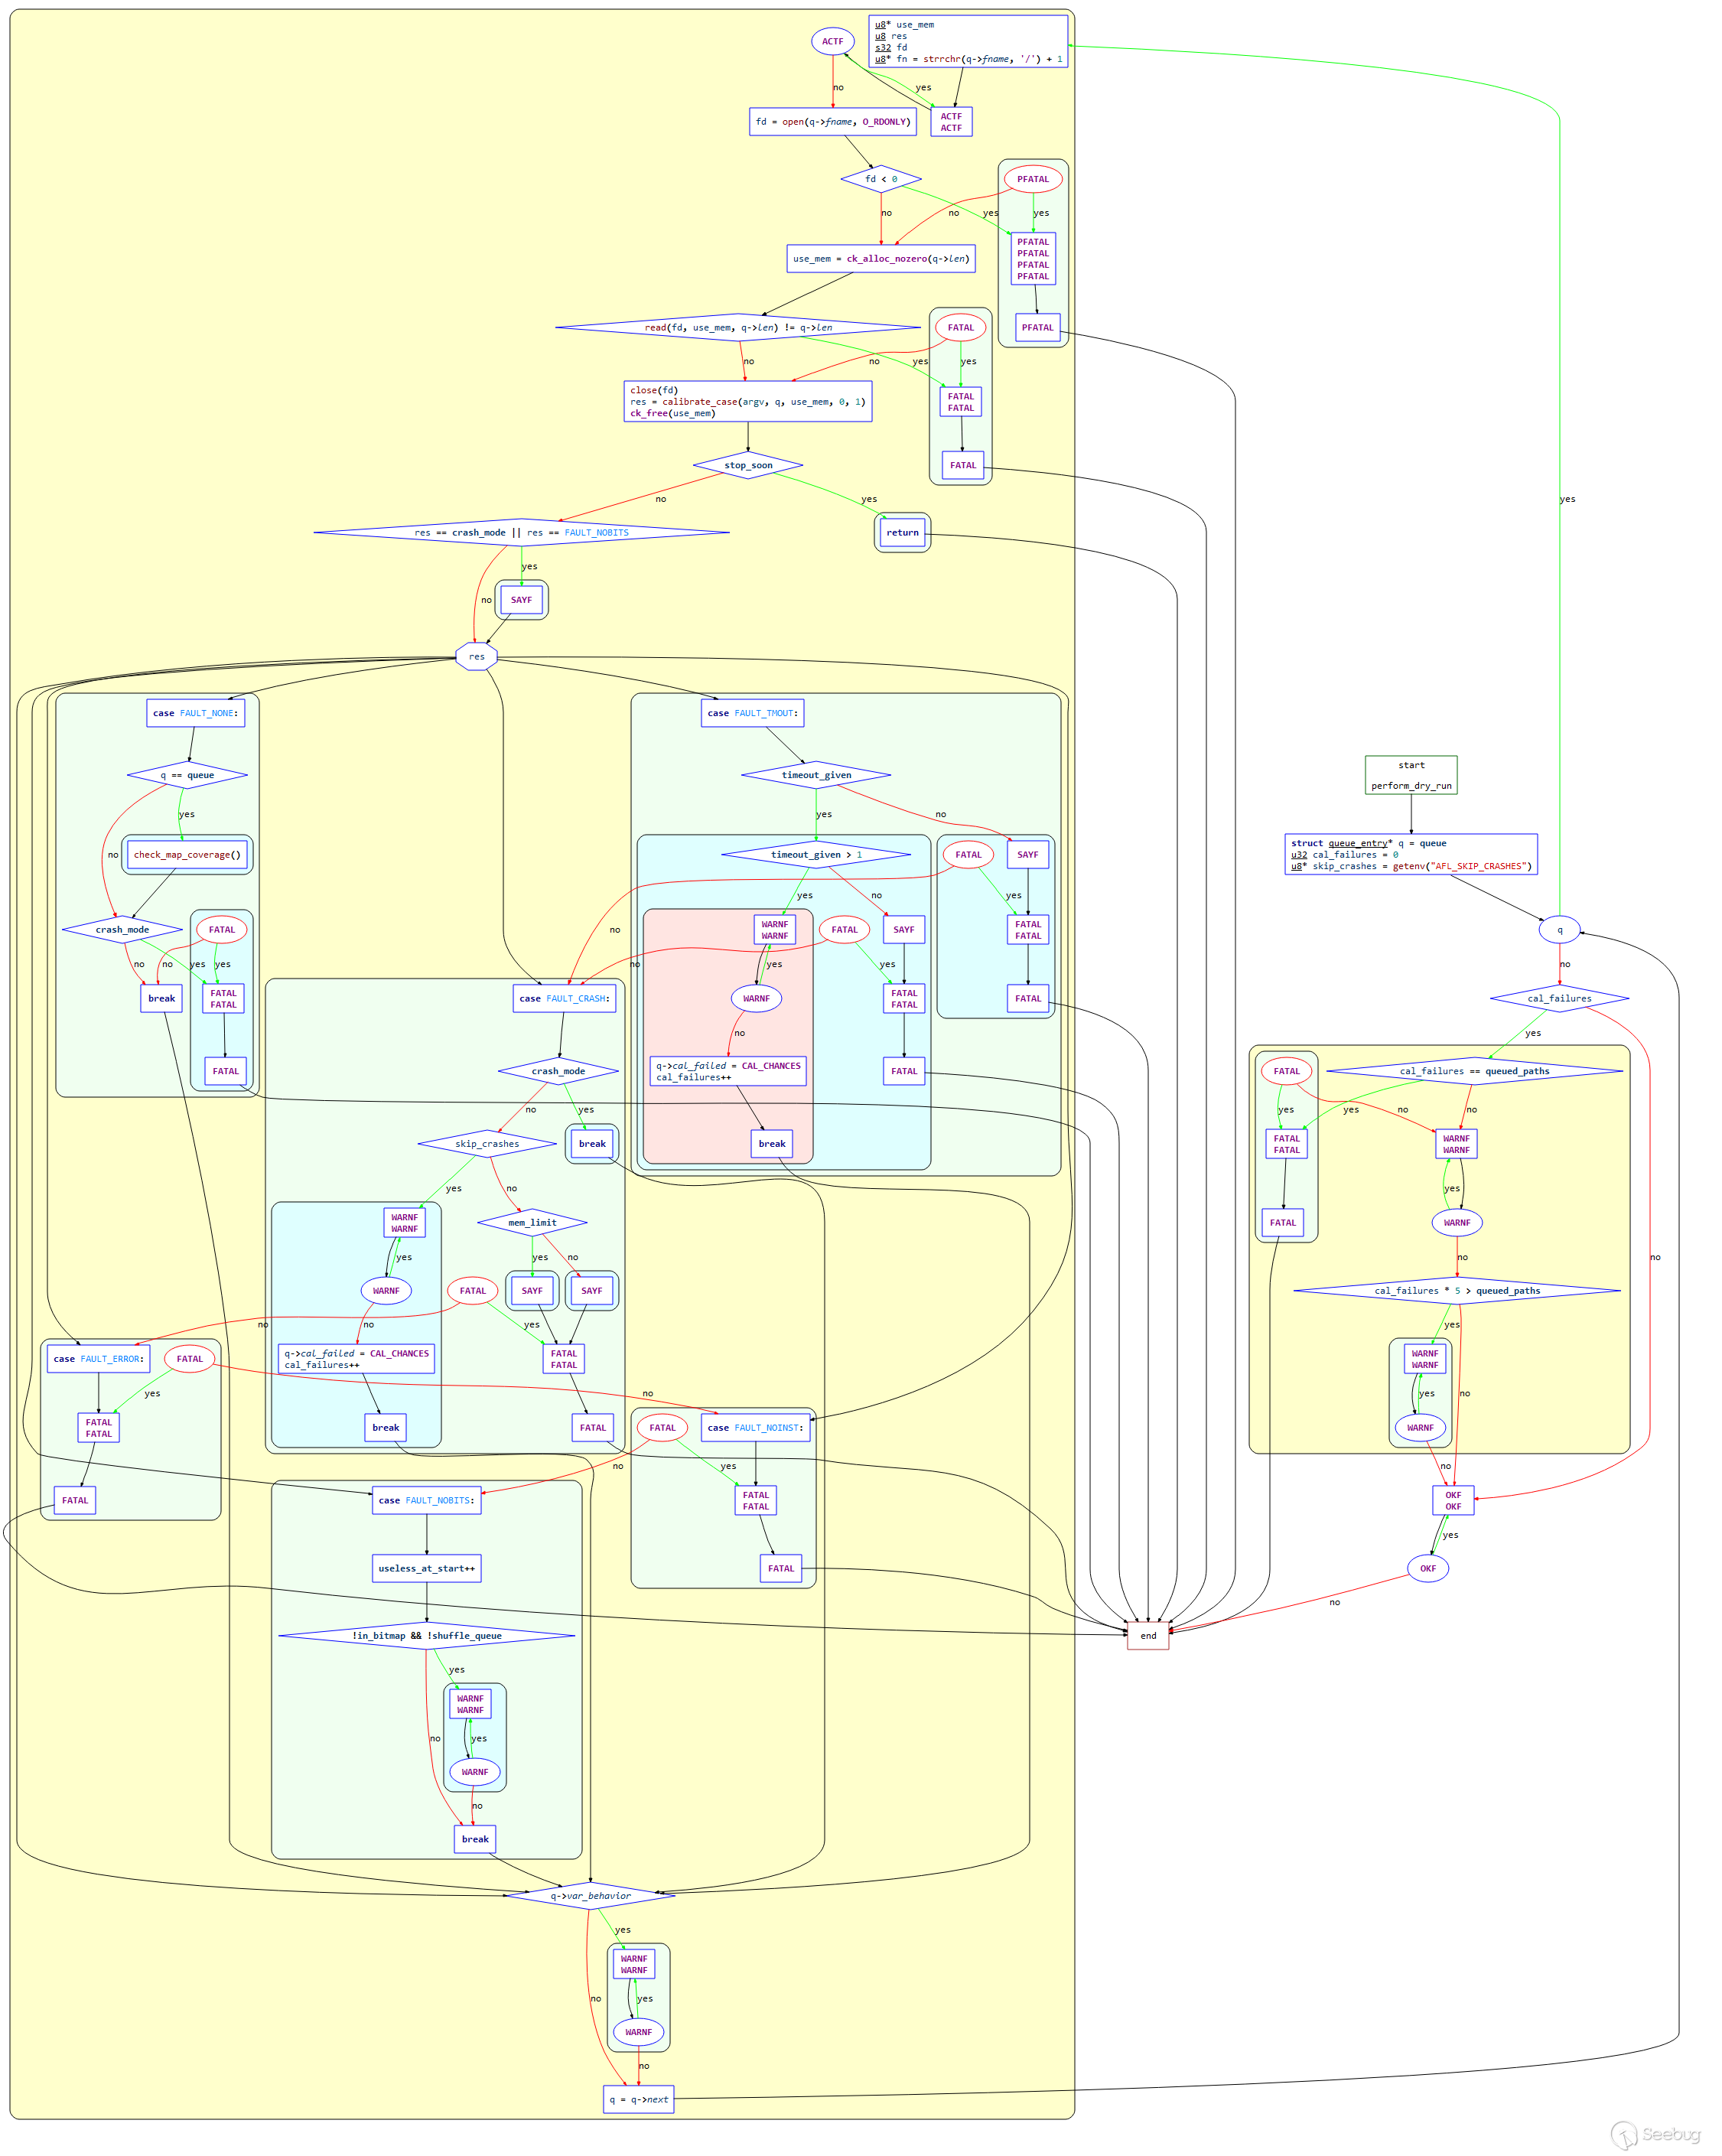
下面將結合函數源碼進行解析(刪除部分非關鍵代碼):
/* Perform dry run of all test cases to confirm that the app is working as
   expected. This is done only for the initial inputs, and only once. */

static void perform_dry_run(char** argv) {

  struct queue_entry* q = queue; // 創建queue_entry結構體
  u32 cal_failures = 0;
  u8* skip_crashes = getenv("AFL_SKIP_CRASHES"); // 讀取環境變量 AFL_SKIP_CRASHES

  while (q) { // 遍歷隊列

    u8* use_mem;
    u8  res;
    s32 fd;

    u8* fn = strrchr(q->fname, '/') + 1;

    ACTF("Attempting dry run with '%s'...", fn);

    fd = open(q->fname, O_RDONLY);
    if (fd < 0) PFATAL("Unable to open '%s'", q->fname);

    use_mem = ck_alloc_nozero(q->len);

    if (read(fd, use_mem, q->len) != q->len)
      FATAL("Short read from '%s'", q->fname); // 打開q->fname,讀取到分配的內存中

    close(fd);

    res = calibrate_case(argv, q, use_mem, 0, 1); // 調用函數calibrate_case校準測試用例
    ck_free(use_mem);

    if (stop_soon) return;

    if (res == crash_mode || res == FAULT_NOBITS)
      SAYF(cGRA "    len = %u, map size = %u, exec speed = %llu us\n" cRST,
           q->len, q->bitmap_size, q->exec_us);

    switch (res) { // 判斷res的值

      case FAULT_NONE:

        if (q == queue) check_map_coverage(); // 如果為頭結點,調用check_map_coverage評估覆蓋率

        if (crash_mode) FATAL("Test case '%s' does *NOT* crash", fn); // 拋出異常

        break;

      case FAULT_TMOUT:

        if (timeout_given) { // 指定了 -t 選項

          /* The -t nn+ syntax in the command line sets timeout_given to '2' and
             instructs afl-fuzz to tolerate but skip queue entries that time
             out. */

          if (timeout_given > 1) {
            WARNF("Test case results in a timeout (skipping)");
            q->cal_failed = CAL_CHANCES;
            cal_failures++;
            break;
          }

          SAYF(... ...);

          FATAL("Test case '%s' results in a timeout", fn);

        } else {

          SAYF(... ...);

          FATAL("Test case '%s' results in a timeout", fn);

        }

      case FAULT_CRASH:

        if (crash_mode) break;

        if (skip_crashes) {
          WARNF("Test case results in a crash (skipping)");
          q->cal_failed = CAL_CHANCES;
          cal_failures++;
          break;
        }

        if (mem_limit) { // 建議增加內存

          SAYF(... ...);
        } else {

          SAYF(... ...);

        }

        FATAL("Test case '%s' results in a crash", fn);

      case FAULT_ERROR:

        FATAL("Unable to execute target application ('%s')", argv[0]);

      case FAULT_NOINST: // 測試用例運行沒有路徑信息

        FATAL("No instrumentation detected");

      case FAULT_NOBITS:  // 沒有出現新路徑,判定為無效路徑

        useless_at_start++;

        if (!in_bitmap && !shuffle_queue)
          WARNF("No new instrumentation output, test case may be useless.");

        break;

    }

    if (q->var_behavior) WARNF("Instrumentation output varies across runs.");

    q = q->next; // 讀取下一個queue

  }

  if (cal_failures) {

    if (cal_failures == queued_paths)
      FATAL("All test cases time out%s, giving up!",
            skip_crashes ? " or crash" : "");

    WARNF("Skipped %u test cases (%0.02f%%) due to timeouts%s.", cal_failures,
          ((double)cal_failures) * 100 / queued_paths,
          skip_crashes ? " or crashes" : "");

    if (cal_failures * 5 > queued_paths)
      WARNF(cLRD "High percentage of rejected test cases, check settings!");

  }

  OKF("All test cases processed.");

}
總結以上流程:
- 進入
while循環,遍歷input隊列,從隊列中取出q->fname,讀取文件內容到分配的內存中,然后關閉文件; - 調用
calibrate_case函數校準該測試用例; - 根據校準的返回值
res,判斷錯誤類型; - 打印錯誤信息,退出。
2.3 calibrate_case 函數
該函數同樣為AFL的一個關鍵函數,用于新測試用例的校準,在處理輸入目錄時執行,以便在早期就發現有問題的測試用例,并且在發現新路徑時,評估新發現的測試用例的是否可變。該函數在 perform_dry_run,save_if_interesting,fuzz_one,pilot_fuzzing,core_fuzzing函數中均有調用。該函數主要用途是初始化并啟動fork server,多次運行測試用例,并用 update_bitmap_score 進行初始的byte排序。
函數控制流程圖如下:
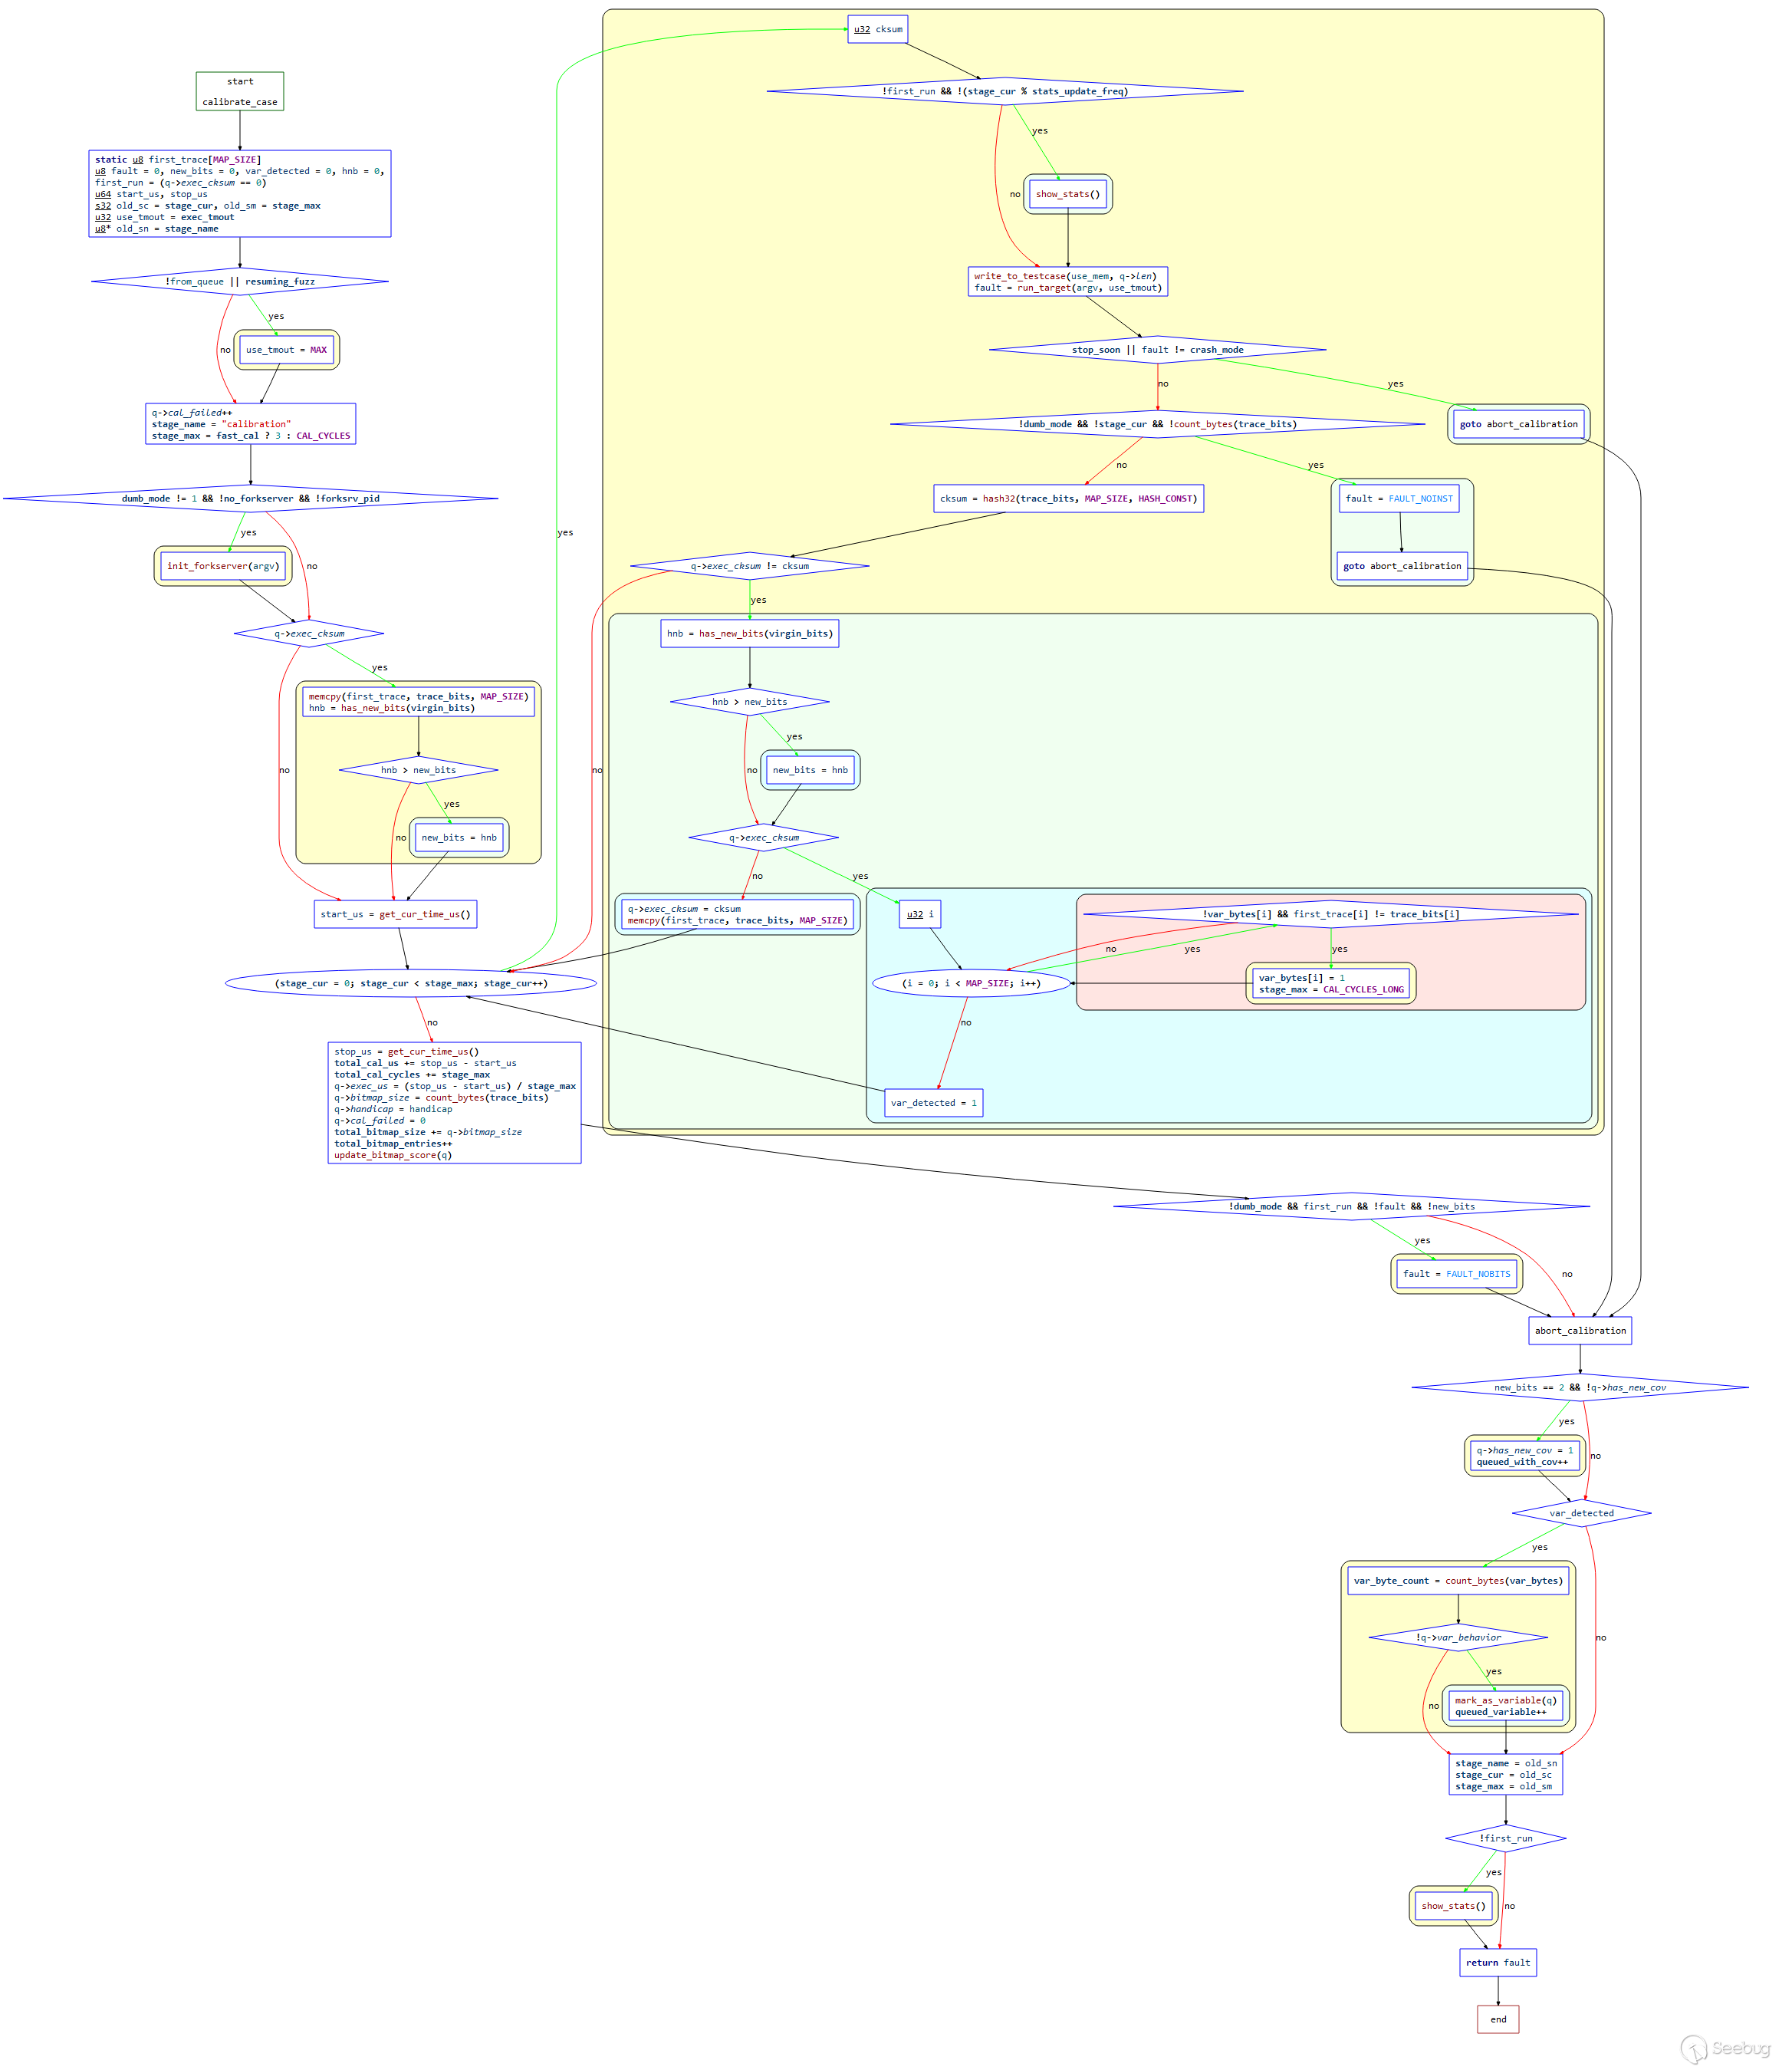
結合源碼進行解讀如下:
/* Calibrate a new test case. This is done when processing the input directory
   to warn about flaky or otherwise problematic test cases early on; and when
   new paths are discovered to detect variable behavior and so on. */

static u8 calibrate_case(char** argv, struct queue_entry* q, u8* use_mem,
                         u32 handicap, u8 from_queue) {

  static u8 first_trace[MAP_SIZE]; // 創建 firts_trace[MAP_SIZE]

  u8  fault = 0, new_bits = 0, var_detected = 0, hnb = 0,
      first_run = (q->exec_cksum == 0); // 獲取執行追蹤結果,判斷case是否為第一次運行,若為0則表示第一次運行,來自input文件夾

  u64 start_us, stop_us;

  s32 old_sc = stage_cur, old_sm = stage_max;
  u32 use_tmout = exec_tmout;
  u8* old_sn = stage_name; // 保存原有 stage_cur, stage_max, stage_name

  /* Be a bit more generous about timeouts when resuming sessions, or when
     trying to calibrate already-added finds. This helps avoid trouble due
     to intermittent latency. */

  if (!from_queue || resuming_fuzz)
    // 如果from_queue為0(表示case不是來自queue)或者resuming_fuzz為1(表示處于resuming sessions)
    use_tmout = MAX(exec_tmout + CAL_TMOUT_ADD,
                    exec_tmout * CAL_TMOUT_PERC / 100); // 提升 use_tmout 的值

  q->cal_failed++;

  stage_name = "calibration"; // 設置 stage_name
  stage_max  = fast_cal ? 3 : CAL_CYCLES; // 設置 stage_max,新測試用例的校準周期數

  /* Make sure the fork server is up before we do anything, and let's not
     count its spin-up time toward binary calibration. */

  if (dumb_mode != 1 && !no_fork server && !forksrv_pid)
    init_fork server(argv); // 沒有運行在dumb_mode,沒有禁用fork server,切forksrv_pid為0時,啟動fork server

  if (q->exec_cksum) { // 判斷是否為新case(如果這個queue不是來自input文件夾)

    memcpy(first_trace, trace_bits, MAP_SIZE);
    hnb = has_new_bits(virgin_bits);
    if (hnb > new_bits) new_bits = hnb;

  }

  start_us = get_cur_time_us();

  for (stage_cur = 0; stage_cur < stage_max; stage_cur++) { // 開始執行 calibration stage,總計執行 stage_max 輪

    u32 cksum;

    if (!first_run && !(stage_cur % stats_update_freq)) show_stats(); // queue不是來自input,第一輪calibration stage執行結束,刷新一次展示界面

    write_to_testcase(use_mem, q->len);

    fault = run_target(argv, use_tmout);

    /* stop_soon is set by the handler for Ctrl+C. When it's pressed,
       we want to bail out quickly. */

    if (stop_soon || fault != crash_mode) goto abort_calibration;


    if (!dumb_mode && !stage_cur && !count_bytes(trace_bits)) {
      // 如果 calibration stage第一次運行,且不在dumb_mode,共享內存中沒有任何路徑
      fault = FAULT_NOINST;
      goto abort_calibration;
    }

    cksum = hash32(trace_bits, MAP_SIZE, HASH_CONST);

    if (q->exec_cksum != cksum) {

      hnb = has_new_bits(virgin_bits);
      if (hnb > new_bits) new_bits = hnb;

      if (q->exec_cksum) { // 不等于exec_cksum,表示第一次運行,或在相同參數下,每次執行,cksum不同,表示是一個路徑可變的queue

        u32 i;

        for (i = 0; i < MAP_SIZE; i++) {

          if (!var_bytes[i] && first_trace[i] != trace_bits[i]) {
                    // 從0到MAP_SIZE進行遍歷, first_trace[i] != trace_bits[i],表示發現了可變queue
            var_bytes[i] = 1;
            stage_max    = CAL_CYCLES_LONG;

          }

        }

        var_detected = 1;

      } else {

        q->exec_cksum = cksum; // q->exec_cksum=0,表示第一次執行queue,則設置計算出來的本次執行的cksum
        memcpy(first_trace, trace_bits, MAP_SIZE);

      }

    }

  }

  stop_us = get_cur_time_us();

  total_cal_us     += stop_us - start_us;  // 保存所有輪次的總執行時間
  total_cal_cycles += stage_max; // 保存總輪次

  /* OK, let's collect some stats about the performance of this test case.
     This is used for fuzzing air time calculations in calculate_score(). */

  q->exec_us     = (stop_us - start_us) / stage_max; // 單次執行時間的平均值
  q->bitmap_size = count_bytes(trace_bits); // 最后一次執行所覆蓋的路徑數
  q->handicap    = handicap;
  q->cal_failed  = 0;

  total_bitmap_size += q->bitmap_size; // 加上queue所覆蓋的路徑數
  total_bitmap_entries++;

  update_bitmap_score(q);

  /* If this case didn't result in new output from the instrumentation, tell
     parent. This is a non-critical problem, but something to warn the user
     about. */

  if (!dumb_mode && first_run && !fault && !new_bits) fault = FAULT_NOBITS;

abort_calibration:

  if (new_bits == 2 && !q->has_new_cov) {
    q->has_new_cov = 1;
    queued_with_cov++;
  }

  /* Mark variable paths. */

  if (var_detected) { // queue是可變路徑

    var_byte_count = count_bytes(var_bytes);

    if (!q->var_behavior) {
      mark_as_variable(q);
      queued_variable++;
    }

  }

  // 恢復之前的stage值
  stage_name = old_sn;
  stage_cur  = old_sc;
  stage_max  = old_sm;

  if (!first_run) show_stats();

  return fault;

}
總結以上過程如下:
- 進行參數設置,包括當前階段
stage_cur,階段名稱stage_name,新比特 `new_bit 等初始化; - 參數
from_queue,判斷case是否在隊列中,且是否處于resuming session, 以此設置時間延遲。testcase參數q->cal_failed加1, 是否校準失敗參數加1; - 判斷是否已經啟動fork server ,調用函數
init_fork server(); - 拷貝
trace_bits到first_trace,調用get_cur_time_us()獲取開始時間start_us; - 進入loop循環,該loop循環多次執行testcase,循環次數為8次或者3次;
- 調用
write_to_testcase將修改后的數據寫入文件進行測試。如果use_stdin被清除,取消舊文件鏈接并創建一個新文件。否則,縮短prog_in_fd; - 調用
run_target通知fork server可以開始fork并fuzz; - 調用
hash32校驗此次運行的trace_bits,檢查是否出現新的情況; - 將本次運行的出現
trace_bits哈希和本次 testcase的q->exec_cksum對比。如果發現不同,則調用has_new_bits函數和總表virgin_bits對比; - 判斷
q->exec_cksum是否為0,不為0說明不是第一次執行。后面運行如果和前面第一次trace_bits結果不同,則需要多運行幾次; - loop循環結束;
- 收集一些關于測試用例性能的統計數據。比如執行時間延遲,校準錯誤,bitmap大小等等;
- 調用
update_bitmap_score()函數對測試用例的每個byte進行排序,用一個top_rate[]維護最佳入口; - 如果沒有從檢測中得到
new_bit,則告訴父進程,這是一個無關緊要的問題,但是需要提醒用戶。 總結:calibratecase函數到此為止,該函數主要用途是init_fork server;將testcase運行多次;用update_bitmap_score進行初始的byte排序。
2.4 init_forkserve 函數
AFL的fork server機制避免了多次執行 execve() 函數的多次調用,只需要調用一次然后通過管道發送命令即可。該函數主要用于啟動APP和它的fork server。函數整體控制流程圖如下:
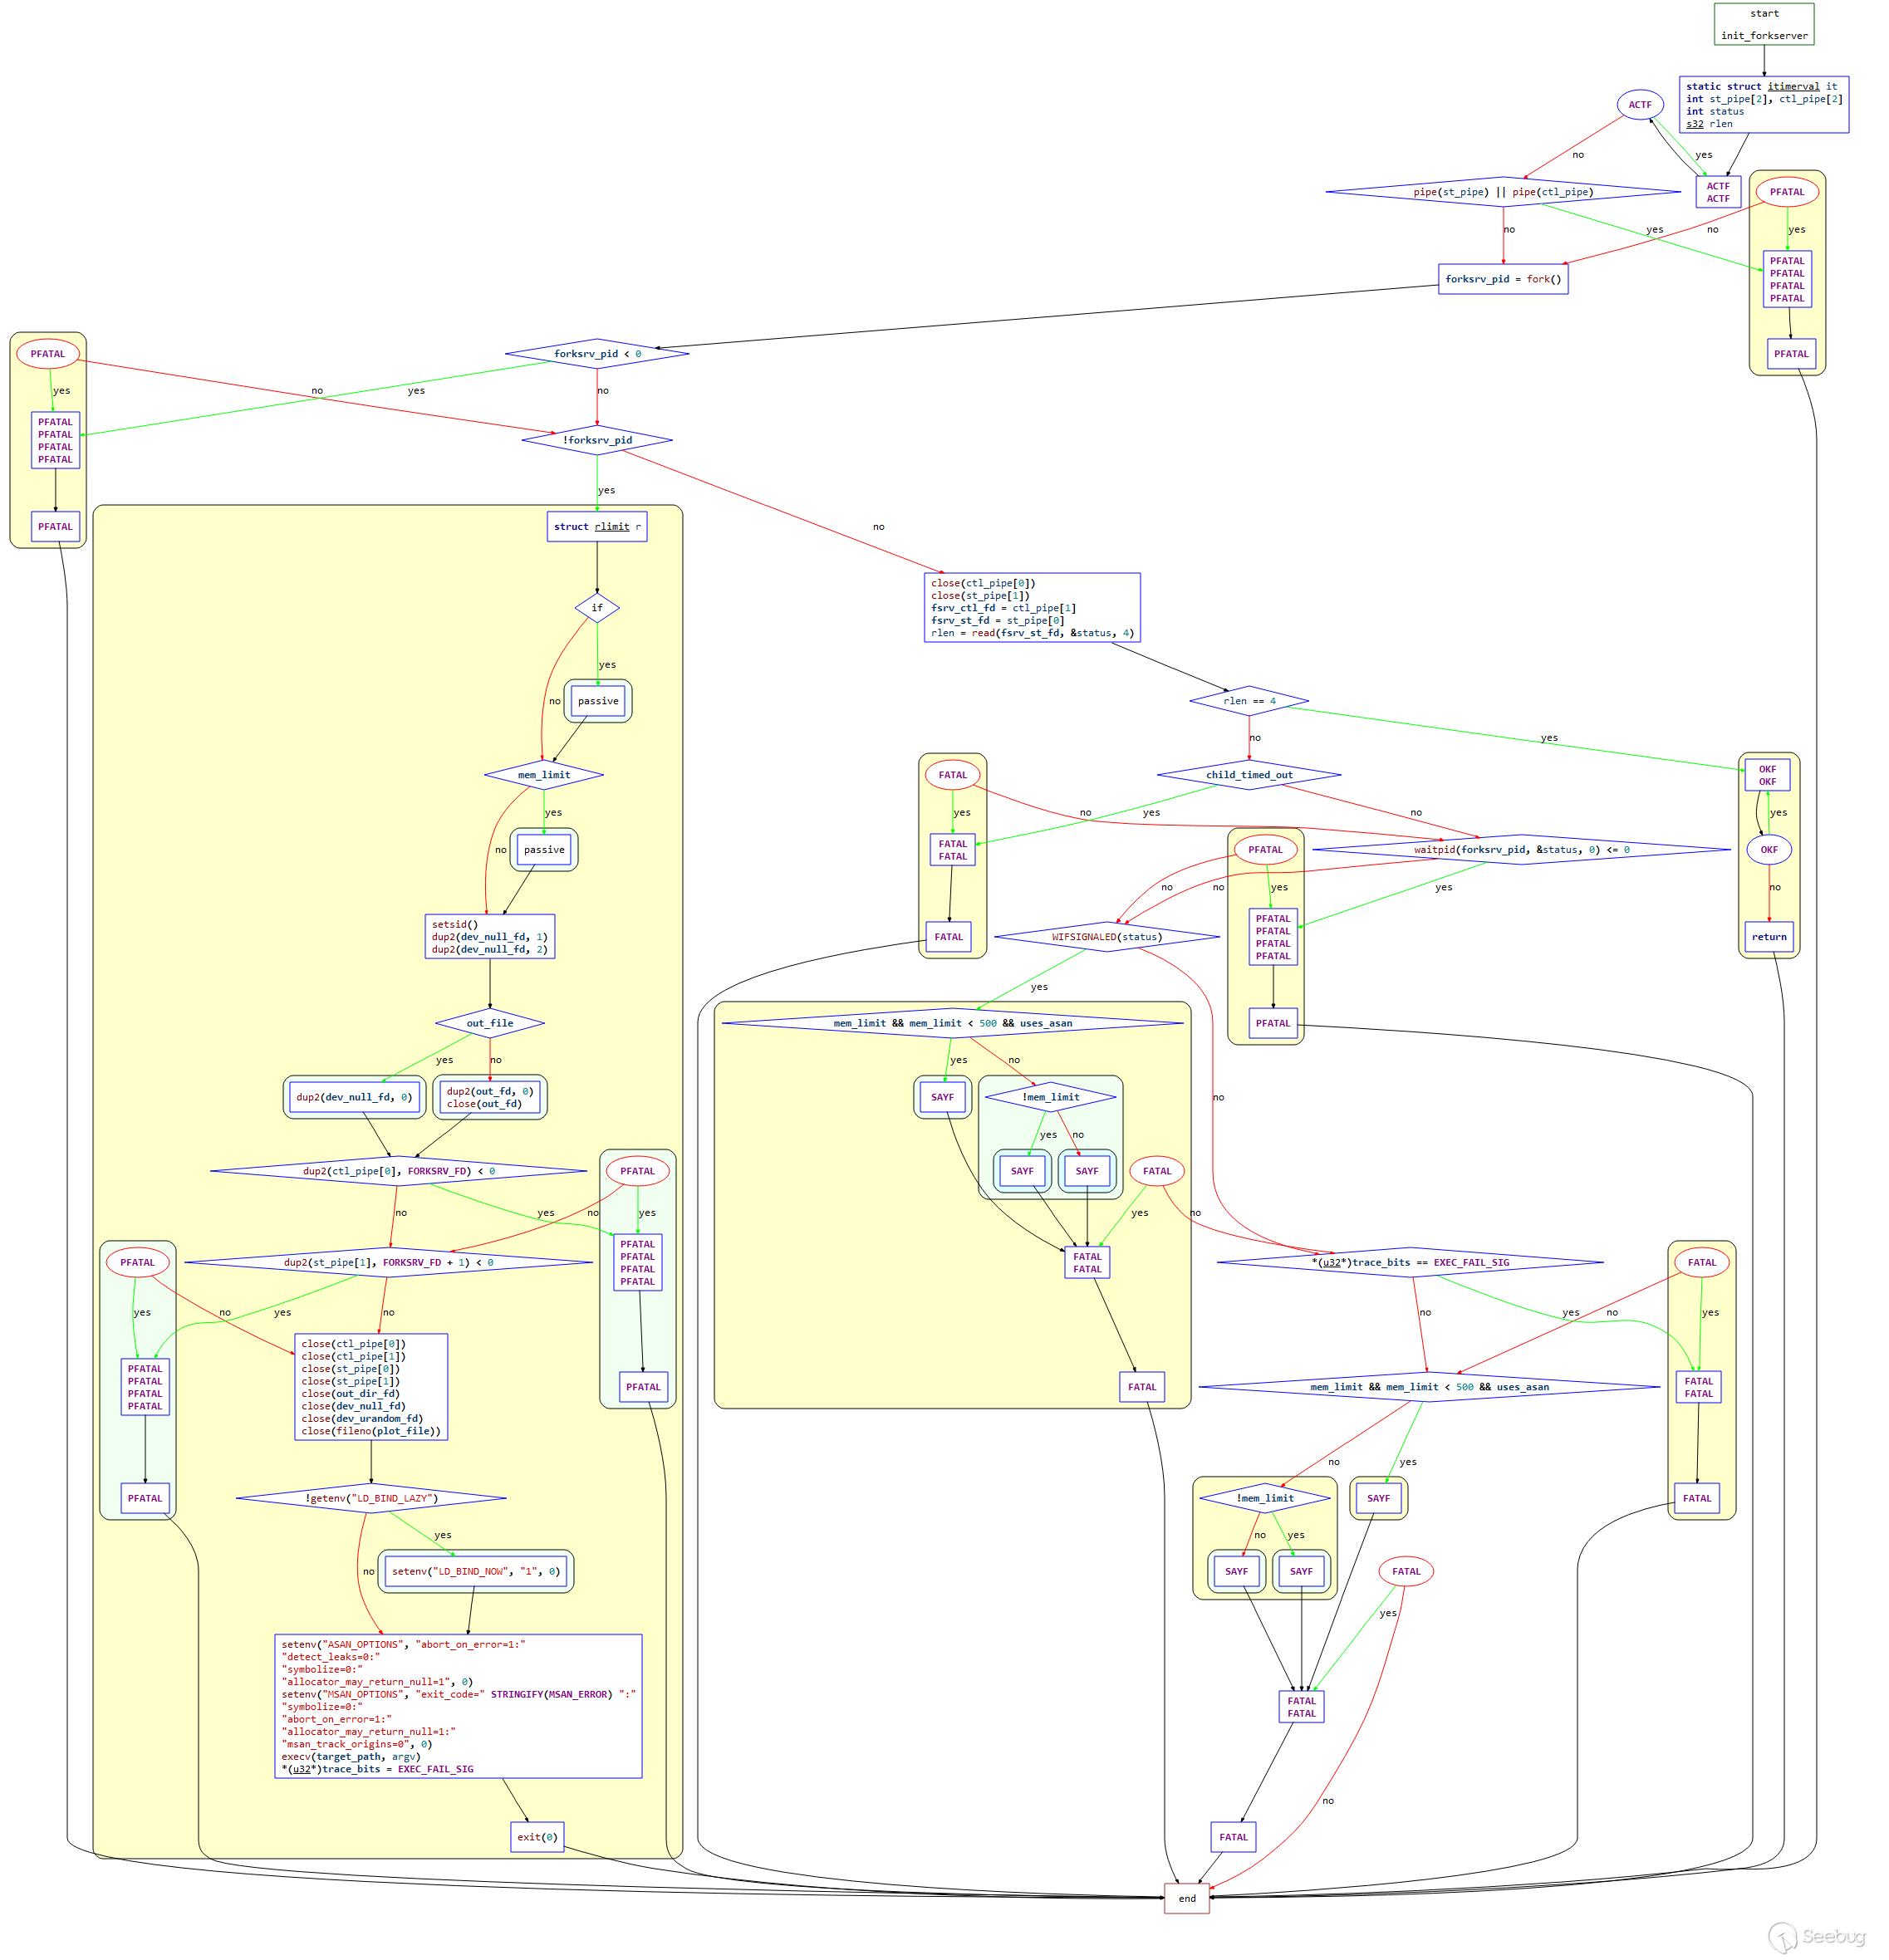
結合源碼梳理一下函數流程:
EXP_ST void init_fork server(char** argv) {

  static struct itimerval it;
  int st_pipe[2], ctl_pipe[2];
  int status;
  s32 rlen;

  ACTF("Spinning up the fork server...");

  if (pipe(st_pipe) || pipe(ctl_pipe)) PFATAL("pipe() failed");
  // 檢查 st_pipe 和ctl_pipe,在父子進程間進行管道通信,一個用于傳遞狀態,一個用于傳遞命令

  forksrv_pid = fork();
  // fork進程出一個子進程
  // 如果fork成功,則現在有父子兩個進程
  // 此時的父進程為fuzzer,子進程則為目標程序進程,也是將來的fork server

  if (forksrv_pid < 0) PFATAL("fork() failed"); // fork失敗

  // 子進程和父進程都會向下執行,通過pid來使父子進程執行不同的代碼

  if (!forksrv_pid) { // 子進程執行

    struct rlimit r;

    /* 中間省略針對OpenBSD的特殊處理 */

    ... ...

    /* Isolate the process and configure standard descriptors. If out_file is
       specified, stdin is /dev/null; otherwise, out_fd is cloned instead. */

    // 創建守護進程
    setsid();

    // 重定向文件描述符1和2到dev_null_fd
    dup2(dev_null_fd, 1);
    dup2(dev_null_fd, 2);

    // 如果指定了out_file,則文件描述符0重定向到dev_null_fd,否則重定向到out_fd
    if (out_file) {

      dup2(dev_null_fd, 0);

    } else {

      dup2(out_fd, 0);
      close(out_fd);

    }

    /* Set up control and status pipes, close the unneeded original fds. */
    // 設置控制和狀態管道,關閉不需要的一些文件描述符

    if (dup2(ctl_pipe[0], FORKSRV_FD) < 0) PFATAL("dup2() failed");
    if (dup2(st_pipe[1], FORKSRV_FD + 1) < 0) PFATAL("dup2() failed");

    close(ctl_pipe[0]);
    close(ctl_pipe[1]);
    close(st_pipe[0]);
    close(st_pipe[1]);

    close(out_dir_fd);
    close(dev_null_fd);
    close(dev_urandom_fd);
    close(fileno(plot_file));

    /* This should improve performance a bit, since it stops the linker from
       doing extra work post-fork(). */

    // 如果沒有設置延遲綁定,則進行設置,不使用缺省模式
    if (!getenv("LD_BIND_LAZY")) setenv("LD_BIND_NOW", "1", 0);

    /* Set sane defaults for ASAN if nothing else specified. */

    // 設置環境變量ASAN_OPTIONS,配置ASAN相關
    setenv("ASAN_OPTIONS", "abort_on_error=1:"
                           "detect_leaks=0:"
                           "symbolize=0:"
                           "allocator_may_return_null=1", 0);

    /* MSAN is tricky, because it doesn't support abort_on_error=1 at this
       point. So, we do this in a very hacky way. */

    // MSAN相關
    setenv("MSAN_OPTIONS", "exit_code=" STRINGIFY(MSAN_ERROR) ":"
                           "symbolize=0:"
                           "abort_on_error=1:"
                           "allocator_may_return_null=1:"
                           "msan_track_origins=0", 0);

        /* 帶參數執行目標程序,報錯才返回
             execv()會替換原有進程空間為目標程序,所以后續執行的都是目標程序。
             第一個目標程序會進入__afl_maybe_log里的__afl_fork_wait_loop,并充當fork server。
             在整個過程中,每次要fuzz一次目標程序,都會從這個fork server再fork出來一個子進程去fuzz。
             因此可以看作是三段式:fuzzer -> fork server -> target子進程
        */
    execv(target_path, argv);

    /* Use a distinctive bitmap signature to tell the parent about execv()
       falling through. */

    // 告訴父進程執行失敗,結束子進程
    *(u32*)trace_bits = EXEC_FAIL_SIG;
    exit(0);

  }

  /* Close the unneeded endpoints. */

  close(ctl_pipe[0]);
  close(st_pipe[1]);

  fsrv_ctl_fd = ctl_pipe[1]; // 父進程只能發送命令
  fsrv_st_fd  = st_pipe[0];  // 父進程只能讀取狀態

  /* Wait for the fork server to come up, but don't wait too long. */
    // 在一定時間內等待fork server啟動
  it.it_value.tv_sec = ((exec_tmout * FORK_WAIT_MULT) / 1000);
  it.it_value.tv_usec = ((exec_tmout * FORK_WAIT_MULT) % 1000) * 1000;

  setitimer(ITIMER_REAL, &it, NULL);

  rlen = read(fsrv_st_fd, &status, 4); // 從管道里讀取4字節數據到status

  it.it_value.tv_sec = 0;
  it.it_value.tv_usec = 0;

  setitimer(ITIMER_REAL, &it, NULL);

  /* If we have a four-byte "hello" message from the server, we're all set.
     Otherwise, try to figure out what went wrong. */

  if (rlen == 4) { // 以讀取的結果判斷fork server是否成功啟動
    OKF("All right - fork server is up.");
    return;
  }

  // 子進程啟動失敗的異常處理相關
  if (child_timed_out)
    FATAL("Timeout while initializing fork server (adjusting -t may help)");

  if (waitpid(forksrv_pid, &status, 0) <= 0)
    PFATAL("waitpid() failed");

   ... ...

}
我們結合fuzzer對該函數的調用來梳理完整的流程如下:
啟動目標程序進程后,目標程序會運行一個fork server,fuzzer自身并不負責fork子進程,而是通過管道與fork server通信,由fork server來完成fork以及繼續執行目標程序的操作。

對于fuzzer和目標程序之間的通信狀態我們可以通過下圖來梳理:
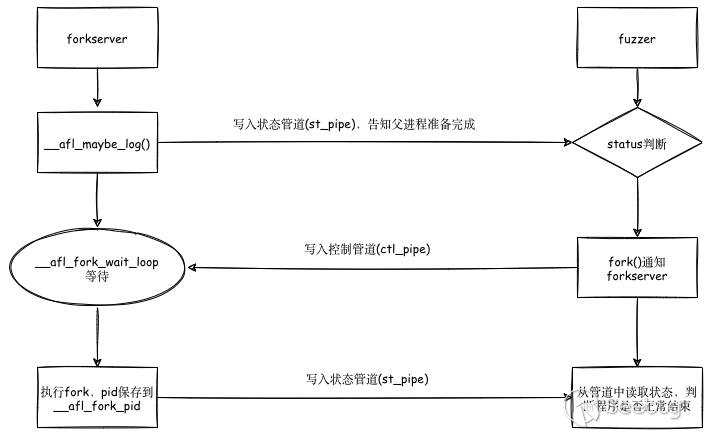
結合前面的插樁部分一起來看:
首先,afl-fuzz 會創建兩個管道:狀態管道和控制管道,然后執行目標程序。此時的目標程序的 main() 函數已經被插樁,程序控制流進入 __afl_maybe_log 中。如果fuzz是第一次執行,則此時的程序就成了fork server們之后的目標程序都由該fork server通過fork生成子進程來運行。fuzz進行過程中,fork server會一直執行fork操作,并將子進程的結束狀態通過狀態管道傳遞給 afl-fuzz。
(對于fork server的具體操作,在前面插樁部分時已經根據源碼進行了說明,可以回顧一下。)
2.5 run_target 函數
該函數主要執行目標應用程序,并進行超時監控,返回狀態信息,被調用的程序會更新 trace_bits[] 。
結合源碼進行解釋:
static u8 run_target(char** argv, u32 timeout) {

  static struct itimerval it;
  static u32 prev_timed_out = 0;
  static u64 exec_ms = 0;

  int status = 0;
  u32 tb4;

  child_timed_out = 0;

  /* After this memset, trace_bits[] are effectively volatile, so we
     must prevent any earlier operations from venturing into that
     territory. */

  memset(trace_bits, 0, MAP_SIZE); // 將trace_bits全部置0,清空共享內存
  MEM_BARRIER();

  /* If we're running in "dumb" mode, we can't rely on the fork server
     logic compiled into the target program, so we will just keep calling
     execve(). There is a bit of code duplication between here and
     init_fork server(), but c'est la vie. */

  if (dumb_mode == 1 || no_fork server) { // 如果是dumb_mode模式且沒有fork server

    child_pid = fork(); // 直接fork出一個子進程

    if (child_pid < 0) PFATAL("fork() failed");

    if (!child_pid) {

     ... ...

      /* Isolate the process and configure standard descriptors. If out_file is
         specified, stdin is /dev/null; otherwise, out_fd is cloned instead. */

      setsid();

      dup2(dev_null_fd, 1);
      dup2(dev_null_fd, 2);

      if (out_file) {

        dup2(dev_null_fd, 0);

      } else {

        dup2(out_fd, 0);
        close(out_fd);

      }

      /* On Linux, would be faster to use O_CLOEXEC. Maybe TODO. */

      close(dev_null_fd);
      close(out_dir_fd);
      close(dev_urandom_fd);
      close(fileno(plot_file));

      /* Set sane defaults for ASAN if nothing else specified. */

      setenv("ASAN_OPTIONS", "abort_on_error=1:"
                             "detect_leaks=0:"
                             "symbolize=0:"
                             "allocator_may_return_null=1", 0);

      setenv("MSAN_OPTIONS", "exit_code=" STRINGIFY(MSAN_ERROR) ":"
                             "symbolize=0:"
                             "msan_track_origins=0", 0);

      execv(target_path, argv); // 讓子進程execv執行目標程序

      /* Use a distinctive bitmap value to tell the parent about execv()
         falling through. */

      *(u32*)trace_bits = EXEC_FAIL_SIG; // execv執行失敗,寫入 EXEC_FAIL_SIG
      exit(0);

    }

  } else {

    s32 res;

    /* In non-dumb mode, we have the fork server up and running, so simply
       tell it to have at it, and then read back PID. */

    // 如果并不是處在dumb_mode模式,說明fork server已經啟動了,我們只需要進行
    // 控制管道的寫和狀態管道的讀即可
    if ((res = write(fsrv_ctl_fd, &prev_timed_out, 4)) != 4) {

      if (stop_soon) return 0;
      RPFATAL(res, "Unable to request new process from fork server (OOM?)");

    }

    if ((res = read(fsrv_st_fd, &child_pid, 4)) != 4) {

      if (stop_soon) return 0;
      RPFATAL(res, "Unable to request new process from fork server (OOM?)");

    }

    if (child_pid <= 0) FATAL("Fork server is misbehaving (OOM?)");

  }

  /* Configure timeout, as requested by user, then wait for child to terminate. */


// 配置超時,等待子進程結束
  it.it_value.tv_sec = (timeout / 1000);
  it.it_value.tv_usec = (timeout % 1000) * 1000;

  setitimer(ITIMER_REAL, &it, NULL);

  /* The SIGALRM handler simply kills the child_pid and sets child_timed_out. */

  if (dumb_mode == 1 || no_fork server) {

    if (waitpid(child_pid, &status, 0) <= 0) PFATAL("waitpid() failed");

  } else {

    s32 res;

    if ((res = read(fsrv_st_fd, &status, 4)) != 4) {

      if (stop_soon) return 0;
      RPFATAL(res, "Unable to communicate with fork server (OOM?)");

    }

  }

  if (!WIFSTOPPED(status)) child_pid = 0;

  getitimer(ITIMER_REAL, &it);
  exec_ms = (u64) timeout - (it.it_value.tv_sec * 1000 +
                             it.it_value.tv_usec / 1000); // 計算執行時間

  it.it_value.tv_sec = 0;
  it.it_value.tv_usec = 0;

  setitimer(ITIMER_REAL, &it, NULL);

  total_execs++;

  /* Any subsequent operations on trace_bits must not be moved by the
     compiler below this point. Past this location, trace_bits[] behave
     very normally and do not have to be treated as volatile. */

  MEM_BARRIER();

  tb4 = *(u32*)trace_bits;

  // 分別執行64和32位下的classify_counts,設置trace_bits所在的mem
#ifdef WORD_SIZE_64
  classify_counts((u64*)trace_bits);
#else
  classify_counts((u32*)trace_bits);
#endif /* ^WORD_SIZE_64 */

  prev_timed_out = child_timed_out;

  /* Report outcome to caller. */

  if (WIFSIGNALED(status) && !stop_soon) {

    kill_signal = WTERMSIG(status);

    if (child_timed_out && kill_signal == SIGKILL) return FAULT_TMOUT;

    return FAULT_CRASH;

  }

  /* A somewhat nasty hack for MSAN, which doesn't support abort_on_error and
     must use a special exit code. */

  if (uses_asan && WEXITSTATUS(status) == MSAN_ERROR) {
    kill_signal = 0;
    return FAULT_CRASH;
  }

  if ((dumb_mode == 1 || no_fork server) && tb4 == EXEC_FAIL_SIG)
    return FAULT_ERROR;

  /* It makes sense to account for the slowest units only if the testcase was run
  under the user defined timeout. */
  if (!(timeout > exec_tmout) && (slowest_exec_ms < exec_ms)) {
    slowest_exec_ms = exec_ms;
  }

  return FAULT_NONE;

}
2.6 update_bitmap_score 函數
當我們發現一個新路徑時,需要判斷發現的新路徑是否更“favorable”,也就是是否包含最小的路徑集合能遍歷到所有bitmap中的位,并在之后的fuzz過程中聚焦在這些路徑上。
以上過程的第一步是為bitmap中的每個字節維護一個 top_rated[] 的列表,這里會計算究竟哪些位置是更“合適”的,該函數主要實現該過程。
函數的控制流程圖如下:
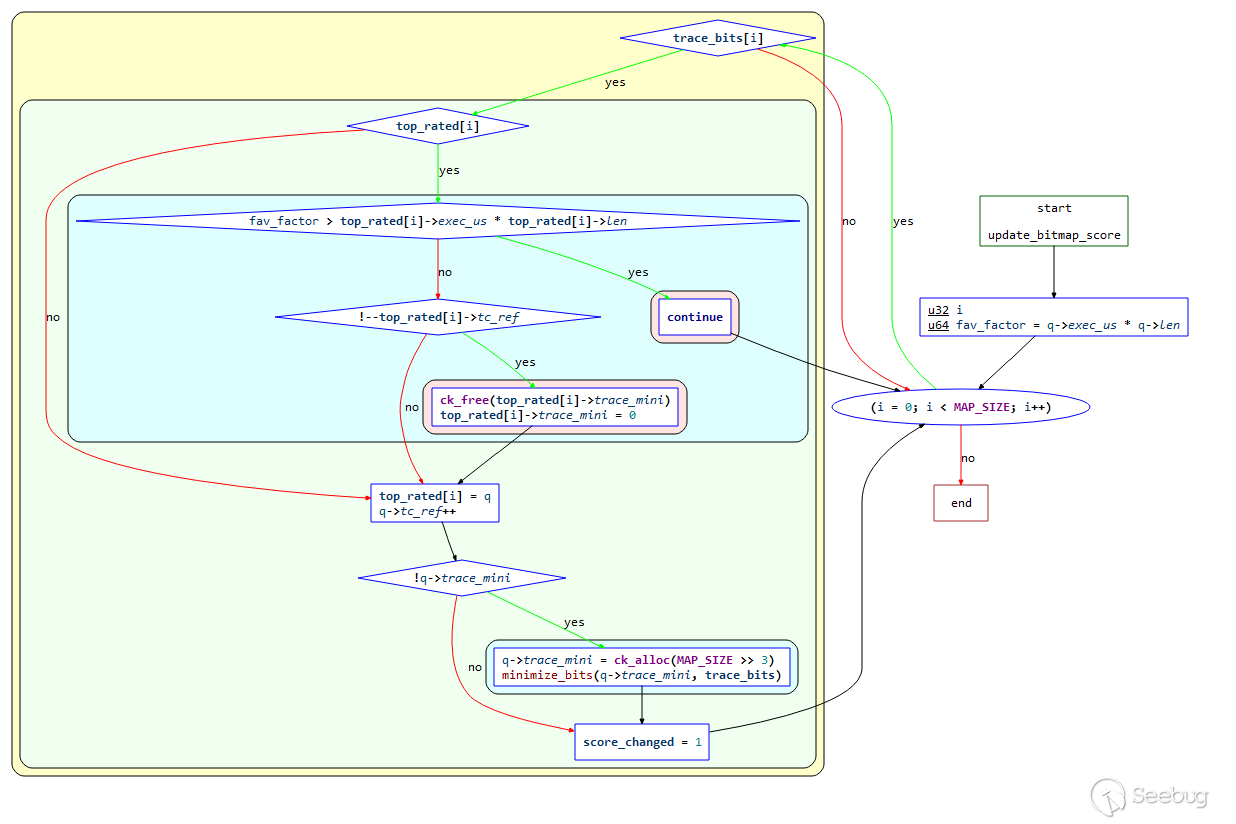
結合源碼進行解釋:
static void update_bitmap_score(struct queue_entry* q) {

  u32 i;
  u64 fav_factor = q->exec_us * q->len;
  // 首先計算case的fav_factor,計算方法是執行時間和樣例大小的乘積

  /* For every byte set in trace_bits[], see if there is a previous winner,
     and how it compares to us. */

  for (i = 0; i < MAP_SIZE; i++) // 遍歷trace_bits數組

    if (trace_bits[i]) { // 不為0,表示已經被覆蓋到的路徑

       if (top_rated[i]) { // 檢查top_rated是否存在

         /* Faster-executing or smaller test cases are favored. */

         if (fav_factor > top_rated[i]->exec_us * top_rated[i]->len) continue; // 判斷哪個計算結果更小
         // 如果top_rated[i]的更小,則代表它的更優,不做處理,繼續遍歷下一個路徑;
         // 如果q的更小,就執行以下代碼:

         /* Looks like we're going to win. Decrease ref count for the
            previous winner, discard its trace_bits[] if necessary. */

         if (!--top_rated[i]->tc_ref) {
           ck_free(top_rated[i]->trace_mini);
           top_rated[i]->trace_mini = 0;
         }
       }
       /* Insert ourselves as the new winner. */

       top_rated[i] = q; // 設置為當前case
       q->tc_ref++;

       if (!q->trace_mini) { // 為空
         q->trace_mini = ck_alloc(MAP_SIZE >> 3);
         minimize_bits(q->trace_mini, trace_bits);
       }

       score_changed = 1;

     }

}
3. 主循環
3.1 主循環之前
3.1.1 cull_queue 函數
在前面討論的關于case的 top_rated 的計算中,還有一個機制是檢查所有的 top_rated[] 條目,然后順序獲取之前沒有遇到過的byte的對比分數低的“獲勝者”進行標記,標記至少會維持到下一次運行之前。在所有的fuzz步驟中,“favorable”的條目會獲得更多的執行時間。
函數的控制流程圖如下:
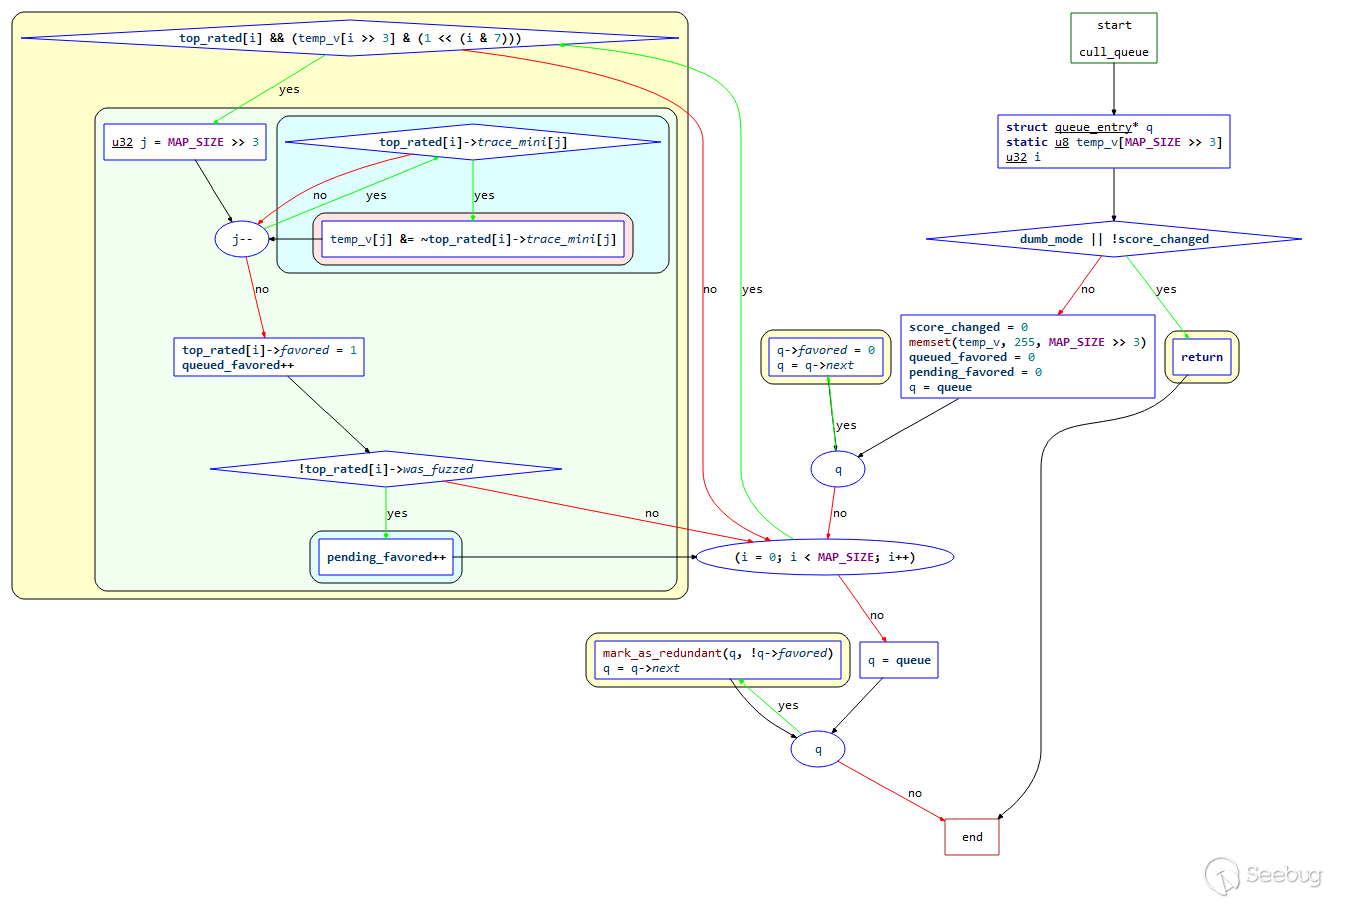
結合源碼解析如下:
static void cull_queue(void) {

  struct queue_entry* q;
  static u8 temp_v[MAP_SIZE >> 3];
  u32 i;

  if (dumb_mode || !score_changed) return;  // 如果處于dumb模式或者score沒有發生變化(top_rated沒有發生變化),直接返回

  score_changed = 0;

  memset(temp_v, 255, MAP_SIZE >> 3);
  // 設置temp_v大小為MAP_SIZE>>3,初始化為0xff,全1,表示還沒有被覆蓋到,為0表示被覆蓋到了。

  queued_favored  = 0;
  pending_favored = 0;

  q = queue;

  while (q) { // 進行隊列遍歷
    q->favored = 0; // 所有元素的favored均設置為0
    q = q->next;
  }

  /* Let's see if anything in the bitmap isn't captured in temp_v.
     If yes, and if it has a top_rated[] contender, let's use it. */

  // i從0到MAP_SIZE進行迭代,篩選出一組隊列條目,它們可以覆蓋到所有現在已經覆蓋的路徑
  for (i = 0; i < MAP_SIZE; i++)
    if (top_rated[i] && (temp_v[i >> 3] & (1 << (i & 7)))) {

      u32 j = MAP_SIZE >> 3;

      /* Remove all bits belonging to the current entry from temp_v. */

      // 從temp_v中,移除所有屬于當前current-entry的byte,也就是這個testcase觸發了多少path就給tempv標記上
      while (j--)
        if (top_rated[i]->trace_mini[j])
          temp_v[j] &= ~top_rated[i]->trace_mini[j];

      top_rated[i]->favored = 1;
      queued_favored++;

      if (!top_rated[i]->was_fuzzed) pending_favored++;

    }

  q = queue;

  while (q) { // 遍歷隊列,不是favored的case(冗余的測試用例)被標記成redundant_edges
    mark_as_redundant(q, !q->favored); // 位置在/queue/.state/redundent_edges中
    q = q->next;
  }

}
這里根據網上公開的一個例子來理解該過程:
現假設有如下tuple和seed信息:
-
tuple: t0, t1, t2, t3, t4
-
seed: s0, s1, s2
- 初始化
temp_v = [1,1,1,1,1] - s1可覆蓋t2, t3,s2覆蓋t0, t1, t4,并且top_rated[0] = s2,top_rated[2]=s1
將按照如下過程進行篩選和判斷:
- 首先判斷 temp_v[0]=1,說明t0沒有被覆蓋;
- top_rated[0] 存在 (s2) -> 判斷s2可以覆蓋的范圍 ->
trace_mini = [1,1,0,0,1]; - 更新
temp_v=[0,0,1,1,0], 標記s2為 "favored"; - 繼續判斷 temp_v[1]=0,說明t1此時已經被覆蓋,跳過;
- 繼續判斷 temp_v[2]=1,說明t2沒有被覆蓋;
- top_rated[2] 存在 (s1) -> 判斷s1可以覆蓋的范圍 ->
trace_mini=[0,0,1,1,0]; - 更新
temp_v=[0,0,0,0,0],標記s1為 "favored"; - 此時所有tuple都被覆蓋,具備"favored'標記的為s1, s2,過程結束。
3.1.2 show_init_stats 函數
進入主循環前的準備工作使用的函數之一,主要作用為在處理輸入目錄的末尾顯示統計信息,警告信息以及硬編碼的常量;
3.1.3 find_start_position 函數
進入主循環前的準備工作使用的函數之一,主要作用為在resume時,嘗試查找要開始的隊列的位置。
3.1.4 write_stats_file 函數
也是準備工作函數之一,主要作用為更新統計信息文件以進行無人值守的監視。
3.1.5 save_auto 函數
該函數主要保存自動生成的extras。
3.2 主循環
這里是seed變異的主循環處理過程,我們將結合流程圖和源碼進行詳細解讀。
主循環的控制流程圖如下(將while部分單獨設置為了一個函數,只看循環部分即可):
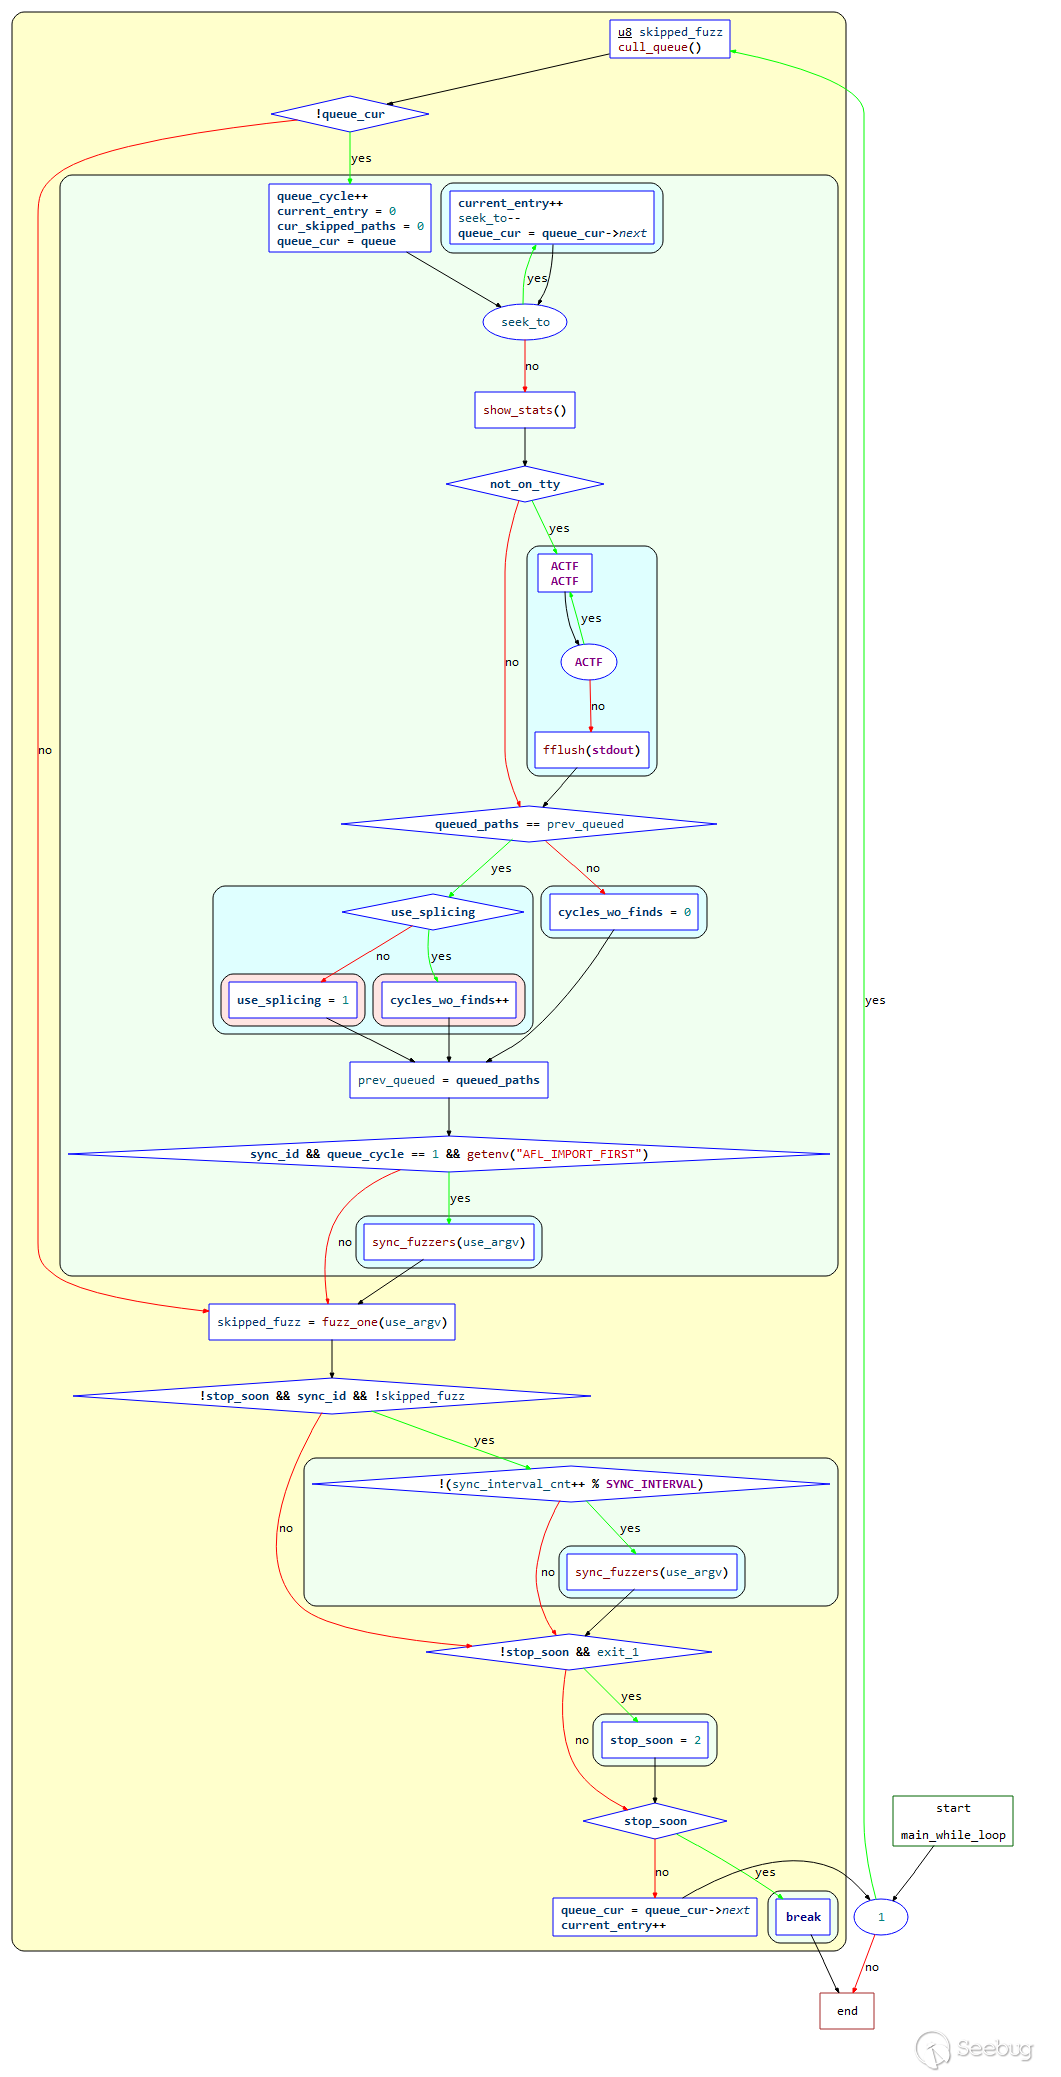
主循環源碼:
while (1) {

  u8 skipped_fuzz;

  cull_queue(); // 調用cull_queue進行隊列精簡

  if (!queue_cur) { // 如果queue_cure為空(所有queue都被執行完一輪)

    queue_cycle++; // 計數器,所有queue執行的輪數
    current_entry     = 0;
    cur_skipped_paths = 0;
    queue_cur         = queue; // 準備開始新一輪fuzz

    while (seek_to) { // 如果seek_to不為空
      current_entry++;
      seek_to--;
      queue_cur = queue_cur->next; // 從seek_to指定的queue項開始執行
    }

    show_stats(); // 刷新展示界面

    if (not_on_tty) {
      ACTF("Entering queue cycle %llu.", queue_cycle);
      fflush(stdout);
    }

    /* If we had a full queue cycle with no new finds, try
         recombination strategies next. */

    if (queued_paths == prev_queued) { // 如果一輪執行后queue中的case數與執行前一樣,表示沒有發現新的case

      if (use_splicing) cycles_wo_finds++; else use_splicing = 1; // 是否使用splice進行case變異

    } else cycles_wo_finds = 0;

    prev_queued = queued_paths;

    if (sync_id && queue_cycle == 1 && getenv("AFL_IMPORT_FIRST"))
      sync_fuzzers(use_argv);

  }

  skipped_fuzz = fuzz_one(use_argv); // 對queue_cur進行一次測試

  if (!stop_soon && sync_id && !skipped_fuzz) {
   // 如果skipped_fuzz為0且存在sync_id,表示要進行一次sync

    if (!(sync_interval_cnt++ % SYNC_INTERVAL))
      sync_fuzzers(use_argv);

  }
  if (!stop_soon && exit_1) stop_soon = 2;

  if (stop_soon) break;

  queue_cur = queue_cur->next;
  current_entry++;

}
總結以上內容,該處該過程整體如下:
- 判斷
queue_cur是否為空,如果是則表示已經完成隊列遍歷,初始化相關參數,重新開始一輪; - 找到queue入口的case,直接跳到該case;
- 如果一整個隊列循環都沒新發現,嘗試重組策略;
- 調用關鍵函數
fuzz_one()對該case進行fuzz; - 上面的變異完成后,AFL會對文件隊列的下一個進行變異處理。當隊列中的全部文件都變異測試后,就完成了一個”cycle”,這個就是AFL狀態欄右上角的”cycles done”。而正如cycle的意思所說,整個隊列又會從第一個文件開始,再次進行變異,不過與第一次變異不同的是,這一次就不需要再進行“deterministic fuzzing”了。如果用戶不停止AFL,seed文件將會一遍遍的變異下去。
3.3 主循環后
3.3.1 fuzz_one 函數
該函數源碼在1000多行,出于篇幅原因,我們簡要介紹函數的功能。但強烈建議通讀該函數源碼,
函數主要是從queue中取出entry進行fuzz,成功返回0,跳過或退出的話返回1。
整體過程:
- 根據是否有
pending_favored和queue_cur的情況,按照概率進行跳過;有pending_favored, 對于已經fuzz過的或者non-favored的有99%的概率跳過;無pending_favored,95%跳過fuzzed&non-favored,75%跳過not fuzzed&non-favored,不跳過favored; - 假如當前項有校準錯誤,并且校準錯誤次數小于3次,那么就用calibrate_case進行測試;
- 如果測試用例沒有修剪過,那么調用函數trim_case對測試用例進行修剪;
- 修剪完畢之后,使用calculate_score對每個測試用例進行打分;
- 如果該queue已經完成deterministic階段,則直接跳到havoc階段;
- deterministic階段變異4個stage,變異過程中會多次調用函數common_fuzz_stuff函數,保存interesting 的種子:
- bitflip,按位翻轉,1變為0,0變為1
- arithmetic,整數加/減算術運算
- interest,把一些特殊內容替換到原文件中
- dictionary,把自動生成或用戶提供的token替換/插入到原文件中
- havoc,中文意思是“大破壞”,此階段會對原文件進行大量變異。
- splice,中文意思是“絞接”,此階段會將兩個文件拼接起來得到一個新的文件。
- 該輪完成。
這里涉及到AFL中的變異策略,不在本次的討論中,感興趣的小伙伴可以結合源碼自行進行研究。
3.3.2 sync_fuzzers 函數
該函數的主要作用是進行queue同步,先讀取有哪些fuzzer文件夾,然后讀取其他fuzzer文件夾下的queue文件夾中的測試用例,然后以此執行。如果在執行過程中,發現這些測試用例可以觸發新路徑,則將測試用例保存到自己的queue文件夾中,并將最后一個同步的測試用例的id寫入到 .synced/fuzzer文件夾名 文件中,避免重復運行。
四、總結
分析完源碼,可以感受到,AFL遵循的基本原則是簡單有效,沒有進行過多的復雜的優化,能夠針對fuzz領域的痛點,對癥下藥,拒絕花里胡哨,給出切實可行的解決方案,在漏洞挖掘領域的意義的確非同凡響。后期的很多先進的fuzz工具基本沿用了AFL的思路,甚至目前為止已基本圍繞AFL建立了“生態圈”,涉及到多個平臺、多種漏洞挖掘對象,對于安全研究員來說實屬利器,值得從事fuzz相關工作的研究員下足功夫去體會AFL的精髓所在。
考慮到篇幅限制,我們沒有對AFL中的變異策略進行源碼說明,實屬遺憾。如果有機會,將新開文章詳細介紹AFL的變異策略和源碼分析。
五、參考文獻
- http://lcamtuf.coredump.cx/afl/
- https://eternalsakura13.com/2020/08/23/afl/
- https://bbs.pediy.com/thread-265936.htm
- https://bbs.pediy.com/thread-249912.htm#msg_header_h3_3
 本文由 Seebug Paper 發布,如需轉載請注明來源。本文地址:http://www.bjnorthway.com/1732/
暫無評論